

Introduction to Key Lime Mini Cheesecakes
As a busy mom, I know how precious time can be, especially when it comes to whipping up something delightful for family or friends. That’s why I absolutely adore these Key Lime Mini Cheesecakes! They’re not just a treat; they’re a quick solution for those moments when you want to impress without spending hours in the kitchen. With their tangy flavor and creamy texture, these little gems are perfect for any occasion. Whether it’s a birthday party or a simple family dinner, these mini cheesecakes will surely wow your guests and leave them asking for more!
Why You’ll Love This Key Lime Mini Cheesecakes
These Key Lime Mini Cheesecakes are a dream come true for busy lives! They’re incredibly easy to make, taking just a little over two hours from start to finish, including chilling time. The bright, zesty flavor of key lime dances on your taste buds, making every bite a refreshing delight. Plus, they’re portioned perfectly, so you can indulge without the guilt. Trust me, these mini treats will become a staple in your dessert repertoire!
Ingredients for Key Lime Mini Cheesecakes
Gathering the right ingredients is the first step to creating these delightful Key Lime Mini Cheesecakes. Here’s what you’ll need:
- Cream Cheese: This is the star of the show, providing that rich and creamy texture we all love in cheesecakes.
- Granulated Sugar: A touch of sweetness balances the tangy key lime flavor, making each bite irresistible.
- Sour Cream: It adds a lovely creaminess and a slight tang, enhancing the overall flavor profile.
- Key Lime Juice: The key ingredient that gives these mini cheesecakes their signature zesty kick. Freshly squeezed is best, but bottled works too!
- Vanilla Extract: A splash of vanilla rounds out the flavors beautifully, adding warmth to the mix.
- Graham Cracker Crumbs: These form the crust, providing a crunchy texture that contrasts perfectly with the creamy filling.
- Melted Butter: This helps bind the graham cracker crumbs together, creating a deliciously buttery crust.
- Powdered Sugar: For a sweet topping, this adds a lovely finish when sprinkled over the whipped cream.
- Whipped Cream: A dollop on top makes for a beautiful presentation and adds extra creaminess.
For those looking to experiment, consider adding a bit more key lime juice for a stronger flavor or using a gluten-free graham cracker alternative for a gluten-free version. You can find all the exact measurements at the bottom of the article, ready for printing!
How to Make Key Lime Mini Cheesecakes
Now that you have all your ingredients ready, let’s dive into the fun part—making these delightful Key Lime Mini Cheesecakes! Follow these simple steps, and you’ll have a dessert that’s sure to impress.
Step 1: Preheat the Oven
First things first, preheat your oven to 325°F (160°C). Preheating is crucial because it ensures that your mini cheesecakes bake evenly. A hot oven helps set the filling just right, giving you that perfect creamy texture.
Step 2: Prepare the Crust
In a mixing bowl, combine your graham cracker crumbs with melted butter. Stir until the crumbs are well-coated and resemble wet sand. Now, take this mixture and press it firmly into the bottom of your mini cheesecake cups. Use the back of a spoon or your fingers to create an even layer. This crust will provide a delightful crunch that complements the creamy filling.
Step 3: Make the Cheesecake Filling
In another bowl, beat the softened cream cheese and granulated sugar together until smooth and creamy. This step is key for a lump-free filling! Next, add in the sour cream, key lime juice, and vanilla extract. Mix until everything is well combined and silky. The zesty aroma will have your mouth watering!
Step 4: Assemble the Cheesecakes
Now it’s time to pour that luscious cheesecake filling over the crust in each cup. Fill them about three-quarters full to allow room for rising. Don’t worry if it looks a bit messy; it’ll all come together beautifully once baked!
Step 5: Bake the Mini Cheesecakes
Place your mini cheesecakes in the preheated oven and bake for 15-20 minutes. Keep an eye on them! They should be set around the edges but still slightly jiggly in the center. This means they’ll firm up perfectly as they cool.
Step 6: Cool and Refrigerate
Once baked, remove the cheesecakes from the oven and let them cool at room temperature for about 30 minutes. After that, pop them in the refrigerator for at least 2 hours. Chilling is essential; it allows the flavors to meld and the texture to become creamy and dreamy.
Step 7: Serve with Toppings
When you’re ready to serve, top each mini cheesecake with a generous dollop of whipped cream. For an extra touch, sprinkle a little powdered sugar on top. This not only adds sweetness but also makes for a beautiful presentation. Your guests will be in awe!
Tips for Success
- Make sure your cream cheese is softened for a smooth filling.
- Use fresh key lime juice for the best flavor; it makes a world of difference!
- Don’t overbake; the center should be slightly jiggly when you take them out.
- Chill the cheesecakes overnight for even better flavor and texture.
- Experiment with toppings like fresh fruit or a lime zest sprinkle for added flair!
Equipment Needed
- Mixing Bowls: A set of various sizes is handy; you can use any large bowl you have.
- Electric Mixer: A hand mixer works great, but a whisk can do the job if you’re feeling strong!
- Mini Cheesecake Cups: Use silicone molds or muffin tins lined with paper liners.
- Measuring Cups and Spoons: Essential for accuracy; you can also use a kitchen scale if you prefer.
- Spatula: A rubber spatula is perfect for scraping down the sides of the bowl.
Variations of Key Lime Mini Cheesecakes
- Chocolate Drizzle: Add a rich chocolate drizzle on top for a decadent twist that pairs beautifully with the tangy lime.
- Berry Bliss: Top with fresh berries like strawberries or blueberries for a burst of color and flavor.
- Gluten-Free Option: Substitute regular graham crackers with gluten-free ones to make these mini cheesecakes suitable for gluten-sensitive guests.
- Vegan Version: Use vegan cream cheese and a plant-based sour cream alternative for a dairy-free treat.
- Key Lime Pie Bars: Instead of mini cheesecakes, pour the filling into a larger pan for key lime pie bars, cutting them into squares for easy serving.
Serving Suggestions for Key Lime Mini Cheesecakes
- Fresh Fruit: Serve with slices of fresh lime or a handful of berries for a colorful contrast.
- Mint Leaves: Garnish with mint leaves for a refreshing touch that enhances the presentation.
- Cocktails: Pair with a light cocktail, like a mojito or a gin and tonic, for a delightful flavor combination.
- Elegant Platter: Arrange the mini cheesecakes on a decorative platter for a stunning display at gatherings.
- Chocolate Shavings: Add chocolate shavings on top for an extra layer of indulgence.
FAQs about Key Lime Mini Cheesecakes
Can I make Key Lime Mini Cheesecakes ahead of time?
Absolutely! These mini cheesecakes can be made a day in advance. Just store them in the refrigerator until you’re ready to serve. This actually enhances the flavors!
What can I use instead of key lime juice?
If you can’t find key lime juice, regular lime juice works just fine. The flavor will be slightly different, but still delicious!
How do I know when the mini cheesecakes are done baking?
Look for the edges to be set while the center remains slightly jiggly. They will firm up as they cool, giving you that perfect creamy texture.
Can I freeze Key Lime Mini Cheesecakes?
Yes, you can freeze them! Just wrap each mini cheesecake tightly in plastic wrap and store them in an airtight container. They’ll keep for up to a month.
What toppings pair well with Key Lime Mini Cheesecakes?
Whipped cream is a classic choice, but you can also try fresh fruit, chocolate shavings, or a sprinkle of lime zest for an extra zing!
Final Thoughts
Making these Key Lime Mini Cheesecakes is more than just a cooking task; it’s a delightful experience that brings joy to both the cook and the guests. The bright, zesty flavor and creamy texture create a little moment of happiness in every bite. Whether you’re celebrating a special occasion or simply treating yourself after a long day, these mini cheesecakes are sure to brighten your mood. Plus, the smiles on your loved ones’ faces when they take that first bite? Priceless! So, roll up your sleeves and enjoy the sweet satisfaction of creating something truly special.
Print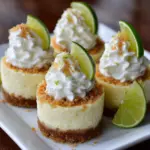
Key Lime Mini Cheesecakes That Will Wow Your Guests!
- Prep Time: 20 minutes
- Cook Time: 20 minutes
- Total Time: 2 hours 40 minutes
- Yield: 12 mini cheesecakes 1x
- Category: Dessert
- Method: Baking
- Cuisine: American
- Diet: Vegetarian
Description
Delicious and tangy key lime mini cheesecakes that are perfect for any occasion.
Ingredients
- 8 oz cream cheese, softened
- 1/2 cup granulated sugar
- 1/2 cup sour cream
- 1/4 cup key lime juice
- 1 tsp vanilla extract
- 1/2 cup graham cracker crumbs
- 2 tbsp melted butter
- 1/4 cup powdered sugar (for topping)
- Whipped cream (for serving)
Instructions
- Preheat the oven to 325°F (160°C).
- In a mixing bowl, combine graham cracker crumbs and melted butter, then press the mixture into the bottom of mini cheesecake cups.
- In another bowl, beat the cream cheese and granulated sugar until smooth.
- Add sour cream, key lime juice, and vanilla extract to the cream cheese mixture and mix until well combined.
- Pour the cheesecake mixture over the crust in each cup.
- Bake for 15-20 minutes or until set.
- Let cool, then refrigerate for at least 2 hours.
- Before serving, top with whipped cream and sprinkle with powdered sugar.
Notes
- For a stronger lime flavor, add more key lime juice.
- These can be made a day in advance for convenience.
- Store leftovers in the refrigerator for up to 3 days.
Nutrition
- Serving Size: 1 mini cheesecake
- Calories: 150
- Sugar: 10g
- Sodium: 150mg
- Fat: 8g
- Saturated Fat: 5g
- Unsaturated Fat: 2g
- Trans Fat: 0g
- Carbohydrates: 18g
- Fiber: 1g
- Protein: 2g
- Cholesterol: 30mg


