

Introduction to Bacon-Wrapped Grilled Cheese Fingers
As a busy mom, I know how challenging it can be to whip up something delicious that everyone will love. That’s why I’m excited to share my Bacon-Wrapped Grilled Cheese Fingers with you! This recipe is a delightful twist on the classic grilled cheese sandwich, combining crispy bacon with gooey cheese. It’s perfect for a quick lunch, a fun snack, or even a party appetizer. Trust me, these little bites of joy will impress your loved ones and make your kitchen feel like a cozy haven of comfort food.
Why You’ll Love This Bacon-Wrapped Grilled Cheese Fingers
These Bacon-Wrapped Grilled Cheese Fingers are not just a treat for the taste buds; they’re a lifesaver for busy days! They come together in just 20 minutes, making them a quick solution for lunch or dinner. The combination of crispy bacon and melted cheese creates a flavor explosion that will have everyone asking for seconds. Plus, they’re easy to customize, so you can cater to your family’s preferences effortlessly!
Ingredients for Bacon-Wrapped Grilled Cheese Fingers
Gathering the right ingredients is the first step to creating these mouthwatering Bacon-Wrapped Grilled Cheese Fingers. Here’s what you’ll need:
- Bread: Choose your favorite type, whether it’s classic white, whole grain, or even sourdough. Each will bring its own unique flavor and texture.
- Cheese: I recommend cheddar for its sharpness, but feel free to mix it up! Mozzarella, pepper jack, or gouda can add a delightful twist.
- Bacon: The star of the show! Crispy bacon adds that savory crunch. You can use regular or turkey bacon for a lighter option.
- Butter: A must for grilling! It adds flavor and helps achieve that golden, crispy exterior.
For those who like a little heat, consider adding jalapeños or a splash of hot sauce to the cheese. You can also experiment with different cheeses for varied flavors. Remember, the exact quantities of these ingredients are available at the bottom of the article for easy printing!
How to Make Bacon-Wrapped Grilled Cheese Fingers
Now that you have your ingredients ready, let’s dive into the fun part—making these Bacon-Wrapped Grilled Cheese Fingers! Follow these simple steps, and you’ll have a delicious snack in no time.
Step 1: Preheat Your Grill or Skillet
Start by preheating your grill or skillet over medium heat. This step is crucial! A hot surface ensures even cooking and helps the bacon get that perfect crispy texture. Trust me, no one wants soggy bacon!
Step 2: Assemble the Grilled Cheese
Next, it’s time to assemble your grilled cheese. Place a slice of cheese between two slices of bread. Make sure the cheese is centered, so it melts evenly. If you’re feeling adventurous, add a sprinkle of herbs or spices for an extra flavor boost!
Step 3: Wrap with Bacon
Now, let’s wrap it up! Take two slices of bacon and wrap them around the sandwich, overlapping slightly. This helps keep everything together. If you’re worried about the bacon unraveling, use toothpicks to secure the ends. It’s like giving your sandwich a cozy bacon blanket!
Step 4: Butter the Outside
Don’t forget to butter the outside of your sandwiches! This adds a rich flavor and helps achieve that golden, crispy crust we all love. Spread a generous layer of butter on each side before grilling. It’s the secret to perfection!
Step 5: Grill to Perfection
Place your sandwiches on the grill or skillet. Cook for about 4-5 minutes on each side. Keep an eye on them! You want the bacon crispy and the cheese melted. If you notice the bacon cooking too fast, lower the heat a bit. Patience is key!
Step 6: Serve and Enjoy
Once they’re golden brown and delicious, remove the sandwiches from the heat. Let them cool for a minute before cutting them into fingers. This makes them easier to handle and prevents the gooey cheese from spilling out. Serve warm and watch them disappear!
Tips for Success
- Use a non-stick skillet for easy flipping and cleanup.
- Experiment with different cheeses for unique flavors.
- Keep the heat medium to avoid burning the bacon while ensuring the cheese melts.
- For extra crunch, try adding a sprinkle of breadcrumbs on the outside before grilling.
- Serve with a side of marinara sauce for dipping—yum!
Equipment Needed
- Grill or Skillet: A non-stick skillet works wonders, but a grill pan can add those beautiful grill marks.
- Spatula: A sturdy spatula is essential for flipping your sandwiches with ease.
- Toothpicks: Handy for securing the bacon if needed, but you can skip them if your wraps are tight.
- Butter Knife: For spreading butter on the bread, a simple butter knife will do the trick!
Variations of Bacon-Wrapped Grilled Cheese Fingers
- Spicy Kick: Add sliced jalapeños or a drizzle of hot sauce inside for a fiery twist.
- Cheesy Delight: Mix different cheeses like mozzarella and pepper jack for a melty surprise.
- Herb Infusion: Sprinkle fresh herbs like basil or oregano inside for a burst of flavor.
- Veggie Boost: Add thinly sliced tomatoes or spinach for a healthier option.
- Sweet and Savory: Try adding a layer of fig jam or apple slices for a sweet contrast to the salty bacon.
Serving Suggestions for Bacon-Wrapped Grilled Cheese Fingers
- Dip it: Serve with marinara sauce or ranch dressing for a delightful dip.
- Pair it: A crisp side salad or coleslaw complements the richness perfectly.
- Drink it: Enjoy with a cold glass of iced tea or a refreshing lemonade.
- Presentation: Arrange on a platter with toothpicks for easy serving at parties.
FAQs about Bacon-Wrapped Grilled Cheese Fingers
Can I make Bacon-Wrapped Grilled Cheese Fingers ahead of time?
Absolutely! You can assemble the sandwiches and wrap them in bacon, then refrigerate until you’re ready to grill. Just remember to let them sit at room temperature for a few minutes before cooking to ensure even cooking.
What type of cheese works best for this recipe?
While cheddar is a classic choice, feel free to experiment! Mozzarella, gouda, or even a spicy pepper jack can elevate your Bacon-Wrapped Grilled Cheese Fingers to new heights. The key is to choose a cheese that melts well.
How do I store leftovers?
If you have any leftovers (which is rare!), store them in an airtight container in the fridge for up to 2 days. Reheat in a skillet to regain that crispy texture!
Can I use turkey bacon instead of regular bacon?
Yes, turkey bacon is a great alternative! It’s a bit leaner, but it still adds that savory flavor. Just keep an eye on the cooking time, as turkey bacon may cook faster.
What can I serve with Bacon-Wrapped Grilled Cheese Fingers?
These tasty bites pair wonderfully with marinara sauce for dipping, a fresh salad, or even some crispy potato wedges. They’re versatile enough to complement any side!
Final Thoughts
Making Bacon-Wrapped Grilled Cheese Fingers is more than just cooking; it’s about creating joyful moments in the kitchen. The aroma of sizzling bacon and melting cheese fills the air, inviting everyone to gather around. These delightful bites are perfect for busy days or special occasions, bringing smiles to faces young and old. Plus, the ease of preparation means you can spend less time cooking and more time enjoying with your loved ones. So, roll up your sleeves, embrace the deliciousness, and let these tasty treats become a cherished part of your family’s culinary adventures!
Print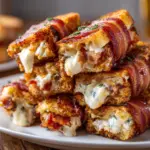
Bacon-Wrapped Grilled Cheese Fingers: A Tasty Twist!
- Prep Time: 10 minutes
- Cook Time: 10 minutes
- Total Time: 20 minutes
- Yield: 4 servings 1x
- Category: Appetizer
- Method: Grilling
- Cuisine: American
- Diet: Gluten Free
Description
Bacon-Wrapped Grilled Cheese Fingers are a delicious twist on the classic grilled cheese sandwich, combining crispy bacon with gooey cheese for a savory snack.
Ingredients
- 4 slices of bread
- 4 slices of cheese (cheddar or your choice)
- 8 slices of bacon
- Butter (for grilling)
Instructions
- Preheat your grill or skillet over medium heat.
- Assemble the grilled cheese by placing a slice of cheese between two slices of bread.
- Wrap each sandwich with two slices of bacon, securing the ends with toothpicks if necessary.
- Spread butter on the outside of the sandwiches.
- Place the sandwiches on the grill or skillet and cook until the bacon is crispy and the cheese is melted, about 4-5 minutes per side.
- Remove from heat, let cool slightly, and cut into fingers. Serve warm.
Notes
- Feel free to use different types of cheese for varied flavors.
- For a spicy kick, add jalapeños or hot sauce to the cheese.
- Make sure to monitor the heat to avoid burning the bacon.
Nutrition
- Serving Size: 1 sandwich
- Calories: 350
- Sugar: 2g
- Sodium: 800mg
- Fat: 25g
- Saturated Fat: 10g
- Unsaturated Fat: 15g
- Trans Fat: 0g
- Carbohydrates: 30g
- Fiber: 2g
- Protein: 15g
- Cholesterol: 50mg


