
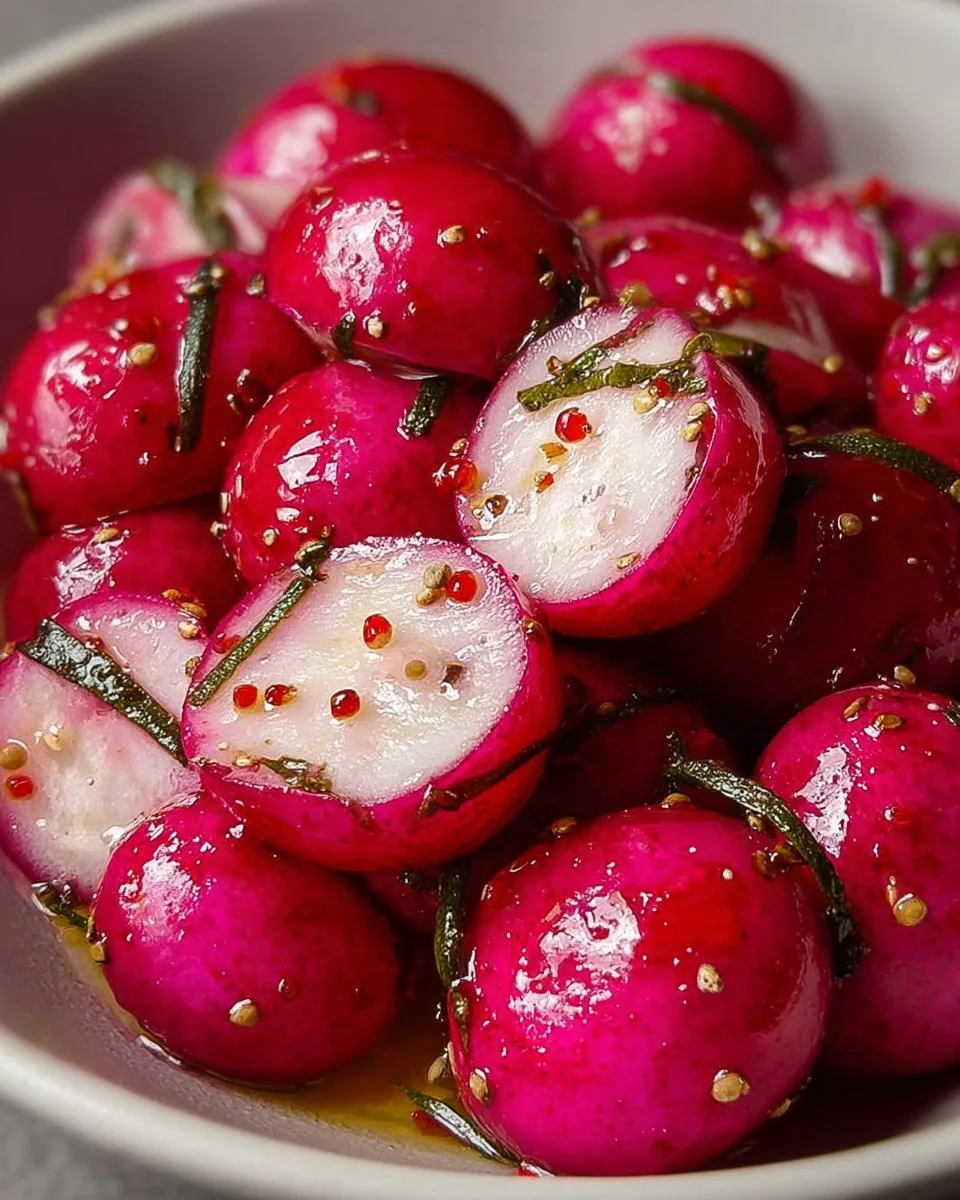
There’s something undeniably magical about the first bite of a crunchy, tangy pickled radish. Imagine a garden-fresh radish, its vibrant pink skin and crisp white flesh enticing your senses. As you sink your teeth into one, the briny sharpness mingles delightfully with a hint of sweetness, producing a dazzling crunch that dances on your tongue and awakens your palate. Each slice bursts with a harmonious blend of flavors, brightening even the simplest of dishes into a culinary spectacle. As the tangy aroma envelops your kitchen, you can almost feel the warmth of the sun shining on the garden where these radishes have grown. It’s a taste that draws your family and friends around the dinner table, sparking joy and conversation with every bite.
Pickled radishes aren’t just a culinary delight; they are a testament to the art of preserving fresh produce. These little beauties add a splash of color, a punch of flavor, and a refreshing crunch that can transform any dish. Whether you serve them atop tacos, toss them into salads, or use them as a zesty garnish, they practically insist on elevating your culinary creations. The thrill of making your own pickled radishes in your own kitchen fills you with a sense of accomplishment and love. With just a handful of simple ingredients, you can create this addictive condiment that promises to bring excitement to your meals.
Why You’ll Love This Pickled Radishes Recipe
This pickled radishes recipe wins hearts for several reasons. First, the flavor is unlike anything you’ll find in a store-bought jar. Once you experience the lively crunch paired with that sweet-tart zing, store-bought versions will never feel the same. Second, this recipe is incredibly versatile; you can adjust the spices, sweetness, or even the level of tartness to suit your palate.
Perfect for summer barbecues, picnics, or just because—these pickled radishes are a feast for the senses. They invite creativity into your kitchen, making every meal special. Plus, they’re a healthy way to add a pop of color and a burst of flavor without extra calories. With their dazzling pink hue, they’ll impress your guests and tantalize your taste buds, proving that sometimes, the simplest pleasures are the most rewarding.
Preparation Phase & Tools to Use
Gathering your tools can help this process flow smoothly. Here’s what you need:
- A sharp knife or mandoline: A great knife makes slicing radishes a breeze, while a mandoline ensures perfectly thin, even slices.
- A clean glass jar: A pint-sized mason jar works wonderfully, retaining the crispness of the radishes while showcasing their vibrant color.
- A small saucepan: This will be vital for creating your flavorful brine, combining the vinegar, water, and spices with ease.
Practical Preparation Tips:
- Ensure your jar is clean; consider boiling it briefly to sterilize. A clean environment prevents unwanted bacteria and makes your pickles last longer.
- Have all your ingredients ready and measured out before you start. This organization streamlines the process and keeps things efficient and enjoyable.
Ingredients for Pickled Radishes
- Radishes: Choose firm, vibrant radishes, free from blemishes. While red radishes are classic, consider experimenting with black or watermelon radishes for a flavor twist.
- Vinegar: White vinegar serves as a standard option, but don’t shy away from apple cider vinegar. Its rich depth of flavor adds a delightful dimension.
- Water: Balances the acidity of the vinegar, creating a harmonious brine.
- Garlic Cloves: The addition of garlic infuses your pickles with aromatic earthiness. Fresh cloves pack more flavor than powdered varieties.
- Sugar: Just a hint balances the tang of the vinegar; you can adjust this to your sweetness preference.
- Salt: Essential for the brining process, it enhances flavor and preserves the radishes.
- Spices (optional): Feel free to play with mustard seeds, black peppercorns, or a sprinkle of red pepper flakes to add a personal touch.
Key Ingredient Insights
Get creative with your ingredients. If you prefer a sweeter pickle, add a bit more sugar. For a spicier kick, consider a dash of chili flakes or even jalapeños. The possibilities are as endless as your imagination.
How to Make Pickled Radishes
-
Slice the Radishes: Begin by washing and drying your radishes. Use your sharp knife or mandoline to slice them thinly, ideally about 1/8 inch thick. Aim for uniformity for optimal pickling.
-
Prepare the Brine: In a small saucepan over medium heat, combine equal parts of vinegar and water (typically, 1 cup each) with about 1-2 tablespoons of sugar, and 1 tablespoon of salt. Toss in the crushed garlic cloves. Stir occasionally until the mixture heats up and the sugar and salt dissolve completely.
-
Season Them Up: Add your chosen spices to the clean jar containing the sliced radishes. This step helps infuse the flavor right from the start.
-
Pour the Brine: Pour the hot brine over the radish slices, ensuring that they are fully submerged. Use a spoon to gently press them down if necessary.
-
Cooling Time: Allow the jar to cool at room temperature for about 30 minutes. Afterward, place it in the refrigerator. For the best flavor, let the pickled radishes sit for a day or two before indulging.
Chef’s Notes & Helpful Tips
- Make-Ahead Tips: These pickled radishes last for up to two weeks in the fridge, so they’re perfect for preparing ahead of time for parties or meal preps during the week.
- Cooking Alternatives: If you’re short on time, a quick soak in hot brine (allowing only about an hour in the fridge) can provide a good flavor kick, but longer pickling yields deeper tastes.
- Customization Ideas: Experiment with different herbs or spices. Fresh dill or cilantro can offer unexpected twists, while a splash of honey instead of sugar lends unique sweetness.
Common Mistakes to Avoid
-
Skipping the Sterilization: Not sterilizing your jar can introduce unwanted bacteria. Always ensure it’s properly cleaned.
-
Not Slicing Evenly: Uneven slices lead to varying pickling times. Stick to uniform thickness to ensure consistent flavor and crunch.
-
Forgetting to Submerge: If the radishes aren’t submerged entirely, some may not pickle properly. Weight them down or ensure all bits are covered in brine.
-
Rushing the Flavor Development: Giving your pickles time to sit in the fridge allows the flavors to meld beautifully, so try to resist the temptation to dive in right away!
What to Serve With Pickled Radishes
Explore a world of culinary combinations with these vibrant pickles:
- Tacos: Their crunch and sharp tang elevate any taco filling, be it fish, beef, or veggie-based.
- Salads: Toss them with greens for an instant flavor upgrade; their zest brings salads to life.
- Sandwiches: Layer them into your favorite sandwiches or wraps for a delightful crunch.
- Rice Bowls: Brighten up a simple rice bowl with pickled radishes; they add color and flavor without overwhelming the dish.
- Charcuterie Boards: Use them on cheese and meat platters, where the acidity helps balance rich flavors.
- Sushi: Incorporate them into sushi rolls for an unexpected twist.
Storage & Reheating Instructions
Store your pickled radishes in the refrigerator where they will keep for up to two weeks. Their vibrant color and crunchy texture will remain intact, granting you delicious bites for days. They do not freeze well, as freezing alters their texture, leaving them limp and less appetizing upon thawing.
Estimated Nutrition Information
Approximate values per serving (based on 1/4 cup):
- Calories: 15
- Total Fat: 0g
- Carbs: 4g
- Fiber: 1g
- Sugars: 2g
- Protein: 1g
These values are estimates and can vary based on specific ingredients used.
FAQs
-
Can I adjust the sweetness or saltiness?
Absolutely! Feel free to tweak the sugar and salt to suit your taste. A little extra sugar can enhance the sweetness, while more salt can increase the brininess. -
How long do pickled radishes last?
When refrigerated in a sterilized jar, they can last up to two weeks. Always check for any off smells or changes in texture before consuming. -
Can I use different types of radishes?
Yes! Try different radish varieties, such as black radishes or watermelon radishes, for exciting flavor and color options. -
Is it necessary to use garlic?
While garlic adds a delightful flavor, it’s not mandatory. You can omit it if you prefer a milder taste or are avoiding garlic for dietary reasons. -
What can I do with leftover brine?
Don’t discard leftover brine! It makes a fantastic marinade for meats or veggies, infusing them with that zesty pickled flavor.
A Burst of Flavor Awaits
Experience the joy of crafting your pickled radishes, transforming ordinary vegetables into extraordinary treats. Each crunchy bite presents a canvas of flavor that enhances your meals and excites your taste buds. With the sun-drenched sweetness and vibrancy of fresh produce, these pickled delights create an experience that nourishes both body and soul. So gather your ingredients, embrace your creativity, and let your kitchen become a haven of delicious scents and dazzling flavors. Bon appétit!
Print
Pickled Radishes
- Prep Time: 10 minutes
- Cook Time: 5 minutes
- Total Time: 15 minutes
- Yield: 4 servings 1x
- Category: Condiment
- Method: Pickling
- Cuisine: American
- Diet: Vegan
Description
A flavorful and crunchy pickled radish recipe that adds a zesty touch to any dish.
Ingredients
- 1 bunch radishes, thinly sliced
- 1 cup white vinegar
- 1 cup water
- 2 garlic cloves, crushed
- 1–2 tablespoons sugar
- 1 tablespoon salt
- Optional spices: mustard seeds, black peppercorns, red pepper flakes
Instructions
- Slice the radishes thinly, ideally about 1/8 inch thick.
- Prepare the brine by combining vinegar, water, sugar, salt, and crushed garlic in a saucepan over medium heat.
- Pour the hot brine over the sliced radishes in a clean jar, ensuring they are fully submerged.
- Cool at room temperature for about 30 minutes, then refrigerate.
- Let the pickled radishes sit for a day or two before serving for best flavor.
Notes
These pickled radishes will last up to two weeks in the fridge. Adjust sugar and spices to taste for custom flavors.
Nutrition
- Serving Size: 1/4 cup
- Calories: 15
- Sugar: 2g
- Sodium: 400mg
- Fat: 0g
- Saturated Fat: 0g
- Unsaturated Fat: 0g
- Trans Fat: 0g
- Carbohydrates: 4g
- Fiber: 1g
- Protein: 1g
- Cholesterol: 0mg


