

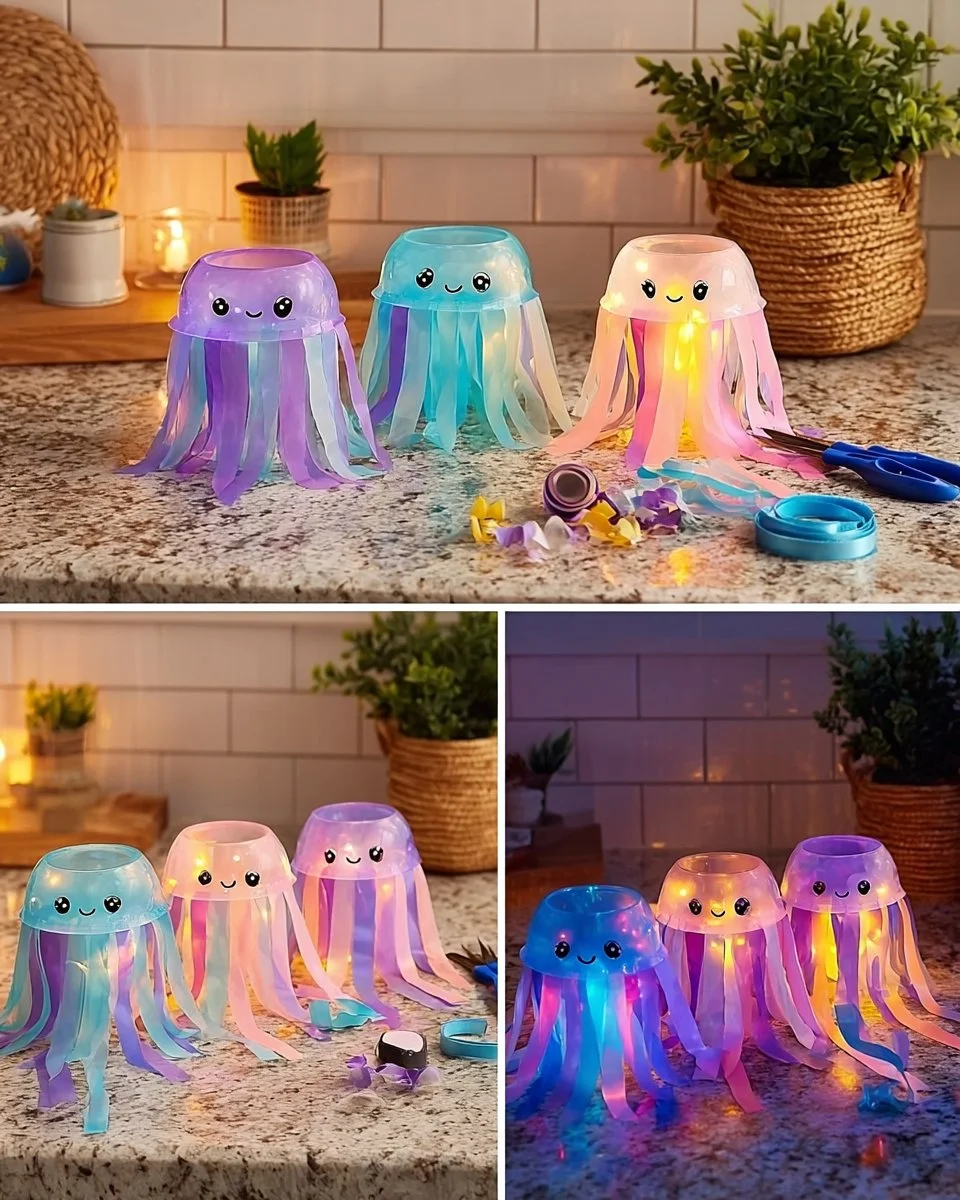
Sparkly Jellyfish Cup Lanterns: A Crafty Glow for Every Occasion
Imagine a peaceful evening, the sun slowly setting on the horizon, giving way to a gentle twilight glow. You sip lemonade on the patio surrounded by friends and loved ones, while laughter dances through the air. Suddenly, your eyes are drawn to delicate, shimmering lanterns hung around — glowing softly like magic under the starlit sky. These enchanting lights aren’t just typical outdoor decor; they’re sparkly jellyfish cup lanterns, and they bring whimsy and warmth to any gathering.
Creating these lovely lanterns is more than a fun craft project; it’s an opportunity for connection, a way to express creativity and infuse your space with a little bit of magic. As you transform ordinary plastic cups into a field of glowing jellyfish, you’re bound to find joy in the process and in sharing your artistic endeavor with others.
Why We Adore This Craft
When it comes to DIY crafts, the best ones are those that capture the spirit of playfulness. Sparkly jellyfish cup lanterns resonate with both kids and adults, making them perfect for family bonding, birthday parties, or romantic evenings. They’re simple to create, delightful to display, and best of all, they allow for a splash of personal creativity.
Think back to your childhood when every simple act of crafting felt like creating something out of magic. This project evokes that nostalgia by combining art and functionality. Who wouldn’t want to hang shimmering jellyfish lanterns for a garden party or a cozy night indoors? Each unique lantern glows with its personality while reflecting the love and effort you’ve poured into it.
Benefits and Best Occasions to Use Sparkly Jellyfish Lanterns
These delightful lanterns are versatile enough for any occasion. Whether you’re hosting a birthday bash, a garden tea party, or simply looking to add a touch of whimsy to your backyard retreat, these jellyfish-inspired creations can set the perfect atmosphere.
They bring an air of festivity to seasonal celebrations like summer solstice or Midsummer nights. Use them to brighten up holiday decorations, drape them along pathways, or illuminate your next sleepover party. The soft flicker of battery-operated tea lights inside the cups infuses the environment with warmth, creating an ambiance that invites conversation and connection.
Gather Your Materials
Before diving into the creative process, let’s gather the materials that will help bring your jellyfish lanterns to life:
- Clear plastic cups: The foundation of our jellyfish lanterns. Their transparency allows the glow to shine through beautifully.
- Googly eyes: These whimsical details bring characters to your jellyfish, giving them life and personality.
- Glitter: For that sparkly, magical effect when the lanterns are lit.
- Clear-drying craft glue: Essential for securing the glitter and other decorations.
- Pastel ribbon strips: The jellyfish’s tentacles come to life with vibrant ribbons.
- Battery-operated LED tea lights: Providing a safe, warm light without the worry of fire hazards.
- Hot glue gun: Perfect for quick-drying attachments and ensuring everything stays in place.
- Scissors: A necessary tool for cutting ribbons and string.
- String for hanging: To make your jellyfish suspend gracefully in the breeze.
Gather these materials, and you’ll be ready to create something truly special.
Step-by-Step Instructions
Ready to get started? Let’s turn those materials into a whimsical wonderland!
-
Start with a Clean Slate:
Turn each plastic cup upside down and apply a thin layer of clear-drying craft glue to the top half of the cup. Don’t worry about coverage; this layer is just a base for your glitter. -
Shake on the Sparkle:
Sprinkle a generous amount of glitter over the glued area. You want a sparkly layer that twinkles like a starry sky, so feel free to be liberal with this step. Allow the glued cups to dry completely. This waiting period is perfect for a quick clean-up of any stray glitter around your workspace (though a little sparkle adds charm!). -
Bring Your Jellyfish to Life:
Once your cups are dry, attach two googly eyes to each, letting their quirky expressions shine through. Then, take a permanent marker to draw a smiling face that captures your jellyfish’s cheerfulness. This step is where personality shines, so give them big grins or silly smirks! -
Create Tentacles:
Cut pastel ribbon into long strips, varying the lengths for an organic, flowing look. Using your hot glue gun, carefully glue these strips around the rim of your cup. These will serve as the jellyfish’s tentacles, so let them hang freely for the best effect. Play with color combinations; mixing hues brightens up the lanterns and adds to the whimsy! -
Light Up:
Now, it’s time to place a battery-operated LED tea light inside each cup. This little flicker will cast an enchanting glow that dances through the glitter and ribbons. -
Hanging Made Simple:
If you want to suspend your jellyfish lanterns for a truly whimsical effect, attach a loop of string to the top of the cup. This piece not only allows your jellyfish to float in the air but also adds to the enchanting presentation. -
Let the Magic Begin:
Once everything is assembled, turn on the lights and arrange them together. Displaying all your creations in one area showcases the beautiful glow while creating a stunning focal point.
Helpful Tips to Elevate Your Craft
- Experiment with multiple shades of pastel ribbons to give your jellyfish a more dynamic look. A combination of colors can evoke a whimsical underwater vibe.
- To enhance the glittery effect, use extra glitter on the cups, allowing them to shine even brighter in the night.
- Always favor battery-operated lights. They’re not only safer, but they also eliminate any risk of heat and ensure that your sparkly creations remain intact.
Creative Variations
Love this idea but want to put a personal spin on it? Consider these creative variations:
- Theme-Based Lanterns: Adapt these jellyfish for seasonal themes. For Halloween, create spooky jellyfish with black glitter and orange ribbons. During winter, incorporate silver and icy blue for a frosty effect.
- Mini Versions: Create smaller versions to use as table decorations or favor gifts at parties. They can easily fit onto a cupcake or dessert table.
- Interactive Craft: Invite friends or family members to join you in crafting. It not only makes the project more fun but allows each participant to bring their unique creativity into the mix.
Beginner Mistakes to Avoid
While making these delightful lanterns is a straightforward process, a few common mistakes can hinder the final result:
- Rushing the Drying Process: Don’t skip allowing the glue and glitter to dry completely. Opting for a faster drying technique could lead to a messy finish.
- Overloading with Glue: Too much glue can cause the glitter to clump instead of providing an even spread. Practice moderation for a more polished look.
- Using Non-LED Lights: Regular tea lights can heat up and warp plastic. Avoid any fire hazards by strictly using battery-operated options.
Presentation Ideas
Once your jellyfish cup lanterns are complete, consider how best to display them. Group them together on a table lit with soft underneath to create a beautiful centerpiece or hang them around your outdoor space for an ethereal feel. They can easily transform an ordinary gathering into a spectacular evening display.
Consider using sheer fabric or tulle to create a flowing backdrop that mimics the ocean, enhancing the theme of your jellyfish lanterns.
Frequently Asked Questions
-
Can I use regular tea lights instead of LED ones?
No, it’s important to use only battery-operated LED tea lights to avoid any fire hazards and ensure the safety of your creations. -
How can I store my jellyfish lanterns after use?
Store them in a cool, dry place. If you’ve used glue, consider delicate handling to avoid any breakages or deformations. -
What if my glitter is clumping?
If you find clumps, you might have used too much glue. For next time, try applying a thin, even layer and allow it to dry before adding glitter.
Conclusion
Crafting sparkly jellyfish cup lanterns creates more than just a beautiful display; it’s an invitation to revisit your creativity and the joy that accompanies it. As you watch these gentle, glowing lanterns illuminate your evenings, may they remind you of the power of imagination and the warmth of gathering together.
So gather your materials, invite your family or friends, roll up your sleeves, and get ready for a delightful crafting adventure. Regardless of the occasion, these jellyfish lanterns are bound to bring light and joy, making your nights magical and memorable. Enjoy every whimsical moment!






