

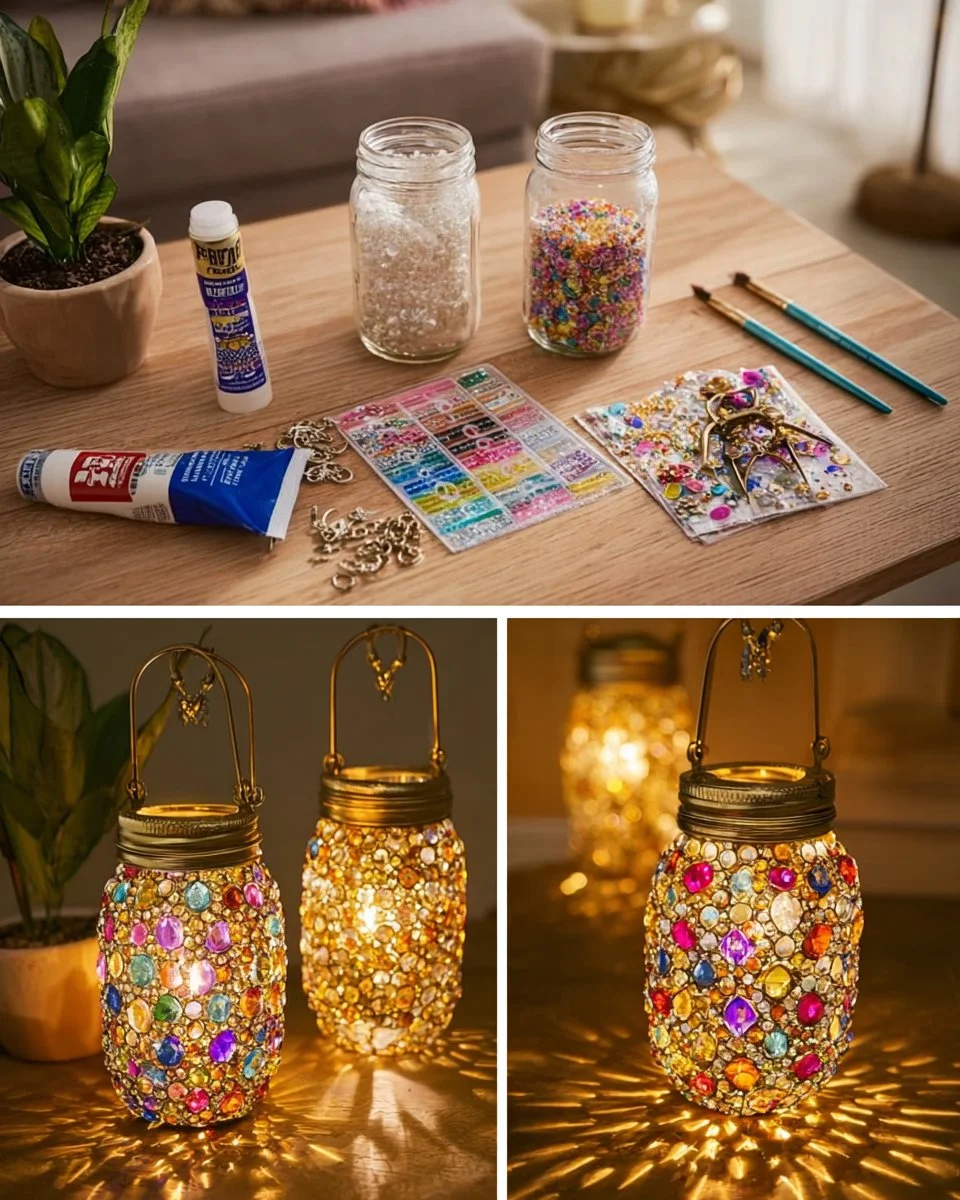
Create a Colorful Gem Mason Jar Lantern: A Crafting Journey Full of Light and Love
Picture this: a gentle summer evening breeze curls through your garden as twilight settles like a soft blanket over your backyard. The sun dips below the horizon, painting the sky with blush and gold. You gather your loved ones around a rustic wooden table, laughter bubbling up like the sweetest bubbles from a soda. Suddenly, as the sun bids farewell, you ignite the ambiance with soft, twinkling lights that dance around you. It’s magical, isn’t it?
This enchanting atmosphere can easily be created with a stunning, DIY Colorful Gem Mason Jar Lantern that casts a warm glow, transforming your space into a whimsical wonderland. The best part is that this project not only serves as a fantastic decorative piece but also allows you to spend quality time creating something beautiful together.
Why People Love This Idea
Crafting has always been about more than just the end product; it’s about the joy of creation and the memories you build along the way. A colorful gem mason jar lantern embodies this spirit beautifully. People adore it for its ease and versatility; you can tailor this lantern to fit any theme or occasion—from a boho garden party to a cozy movie night indoors.
Moreover, it’s an eco-friendly option that encourages you to repurpose an everyday item, all while adding a splash of creativity to your home. The sheer delight in seeing your unique design come to life is immensely satisfying, amplifying the joy of the season, be it summer or winter.
Benefits and Best Occasions to Use It
Imagine illuminating your outdoor space during a summer barbecue, or brightening up your family game night with soft, colorful lights. These lanterns are perfect for:
- Weddings: Create a romantic atmosphere with clusters of lanterns lining the aisle or scattered on tables.
- Outdoor Parties: Use them as centerpieces or hang them from trees, sprinkling charm throughout your gathering.
- Seasonal Decor: Switch up the colored gems to match holidays—pastels for Easter or warm tones for fall.
- Cozy Indoor Nights: Enhance your living space with enchanting accents that bring warmth and comfort.
The delightful glow of these lanterns transports you and your guests to a realm brimming with peace and joy, reminding us that sometimes, the simplest crafts bear the brightest light.
Materials You’ll Need
Before diving into the creative process, let’s gather our materials. Here’s what you’ll need to conjure up your enchanting lantern:
- Glass mason jar: A classic choice for this DIY project, it serves as the main body for your lantern.
- Mod Podge: This versatile glue will help secure your gems firmly to the jar.
- Clear craft glue: For any extra touch-ups needed as you create.
- Acrylic gem stickers: Colorful, shiny, and available in various shapes, they’ll be the stars of your design.
- Pearl stickers: These add a touch of elegance, perfect for filling in gaps.
- Small rhinestones: Infuse extra sparkle and charm into your lantern.
- Paintbrush and tweezers: Essential tools to carefully place your jewels!
- Decorative metal trim: A beautiful finishing touch around the rim of the jar.
- Chain for hanging: If you wish to suspend your lantern, a sturdy chain will do the trick.
- LED tea lights or fairy lights: For a safe and luminous glow that lasts through the night.
Step-by-Step Instructions
Now that we’ve gathered our treasures, let’s embark on this crafting journey together. Each step is a chance to sprinkle your personality into your creation.
Step 1: Prep Your Canvas
Begin by cleaning your mason jar thoroughly. Wash and dry it completely, ensuring that any dust or residue is wiped away. This step is crucial as it allows the Mod Podge to adhere perfectly.
Step 2: Start with Mod Podge
Grab your paintbrush and dab a thin coat of Mod Podge onto a small section of the jar. Working in smaller sections helps prevent the glue from drying out too quickly.
Step 3: Let the Color Flow
With your tweezers handy, begin arranging the colorful gem stickers onto the applied Mod Podge. Play with different patterns—think flowers blooming or delightful mosaic designs that reflect your artistic style.
Step 4: Fill in the Gaps
As you admire your handiwork, notice the spaces left behind. Time to fill those gaps! Stick on your pearl stickers and small rhinestones. Imagine they are little stars in the vast universe of your lantern, brimming with energy and spark.
Step 5: Secure & Dry
For any gems that may not feel entirely secure, use the clear craft glue for extra reassurance. Once everything is in place, set the lantern aside and allow it to dry completely—patience is key in crafting!
Step 6: Add Your Finishing Touches
As your masterpiece dries, attach the decorative metal trim around the rim of the jar. This will elevate the sophisticated look of your lantern. Depending on your preference, affix your hanging chain so you can showcase your creation suspended in the air.
Step 7: Light It Up
Now enter the final and most magical touch: place your LED tea light or fairy lights inside. Feel free to layer the lights for a more dynamic glow, and voila! Your colorful gem mason jar lantern is ready to shine.
Tips to Enhance Your Craft
- Experiment with Shapes: Different gem shapes evoke different designs; perhaps mix scalloped edges with rounded gems for a playful twist.
- Take Your Time: Enjoy the craft process! Work slowly to ensure each piece is lovingly placed, creating a stunning canvas that reflects your personality.
- Cure Time: Allow the lantern to cure overnight before hanging it up. This ensures that everything adheres perfectly, making your lantern last.
Common Beginner Mistakes to Avoid
As every crafting enthusiast will tell you, it’s all about trial and error! Here are a few common missteps to watch for:
- Overcrowding: While more gems sound appealing, overcrowding can detract from the design. Choose to showcase your favorites and ensure they shine.
- Skipping the Cleaning Step: As mentioned, skipping the initial cleaning can lead to adhesive failures. Make that extra effort for a lasting masterpiece.
- Rushing the Drying Process: Building anticipation by allowing it to dry fully will yield better results than rushing to display your lantern.
Creative Variations to Personalize Your Lantern
The beauty of DIY is that you can always make things your own. Consider these variations:
- Seasonal Themes: Change the color palette depending on the time of year. Rich, warm hues for fall or icy shades for winter bring a unique seasonal flair.
- Themed Gatherings: If you’re hosting a beach party, opt for blue and turquoise gems to reflect ocean waves.
- Mix and Match with Other Decor: Combine your lanterns with other homemade crafts like flower wreaths or painted terracotta pots to create a cohesive display.
Presentation Ideas for Your Lanterns
Once completed, think about how to showcase your dazzling creations:
- Clustered Grouping: Place several lanterns on a table for impact, each at varying heights, to create visual interest.
- Hang from Trees: For an outdoor gathering, suspend lanterns from tree branches to cast a magical glow across the space.
- Window Displays: Let the lanterns shine in your home’s windows, inviting the warmth of light both inside and outside.
Maintenance Tips for Longevity
Taking care of your lantern can ensure it serves your space for many seasons to come:
- Keep it Dust-Free: Gently wipe the lantern with a soft cloth to avoid buildup.
- Store Carefully: If you need to store your lantern off-season, wrap it in soft cloth and place it in a box to avoid any accidental damage.
Frequently Asked Questions
Q: Can I use real candles instead of LED lights?
A: It’s not recommended due to the glass jar’s flammability. LED lights provide a safer and just as beautiful alternative!
Q: How can I clean the lantern without damaging the gems?
A: Wipe gently with a damp cloth, avoiding scrubbing to preserve the adhesive holding your gems in place.
Q: Will the Mod Podge hold up outdoors?
A: If you plan to use your lantern outdoors, opt for outdoor Mod Podge to ensure durability against the elements.
Final Thoughts
Creating a colorful gem mason jar lantern is not only about crafting a beautiful object but also about the memories you create while making it. As you gather around your radiant lantern, sharing stories and laughter, you’ll realize that it serves as more than just a source of light; it symbolizes warmth, connection, and creativity.
So gather your materials, invite a friend or family member, and let your imagination run wild. Your vibrant, whimsical lantern is waiting to be born—ready to brighten your world just when you need it. Let this colorful gem mason jar lantern be the spark that ignites many wonderful evenings spent under the stars, surrounded by the warmth of those you cherish.
SEO Meta Description: Discover the magic of crafting a Colorful Gem Mason Jar Lantern. This easy DIY guide explores the materials, step-by-step instructions, and creative variations to help you illuminate your space beautifully. Perfect for any occasion!
SEO Tags: DIY crafts, mason jar lantern, colorful decor, summer parties, home decor, crafting with gems, eco-friendly projects






