

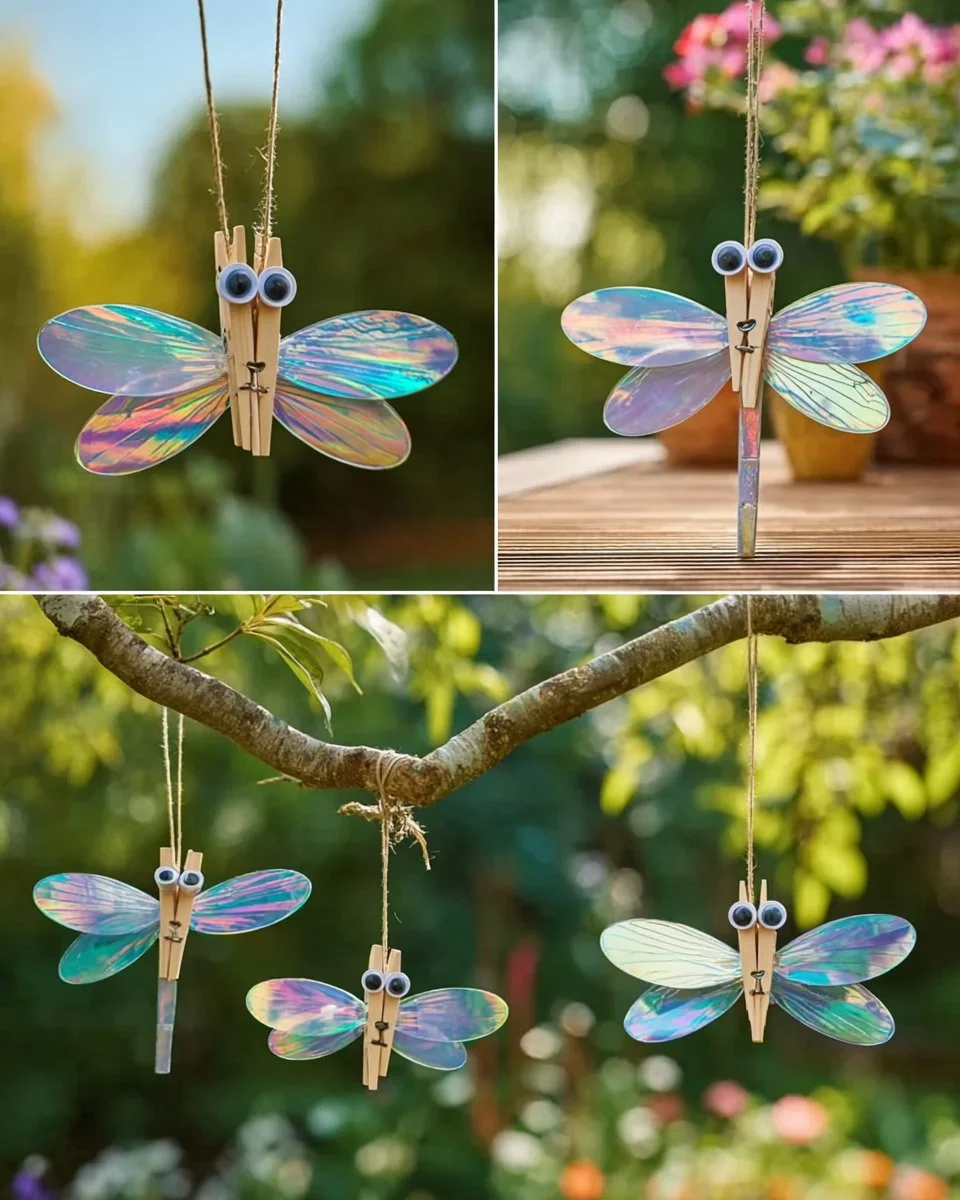
Create a Magical Space with CD Dragonfly Hanging Decor
As the gentle sunlight streams through the branches of the trees in your yard, you lounge outside, a cool drink in hand, soaking up the beauty of the day. Suddenly, your eye catches the vibrant dance of color and light just beyond your porch. It’s not a fluttering butterfly or a whimsical bird, but the sparkly spectacle of handmade dragonflies, glimmering in every shade of the rainbow. These enchanting creatures, crafted from old CDs, are on a mission to bring whimsy to your outdoor space. With a few simple materials and a splash of creativity, you can create your own CD dragonfly hanging decor that transforms your garden or patio into a magical realm.
Why People Love This Idea
The joy of crafting is not merely about creating something functional; it carries an emotional weight that brings people together. Imagine an afternoon spent with your children or grandchildren, eager hands working alongside you to craft these delightful decor pieces. There’s a unique bond that forms as you cut, paint, and assemble together, sharing giggles and stories in the process. Beyond the shared moments, these dragonflies become more than mere decorations; they embody memories, creativity, and personal expression.
And let’s not forget the environmental element! Using old CDs or DVDs—those relics of a bygone era—rather than tossing them into a landfill gives them new life. This project fosters a love for creativity while being gentle on Mother Earth.
Benefits and Best Occasions to Use It
Not only do these majestic dragonflies look stunning, but they also serve multiple purposes. Hang them in your garden to attract attention and spark interest from passersby, or use them in your next outdoor gathering for an added touch of whimsy. They can brighten a birthday party, celebrate the arrival of spring, or simply uplift your everyday outdoor ambiance. When the light hits the CDs just right, rainbow patterns dance on surfaces, captivating hearts young and old.
Materials You’ll Need
Here’s a list of materials to gather that will fuel your creativity:
- Old CDs or DVDs: The star of the show. Repurposing these shiny discs adds a sparkle like no other.
- Wooden clothespins: Functional yet charming, these form the body of the dragonfly and allow for easy hanging.
- Googly eyes: Adding personality and laughter, these little googly orbs bring your dragonfly to life.
- Twine or string: Essential for hanging your creations, it also adds a rustic touch.
- Hot glue gun and glue sticks: The trusty tools for a stable craft; they’ll hold your masterpiece together.
- Scissors: For snipping and shaping your wings with precision.
- Pipe cleaners: These can twist into whimsical antennae, creating character.
- Acrylic paint: Perfect for adding a unique splash of color to your clothespins.
Step-by-Step Instructions
Step 1: Prepare the Wings
Begin by taking your old CDs or DVDs and, using strong scissors, carefully cut out four matching wing shapes. Think of the wings of a dragonfly; they are delicate yet striking, so aim for graceful curves and sharp points at the ends. Make sure to exercise caution while cutting. Adult supervision is advised, especially if little ones are assisting.
Step 2: Customize the Body
Next, if you desire, you can give your wooden clothespins a fresh look by painting them in vibrant hues or soft pastels. Allow them to dry completely. Consider enchanting colors like sky blue or leaf green, which will complement the shimmering wings beautifully.
Step 3: Assemble the Wings
Grab your glue gun and, with a steady hand, apply hot glue to one side of the clothespin. Carefully attach two CD wings, adjusting where necessary to ensure symmetry. Repeat the process on the opposite side. When placed correctly, the wings should gracefully splay out, ready to capture the breeze.
Step 4: Add Personality
As soon as the wings are secure, it’s time to breathe life into your dragonfly. Apply a bit of glue near the top of the clothespin to attach those googly eyes. There’s something undeniably adorable about those wiggly little eyes that sparks joy and adds character.
Step 5: Create Antennae
Using a pipe cleaner, twist a small section into antennae; the fun part is how each antenna can be uniquely shaped! Use a bit of hot glue to secure them on the head area, where they’ll sway and bounce gently in the wind.
Step 6: Prepare for Flight
Now, take a length of twine and tie a snug loop around the top of the clothespin. This will allow your dragonflies to hang freely and dance in the breeze—a truly charming display.
Step 7: Find the Perfect Spot
Finally, find a lovely place to hang your completed dragonflies outdoors where the sunlight can hit them just right. As they sway and catch the light, expect a symphony of rainbow patterns to illuminate your space, enchanting everyone who walks by.
Helpful Tips Along the Way
- For gentle movement, choose lightweight string when hanging your dragonflies. Always test how they sway to maximize their playful dance.
- Sealing your dragonflies with clear spray varnish can provide added protection against the elements, ensuring they last through various seasons.
- If you’re crafting with children, encourage them to personalize their dragonflies with unique patterns or colors, fostering their creative expression.
Common Beginner Mistakes to Avoid
One common mistake is rushing the drying time of the paint or glue. Patience is vital; allow each piece to dry fully before moving on to ensure durability. Also, remember that uneven wing shapes can occur; embrace the organic nature of handmade decor!
Creative Variations
Your dragonflies are merely the beginning! Consider transforming this idea into a whole garden of creatures. Create a family of butterflies and ladybugs using the same principles. Vary the wing sizes for different insects, letting your imagination take flight.
Presentation Ideas
Arrange your dragonflies in a cluster, hanging at varying heights for a mesmerizing effect. Allow sunlight to filter through them, casting colorful shadows across your garden furniture. For an extra magical touch, consider using LED fairy lights to illuminate your dragonflies at night, turning your outdoor space into a whimsical wonderland.
Frequently Asked Questions
Can I use other materials besides CDs?
Absolutely! If CDs are hard to come by, consider using colorful cardstock or painted cardboard. This gives you both ease in craft and vibrant colors.
How long do these last outdoors?
With proper sealing and good placement, your dragonflies can last multiple seasons. However, be mindful of extreme weather conditions.
What other decorations can I create with leftover materials?
The possibilities are limitless! Other fun ideas include wind chimes, garden mobiles, or even wreaths. Let your creativity guide you.
Conclusion: Transform Your Outdoor Space
As you step back to admire your dragonfly creations hanging gracefully in your yard, you can feel a sense of accomplishment wash over you. Each dragonfly not only brightens up your outdoor space but also tells a story—a story of creativity, laughter, and shared moments. Whether they serve as an everyday delight or a charming conversation starter when guests arrive, these colorful decorations will surely bring a spark of enchantment to your life. So why not gather the materials and let your imagination take flight? Your garden—and heart—will thank you.
SEO Meta Description
Discover how to create beautiful CD dragonfly hanging decor that adds whimsy to your outdoor space. With step-by-step instructions and creative tips, you’ll craft stunning art pieces that reflect your personality.
Suggested SEO Tags
- DIY crafts
- Garden decor
- Eco-friendly crafts
- Recycled art
- Outdoor decorations
- Family activities
- Home decor projects






