
Transform Your Space with a Cardboard Tube Mosaic Flower Suncatcher
Imagine a sun-kissed afternoon, the gentle breeze whispering through your open window, and the harmonious giggles of children echoing as they unleash their boundless creativity. It’s moments like these that remind us how art can brighten our lives and bring warmth into our homes. There’s something truly magical about crafting together—a delicate dance of glue, color, and laughter that transforms simple materials into beautiful works of art. One project that embodies this joy is the Cardboard Tube Mosaic Flower Suncatcher—a joyful expression of creativity that captures the essence of spring and fills your space with vibrant hues.
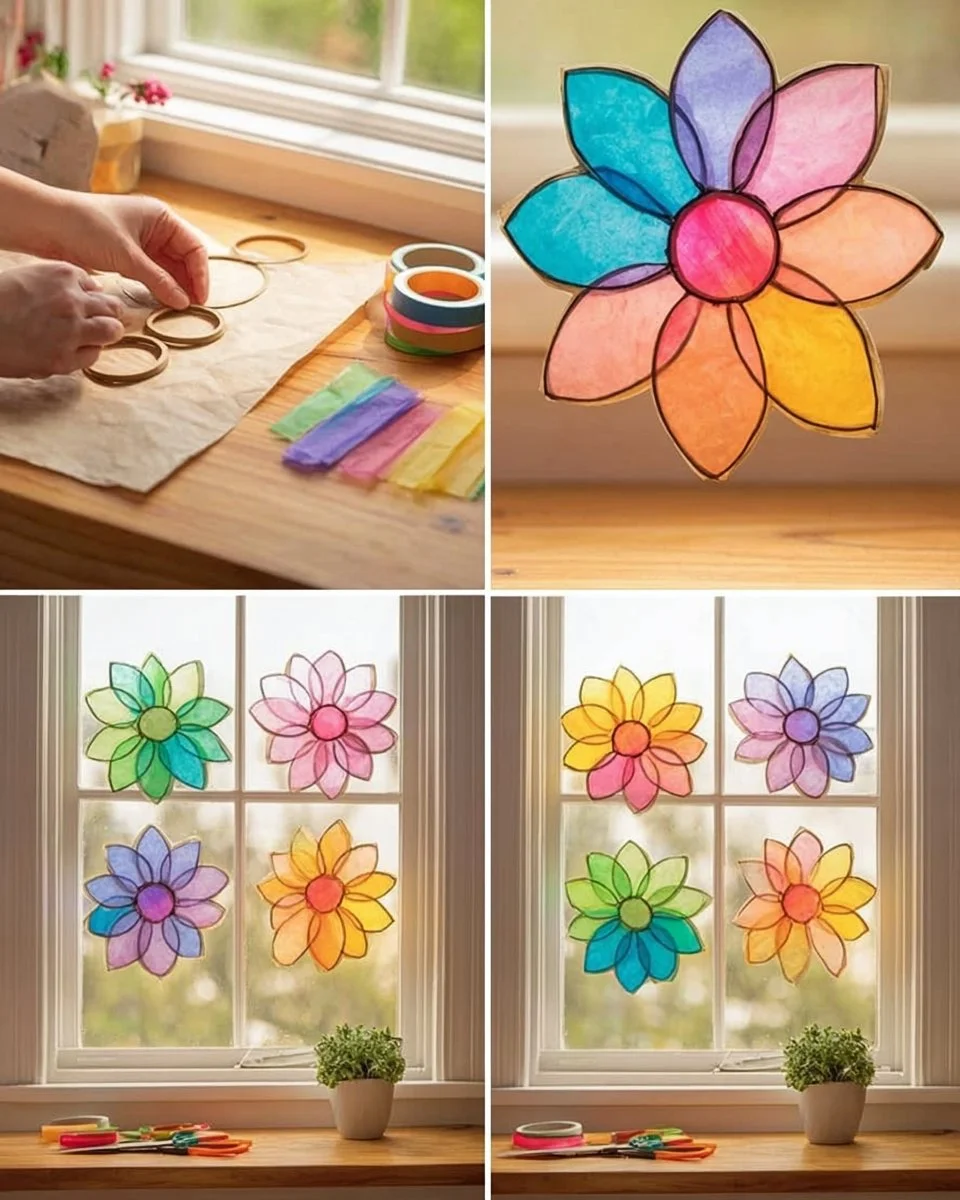
This radiant craft does more than just brighten your window; it becomes a cherished keepsake that enhances your home’s ambiance and fosters meaningful connections. With the sun filtering through the colorful tissues, it creates a stained-glass effect, scattering cheerful light across your room and invoking a sense of wonder. Let’s delve into why this project is beloved by crafters of all ages, explore the simple materials required, and embark on a step-by-step journey to create your very own suncatcher.
Why People Love This Idea
Crafting isn’t just about creating something beautiful; it’s a celebration of the imagination. The act of turning everyday items like cardboard tubes into intricate designs can unleash a wave of creativity that resonates with both children and adults. There’s a charm in watching the colors come together as the petals take their shape, as if bringing a garden to life right within your home.
Moreover, this project is uniquely versatile. Whether you’re preparing for a springtime gathering, celebrating a birthday, or simply brightening your living space, this suncatcher adds a touch of color and whimsy that lifts the spirit. Children can take pride in their creations, while adults can enjoy the powerful sense of nostalgia that comes with crafting something delightful. It’s also an excellent way to recycle those toilet paper tubes lying around your home, actively promoting sustainability while offering an engaging afternoon activity.
Materials You’ll Need
The beauty of this project lies in its simplicity. Here’s what you’ll gather:
- Cardboard Toilet Paper Tubes: A household staple. These create the petals of our flowers, making the suncatcher both eco-friendly and budget-conscious.
- Colorful Tissue Paper: This is where the magic happens. Use a variety of colors to transform your creation into a dazzling mosaic.
- White Parchment Paper or Wax Paper: This layer acts as a base to hold everything together and allows your suncatcher to catch the light.
- School Glue: Perfect for binding the petals and adhering tissue paper.
- Scissors: Sharp and ready to splice through those tubes and paper.
- Clear Tape: Securely affix any wayward parts as needed.
- Paintbrush: For smooth application of glue.
- String for Hanging: To display your masterpiece in the window, inviting light to illuminate your handiwork.
Crafting Your Suncatcher: Step-By-Step Instructions
Ready to transform those mundane toilet paper tubes into a burst of color? Let’s dive in!
Step 1: Start by taking your cardboard tubes and flattening them gently with your hands. This helps create the rings for your petals. Now, grab your scissors to cut the tubes into equal rings, about 1 inch wide each. The sound of the scissors cutting through the cardboard will soon be overtaken by the excitement of creating something beautiful.
Step 2: Here’s where we start to see the petals take shape! Pinch each cardboard ring into a leaf-like formation. This curvature mimics the natural grace of flower petals, giving you the artistic flair that makes each piece unique.
Step 3: Lay the petal shapes out on a flat surface, arranging them into a large flower design. This is your artistic moment—don’t be afraid to reposition them until they feel just right! Once satisfied with your arrangement, glue them together. This step is where you can let your creativity explode; there’s no wrong way here—just a beautiful result waiting to happen.
Step 4: For a polished look, place your newly formed flower frame onto parchment paper. With a pencil, trace around it so you have an outline to guide your next steps.
Step 5: Now, let’s bring in some color! Cut your colorful tissue paper into small squares, about 1-2 inches in size, and begin gluing them behind each petal opening. This is where your project will take on its vibrant personality. Layer different colors for a rich, textured appearance that mimics the layering of petals in nature.
Step 6: Allow the glue to dry completely, taking time to admire your work. In the meantime, you can trim away any excess tissue paper around the edges, cleaning up your flower’s silhouette.
Step 7: Finally, attach a string for hanging. Choose a sturdy string that complements your flower’s design, ensuring it can support your gorgeous creation. Place your suncatcher in a sunny window and prepare for the stunning display that ensues as the rays of light dance through your colorful creation.
Tips for Success and Common Mistakes to Avoid
Creating can sometimes be a messy affair, but remember: that’s part of the charm! If you find your petals curling or lifting, gently placing the flower under a book while it dries can help it stay flat. As you layer tissue paper, consider using several colors that complement each other to elevate your suncatcher’s vibrancy.
Beginners sometimes rush through the drying phase or overlook trimming excess paper. Taking your time ensures a clean finish, while carefully lifting your project after gluing will prevent any tissue pieces from tearing or pulling away from the base.
Creative Variations to Explore
The beauty of crafting is that there are no hard and fast rules. Experiment by making multiple flowers of different shapes and sizes, each one representing various blossoms you adore. If you have glitter on hand, consider sprinkling it on the petals for added shimmer. Alternatively, why not create a garden of flowers, a small bouquet displayed in a sunny spot? You might even pair them with other crafts, such as homemade greeting cards or tags for gift-giving.
Celebrating Your Creation
Once finished, each flower can be a delightful addition to your space and a fabulous decoration for seasonal displays. Place your suncatcher where it can catch the light just right. Picture a radiant glow enveloping your living room, casting colorful reflections on the walls, flooring, and even onto your family’s faces.
FAQs
Can I use other types of paper instead of tissue?
Absolutely! Experiment with colored paper, magazine cutouts, or even fabric scraps—get creative!
Is this project suitable for very young children?
While younger children can participate, adult supervision and help with cutting may be necessary to ensure safety.
How long will my suncatcher last?
With proper care and placement away from harsh or direct sunlight that could cause colors to fade, you can enjoy your suncatcher for many seasons.
Conclusion: Crafting Memories Together
As you bask in the glow of your beautiful Cardboard Tube Mosaic Flower Suncatcher, take a moment to relish the joy this simple craft brings. Each time sunlight spills through your creation, it serves as a gentle reminder: art is about the journey, the laughter, and the shared moments of creativity. So gather your loved ones, embrace the creative mess, and enjoy every delightful step in this cheerful project.
Your new suncatcher is not just an ornament; it’s a piece of your heart and a sparkle in your home—a testament to creativity that brings light into both your living space and your life.
SEO Meta Description: Discover the joy of creating a colorful Cardboard Tube Mosaic Flower Suncatcher with our step-by-step guide. Perfect for all ages, this vibrant craft adds charm to any sunny window.
SEO Tags: DIY Crafts, Mosaic Art, Kids Activities, Home Decor, Sustainable Crafts, Flower Crafts, Suncatchers


