
Dive Into Creativity: Crafting Your Own Glowing Rainbow Fish Lantern
Imagine a warm summer evening, where the sun slowly dips below the horizon, giving way to twinkling stars and the soft glow of fairy lights weaving through your yard. You and your loved ones gather around, laughter ringing in the air as you admire the beauty of your surroundings. Suddenly, something catches your eye—a dazzling glowing fish lantern dancing playfully in the gentle breeze. It’s a striking addition to your setup, a handmade creation that infuses your outdoor gathering with whimsy and warmth. Today, we’re diving into a fabulous crafting project—a glowing rainbow fish lantern that adds an enchanting touch to any occasion.
A Wonderful Craft for All Ages
Why do we love this project, you may wonder? The answer is simple: it embodies creativity, playfulness, and the joy of crafting with loved ones. Crafting is an avenue for self-expression, a chance to ignite the imagination, and a source of shared memories. The glowing rainbow fish lantern isn’t just an object; it brings to life the essence of childhood magic—transforming a simple space into an underwater dreamscape with vibrant colors and cheerful light.
This project is perfect for all ages, making it an excellent family crafting day activity, a unique centerpiece for summer parties, or even a delightful holiday decor piece. Whether you plan to display your lantern indoors or outdoors, its ethereal glow will captivate hearts and spark conversations.
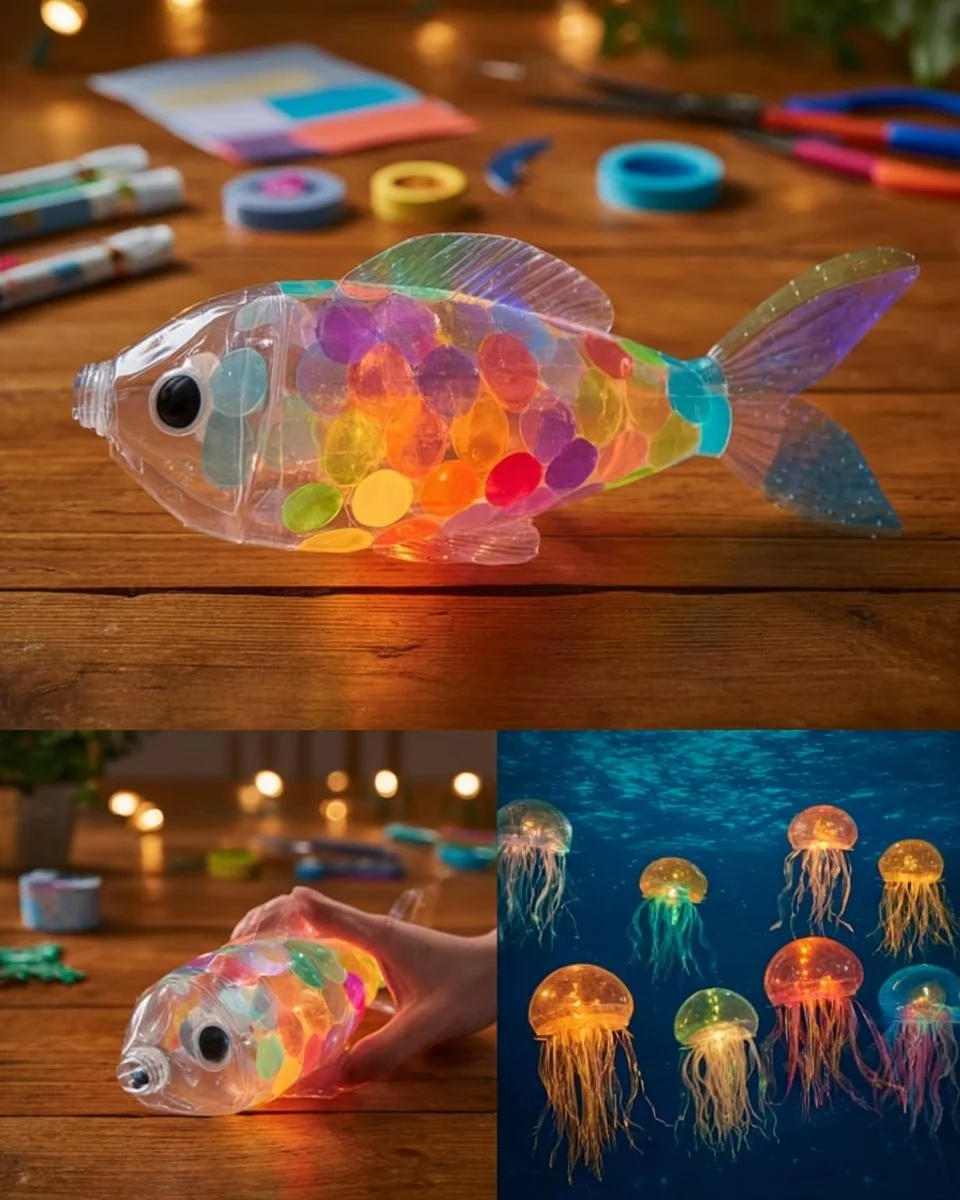
What You’ll Need
To create this charming fish lantern, you’ll want to gather a few simple materials. This list reflects a beautiful blend of everyday items, allowing you to get creative with what you have on hand:
- Clear plastic water bottle: This serves as the fish body; the more colorful, the better!
- Colored tissue paper: Bright colors that will create stunning fish scales.
- Iridescent craft paper or cellophane: Adds brilliant fins and charm to the design.
- LED fairy lights: These lights illuminate your lantern without generating heat, keeping it safe for all environments.
- Googly eyes: For that playful touch, giving personality to your glowing creation.
- Hot glue gun: The trusty tool that binds all parts together.
- Scissors: Essential for crafting the perfect shapes.
- Colored cardstock for templates: When making fins and tails, stiffer paper is highly effective.
- Clear tape: A handy tool for securing elements without the need for glue.
With these materials at hand, you’re ready to embark on your crafting adventure!
Let’s Get Crafting: Step-by-Step Instructions
Step 1: Preparing Your Canvas
Start by thoroughly cleaning and drying your plastic water bottle, then remove any labels. You want a clear canvas ready for a transformation! Your refreshed bottle is now like a blank page awaiting your creative flair.
Step 2: Adding Colorful Scales
Next, cut small circles from your colorful tissue paper. These will form the vibrant fish scales that shimmer under the enchanting glow of the lights. Using your hot glue gun, adhere these circles to the bottle in overlapping rows. Feel free to play around with colors—think of creating a beautiful gradient from warm yellows, deep reds, and lush greens to bright blues, evoking a lively underwater world. As you glue each scale, you can almost hear the sound of gentle waves lapping at the shore.
Step 3: Crafting the Fins and Tail
Now for the iridescent glow! Use your iridescent craft paper or cellophane to cut out fin and tail shapes. These elements truly bring your lantern to life, giving it a sense of movement and ethereal beauty. Secure the fins with your hot glue gun, allowing the shimmering paper to catch the light in myriad ways.
Step 4: Bringing the Fish to Life
It’s time to add some personality! Affix the googly eyes on either side of the bottle opening using hot glue. Watch as your creation transforms from a simple bottle into a vibrant, playful fish, brimming with character and ready to swim through your living space.
Step 5: Illuminating Your Creation
Carefully insert a strand of LED fairy lights into the bottle through the opening. The lights should be cool to the touch, ensuring safety no matter where you display your lantern. The warm twinkle of the lights will soon mingle with the playful colors you’ve added.
Step 6: Adding Hanging Features
If you desire to suspend your glowing fish, this is the point to secure the battery pack and add a hanging loop. A simple piece of string can be attached to the bottle’s neck, enabling you to perch your fish lantern from tree branches or hooks.
Step 7: Display with Delight
Finally, turn on the lights and watch your masterpiece glow! Whether you choose to display your fish lantern alone or as part of a vibrant underwater-themed decor, its captivating glow will make an inviting statement.
Tips and Tricks for Fish Lantern Perfection
In your crafting journey, keep these tips in mind:
- Vibrant Colors: Stick to bright tissue paper colors for maximum effect; this will mimic stained glass and effectively light up your space.
- Placement: When displaying your lantern outdoors, consider hanging it in a shaded area to maximize visibility against the night sky.
- Multiple Fish: Why stop at just one? Create several in various sizes and colors for a stunning school of fish display!
Common Beginner Mistakes to Avoid
If you’re new to crafting, it’s easy to make some common missteps. Here are a few to watch out for:
- Rushing Adhesive: Allow glue to dry fully before moving on to the next step, ensuring everything stays in place.
- Ignoring Light Placement: Make sure your LED lights have enough length to hang down within the fish body; this ensures an even distribution of light.
- Choosing the Wrong Materials: Avoid using regular light bulbs instead of LED; they can generate too much heat and pose safety risks.
Creative Variations to Explore
This project is immensely adaptable! Here are a few creative variations to spark your imagination:
- Theme Variations: Decorate your fish in colors that align with themes—consider using pastel shades for a serene coastal vibe or bright primary colors for a fun carnival theme.
- Personalized Touch: Involve kids by letting them customize the eyes, or add stickers that reflect their personality.
- Seasonal Adaptations: Modify your fish for different seasons—add autumn leaves around it for a fall aesthetic, or snowflakes for a winter theme.
Presentation Ideas for Your Lanterns
The beauty of your glowing rainbow fish lantern doesn’t end with its creation. Think about how to display it for maximum effect:
- Table Centerpiece: Position your lantern in the middle of tables during summer barbeques; it will become a focal point.
- Pathway Lighting: Line your garden path with multiple fish lanterns, lighting the way for evening events.
- Festive Decor: Integrate your glowing fish into holiday decorations; they become a pack of magical sea creatures that bring joy year-round.
Maintenance Tips for Longevity
Your glowing rainbow fish lantern may sit prominently on your porch or in your home for many seasons. Here’s how to ensure it remains in pristine condition:
- Avoid Extreme Weather: If displayed outdoors, consider bringing it inside during harsh weather conditions to protect it from rain or strong winds.
- Periodic Cleaning: Lightly dust the lantern with a soft cloth to maintain its brightness and ensure that the lights shine through beautifully.
Frequently Asked Questions
Q: Can I use a different type of bottle?
A: Absolutely! While the clear plastic water bottle works elegantly, any translucent bottle can work. Just make sure it can safely house the lights.
Q: How do I keep my fish lantern from being too heavy to hang?
A: Opt for lightweight materials and ensure that any attachments for hanging do not exceed the weight of the lantern. Secure with a strong, thin piece of string for stability.
Crafting Memories and Illuminating Spaces
As you sit amongst your friends and family, you’ll feel the delight of your glowing rainbow fish lantern illuminating not just your space, but also your hearts. Each lantern possesses its own story, echoing the joy of creation and the warmth of togetherness. Whether you decide to place it on the mantle, hang it from a tree, or gift it to a loved one, your creation will cast a magical glow that adds life and joy to any setting.
In a world often filled with hurried routines, take a moment to pause, create, and bask in the glow of your creative endeavors. Dive into this crafting adventure and let the underwater wonders shine bright in your home.
SEO Meta Description
Create a glowing rainbow fish lantern that illuminates your spaces with magic and whimsy! This step-by-step guide ensures a fun, family-friendly crafting experience.
SEO Tags
- Glowing Lantern Craft
- DIY Fish Lantern
- Kids Craft Ideas
- LED Decor
- Summer Party Decor
- Colorful Craft Projects
- Creative Family Fun


