

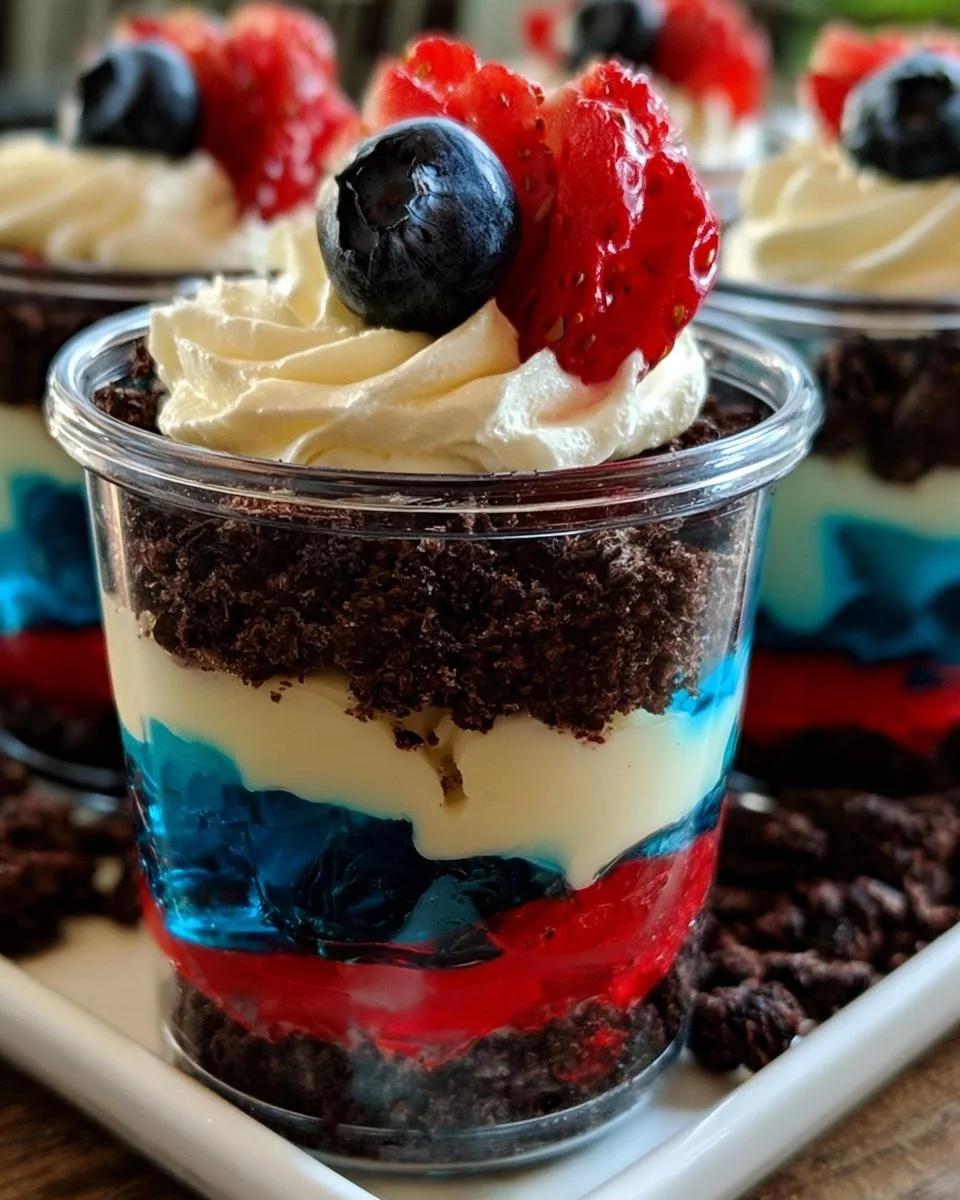
In the warm embrace of summer, as the sun bathes everything in golden light, the festive spirit beckons us to celebrate special moments with loved ones. Picture a gathering filled with laughter, the tantalizing aroma of grilled delights wafting through the air, and the vibrant colors of fresh fruit brightening the tables. Amidst this joyful scene, a dessert arrives that steals the show—is there anything more captivating than a cup brimming with layers of creamy richness, crunchy textures, and fruity bursts of flavor? Enter the dazzling Red, White, and Blue Dirt Cups. Each scoop of this delightful treat transports you to a patriotic picnic where sweetness and nostalgia harmoniously collide.
As you dig in, each layer teases your senses. The velvety vanilla pudding mingles smoothly with the delightful crunch of crushed Oreos, their bittersweet chocolate creating a dreamy contrast. The bright red gelatin dances along with the juicy strawberries, while the blueberry layer bursts with sweet-tart notes. Topped with a fluffy cloud of whipped cream and an artful arrangement of strawberries and blueberries, these dirt cups become not just a dessert, but an experience that encapsulates summer’s joy and holiday spirit.
Don’t be deceived by their playful name; these dessert cups offer a sophisticated blend of flavors and textures that promise to delight guests of all ages. Whether you’re celebrating Independence Day, hosting a birthday bash, or simply indulging your sweet tooth on a lazy afternoon, the Red, White, and Blue Dirt Cups shine bright, ready to make every occasion deliciously unforgettable.
Why You’ll Love This Recipe
These Red, White, and Blue Dirt Cups are more than just a fun dessert—they encapsulate everything glorious about summer celebrations. Their vibrant colors never fail to draw attention, lending a festive touch to tablescapes and hearts alike. The super sweet and creamy vanilla pudding harmonizes perfectly with the crunchy Oreos, creating a delightful contrast that tantalizes the palate. Not only do they look stunning, but they also offer a lightness that keeps you coming back for more.
These dirt cups are endlessly versatile, perfect for barbecues, potlucks, and Fourth of July festivities. Children adore the hands-on element of assembling their own cups, making these treats a delightful family activity. The layers can be adapted according to seasonal fruits or personal preferences, ensuring that no two cups need ever taste the same. With their charming appearance and a symphony of flavors, these cups stand out, promising to become a crowd favorite.
Preparation Phase & Tools to Use
Preparing the Red, White, and Blue Dirt Cups is a delightful process that requires just a few essential tools.
- Mixing Bowl: A large mixing bowl is vital for combining and preparing your ingredients, particularly for the vanilla pudding.
- Whisk: A whisk ensures that your pudding mixes together smoothly, avoiding any lumps for that luxurious texture we all crave.
- Clear Cups: These cups are the star of the show! Choose clear dessert cups or mason jars to display the colorful layers beautifully.
- Spoon or Spatula: These trusty tools allow you to layer the ingredients artfully, giving each cup a polished look.
- Refrigerator: An essential for firming up your layers, especially if you choose to use the gelatin in your cups.
Preparing your cups becomes an engaging activity if you set everything up in advance. Gather your ingredients, create an assembly line, and let the layering begin! The process builds anticipation, making the end result even more delightful.
Ingredients for Red, White and Blue Dirt Cups
To create these magical cups, gather the following ingredients:
- Vanilla Pudding: The base layer that adds a velvety smoothness. Choose instant pudding for quick preparation or make your own for extra flair.
- Blueberry or Blue Gelatin: Provides a fun and fruity flavor; opt for gelatin for simplicity or fresh blueberries for a natural sweetness.
- Strawberry or Red Gelatin: This adds not just vibrant color but a refreshingly sweet and tangy layer.
- Crushed Oreos: These offer the delightful crunch that contrasts beautifully with the creamy pudding, creating a delightful texture.
- Whipped Cream: A fluffy topping that enhances the overall indulgence, making each bite light and airy.
- Red and Blue Fruit: Strawberries and blueberries make perfect garnishes, offering natural freshness and enhancing the visual appeal.
Feel free to play with substitutions based on your taste preferences or dietary needs. For example, you can use dairy-free pudding or gluten-free cookies to make these cups accessible for everyone.
How to Make Red, White and Blue Dirt Cups
Creating these festive dessert cups is as easy as pie—well, easier! Follow these simple steps:
-
Prepare the vanilla pudding: Begin by preparing the vanilla pudding according to the package instructions. Stir until smooth, and set it aside to thicken slightly.
-
Layer the crushed Oreos: In clear cups, add a generous layer of crushed Oreos at the bottom. This forms a deliciously crunchy foundation.
-
Add vanilla pudding: Carefully spoon a layer of the creamy vanilla pudding on top of the Oreos. Allow it to spill over the sides for a visually appealing effect.
-
Incorporate red gelatin or strawberries: Next, add a layer of the red gelatin or a layer of fresh strawberries. The vibrancy will shock your senses.
-
Add blue gelatin or blueberries: Follow with a layer of blue gelatin or fresh blueberries, continuing the colorful trend.
-
Repeat layers: Continue layering until the cups are filled to the brim, alternating flavors for visual delight and harmonious taste.
-
Top with whipped cream: Finish each cup with a generous dollop of whipped cream, creating an inviting peak.
-
Garnish with fruit: Pop a few additional red and blue fruits on top for a beautiful presentation—these little touches make each cup shine.
-
Serve chilled: Place the completed cups in the refrigerator for a couple of hours before serving. Enjoy the refreshing harmony of flavors!
Chef’s Notes & Helpful Tips
To make the most out of your Red, White, and Blue Dirt Cups:
- Make-ahead tips: You can prepare the cups a day in advance. The flavors meld beautifully, and the cookies will soften just enough to be delightfully chewy.
- Cooking alternatives: While this recipe doesn’t require cooking, if you’d like to mix things up, consider using an air fryer for toasted flavors with the Oreos.
- Customization ideas: Get creative! Add layers of different fruits, swap out Oreos for chocolate wafer cookies, or even add a layer of yogurt for a tangy kick.
Common Mistakes to Avoid
While crafting these delightful cups, avoid these common pitfalls to ensure your dessert turns out perfectly:
- Skipping the chilling stage: Don’t rush to serve them right away; refrigerating allows the layers to set, ensuring a beautiful presentation.
- Overmixing the pudding: Whisk gently; overmixing can incorporate air bubbles that disrupt the smooth texture.
- Not crushing Oreos finely enough: Ensure the pieces are small so they can mix well with the creamy layers instead of forming large chunks.
What to Serve With Red, White and Blue Dirt Cups
Pair your dessert with these delightful options for a complete meal experience:
- Grilled Burgers: The savory richness of juicy burgers complements the sweet decadence of your dirt cups beautifully.
- Barbecue Chicken: The smoky flavor of barbecued chicken makes for an incredible contrast to the light, fruity cups.
- Fresh Salad: A vibrant summer salad with seasonal greens cuts through the sweetness, offering a refreshing balance.
- Corn on the Cob: Sweet, buttery corn enhances the nostalgic feel of summertime bites alongside the dirt cups.
- Fruit Skewers: Keep the fruity theme alive with colorful skewers of assorted fruits, enhancing the overall presentation.
- Potato Chips: For a crunchy snack, serve salty potato chips that perfectly balance the sweetness of the dessert.
- Ice Cream: Offer a scoop of vanilla or blueberry ice cream on the side for an indulgent touch.
Storage & Reheating Instructions
Store any leftovers in the refrigerator, covered with plastic wrap, for up to three days to maintain freshness. These delightful cups do not need reheating; serve them cold for the best experience. If you prepare them ahead and wish to freeze, take care to store them in an airtight container to prevent freezer burn. However, be aware that the texture of the layers and fruit may change upon thawing.
Estimated Nutrition Information
Approximate values per each cup (calories may vary based on ingredients):
- Calories: 250
- Protein: 4g
- Total Fat: 10g
- Carbohydrates: 36g
- Sugars: 18g
Note: Nutritional values are estimates and will vary based on specific ingredients used.
FAQs
1. Can I use fresh fruit instead of gelatin?
Absolutely! Fresh fruit adds a vibrant flavor and natural sweetness. Just be sure to layer them attractively in your cups.
2. How long do these cups stay fresh?
When stored properly in the refrigerator, they can last up to three days. However, the texture of the Oreos might change, so they are best enjoyed within the first day or two.
3. Can I make these cups dairy-free?
Yes! Use dairy-free pudding and whipped cream alternatives. Coconut whipped cream works wonderfully and adds a subtle tropical flavor.
4. What if I don’t have clear cups?
Mason jars, small bowls, or even glasses can suffice. The key is to choose something that showcases the colors of your layers.
5. Can I add more layers?
Certainly! Feel free to double the layers or include other flavors based on your preferences. Just ensure that the overall structure holds up.
Conclusion
The Red, White, and Blue Dirt Cups make the perfect addition to any celebration, infusing your gathering with joy, nostalgia, and deliciousness. Each bite—a rhythm of flavor and texture—invites you to slow down, savor, and share a moment of bliss. As you layer these cups, remember that they tell a story of summer dreams and heartwarming memories. Try your hand at this delightful recipe, and let your celebrations shine with sweetness—it’s a treat worth savoring! Enjoy the process, and watch them disappear as everyone clamors for seconds!
Print
Red, White, and Blue Dirt Cups
- Prep Time: 15 minutes
- Cook Time: 0 minutes
- Total Time: 2 hours 15 minutes
- Yield: 6 servings 1x
- Category: Dessert
- Method: No-Cook
- Cuisine: American
- Diet: Vegetarian
Description
Delightful dessert cups layered with creamy vanilla pudding, crunchy Oreos, fresh strawberries, and blueberries, perfect for summer celebrations.
Ingredients
- 1 package Vanilla Pudding
- 1 package Blueberry or Blue Gelatin
- 1 package Strawberry or Red Gelatin
- 2 cups Crushed Oreos
- 2 cups Whipped Cream
- 2 cups Red and Blue Fruit (Strawberries and Blueberries)
Instructions
- Prepare the vanilla pudding according to the package instructions. Stir until smooth and set aside.
- Layer the crushed Oreos in clear cups to form a crunchy foundation.
- Add a layer of vanilla pudding on top of the Oreos.
- Incorporate a layer of red gelatin or fresh strawberries.
- Follow with a layer of blue gelatin or fresh blueberries.
- Continue layering until the cups are filled, alternating flavors.
- Top each cup with whipped cream and garnish with additional fruit.
- Serve chilled and enjoy!
Notes
Make-ahead tips: Prepare the cups a day in advance for the best flavor. Avoid overmixing the pudding to keep a smooth texture.
Nutrition
- Serving Size: 1 cup
- Calories: 250
- Sugar: 18g
- Sodium: 150mg
- Fat: 10g
- Saturated Fat: 5g
- Unsaturated Fat: 2g
- Trans Fat: 0g
- Carbohydrates: 36g
- Fiber: 1g
- Protein: 4g
- Cholesterol: 20mg






