

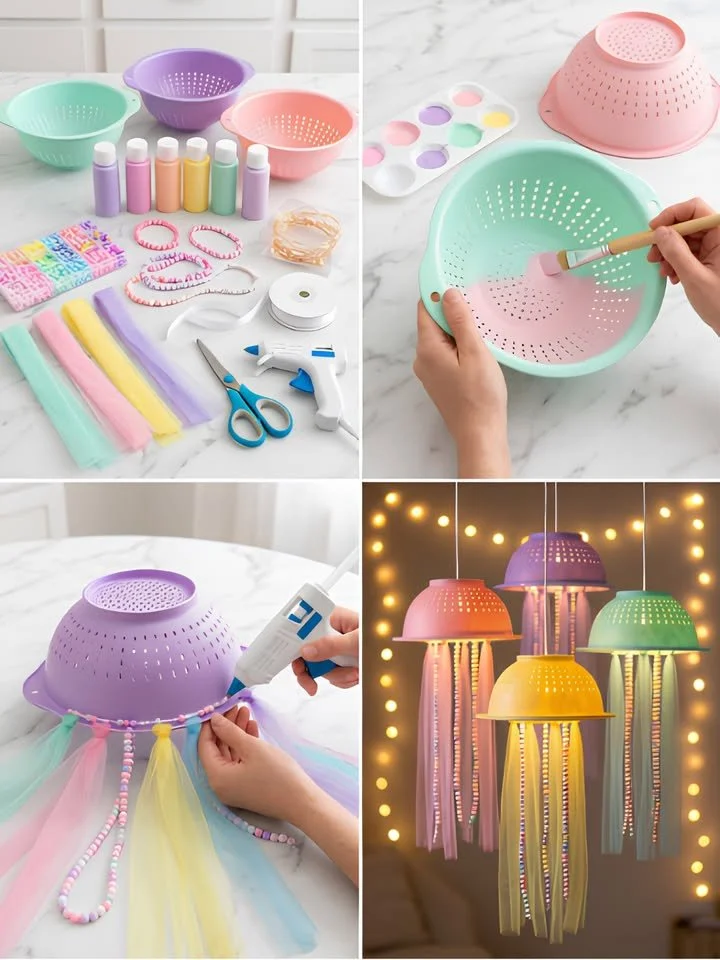
Illuminate Your Space with DIY Jellyfish Lanterns 🪼✨
Imagine this: a cozy evening at home, with soft music playing in the background, and the faint sound of laughter floating in from another room. A table filled with colorful snacks and homemade treats sits next to you, but your focus is pulled towards a newly crafted array of enchanting jellyfish lanterns. Each glowing colander sways gently in the warm breeze, their multicolored ribbons cascading down like the tentacles of a majestic creature from the deep sea. This whimsical display isn’t just a feast for the eyes; it’s a heartfelt token of creativity and love, illuminating both your space and your spirit.
In a world that often rushes past the little joys, DIY projects like these jellyfish lanterns offer us a chance to slow down, create, and truly appreciate the art of crafting. Whether you’re commemorating a special occasion or simply adding a splash of decor to your home, these magical lanterns can be the perfect project. With a few simple materials, a sprinkle of imagination, and maybe a bit of bubbly creativity, you’ll find yourself swept away into a world of glowing jellyfish joy.
Why People Love This Idea
When you think about the essence of crafting, what comes to mind? For many, it’s about expressing oneself, finding calm in the chaos, and creating something beautiful from the ordinary. These jellyfish lanterns encapsulate all that and more. They are a celebration of color, whimsy, and nostalgia—reminding us of childhood days spent exploring tide pools or enchanting stories sprawled between the pages of our favorite books.
Their charm lies not only in their aesthetic appeal but in their versatility. You can hang them indoors to create a dreamy atmosphere in a bedroom, or use them as party decorations for a birthday bash or a whimsical wedding. They bring a magical glow that transforms any dull space into an underwater wonderland, shimmering with life and imagination.
The Benefits of Crafting Jellyfish Lanterns
Creating jellyfish lanterns can not only beautify your environment, but also provide a plethora of benefits. For starters, the process is incredibly therapeutic. Engaging in hands-on projects helps reduce stress, fosters mindfulness, and allows you to express your creativity. Each brush stroke and bead threaded is a small moment of peace in our often chaotic lives, letting your worries drift away.
Furthermore, these lanterns are eco-friendly and budget-friendly. Using simple plastic colanders, discarded ribbons, and fairy lights means you can easily keep costs down while crafting something unique and extraordinary. You can even involve your kids or friends in the process, making it a wonderful bonding experience. Plus, who doesn’t love showing off their handcrafted magic at gatherings or on social media?
Gathering Your Materials
Now that you’re itching to dive into this crafty adventure, let’s gather our supplies! The materials needed are simple and can likely be found around your home or at a local craft store:
- Plastic colanders (in any vibrant color)
- Acrylic craft paint (optional, for adding a personal touch)
- Paintbrush
- Assorted beads (think of colors and textures that inspire you)
- Tulle ribbons or fabric strips (flowy and colorful)
- Ribbon or string for hanging
- Battery-operated fairy lights (for that magical glow)
- Hot glue gun and glue sticks
- Scissors
As you pull together your materials, think about the color palette that excites you. Dreamy pastel hues? Bold primary shades? This is your project, so let your creativity shine!
Step-by-Step Instructions
Let’s get crafting! As you dive into creating these lanterns, imagine the final glowing display illuminating your room like a serene ocean wave.
Step 1: Paint the Colanders
If you choose to paint your colanders, now is the time to let your imagination run wild! Maybe you want to create a soft gradient or a bold splash of color. Grab your brush and apply a few coats to the inside of the colander, and let it dry completely. Just picture the way your vibrant hues will shine against the twinkling lights.
Step 2: Prepare the Tentacles
Next, you’ll want to create the jellyfish’s delicate tentacles. Cut long strips of tulle or fabric into varying lengths. Think about how graceful and free-flowing they will appear as they sway gently. Consider adding beads to the ribbons, stringing them at intervals for added charm. This will create shimmering tentacles that’ll dance in the light, adding to the ethereal look.
Step 3: Attach the Decorations
With the colander turned upside down, it’s time to bring your jellyfish to life! Using the hot glue gun, attach your flowing tulle strips and beaded strands along the rim of the colander. Allow your creativity to flourish here—don’t worry about making it perfect! The beauty of these lanterns lies in their whimsical charm and unique designs.
Step 4: Add the Lights
Now for the truly magical part! Carefully place your battery-operated fairy lights inside the colander, taking care to tuck the battery pack securely inside or attaching it to the top with a piece of ribbon. When you activate these lights, they’ll envelop your jellyfish in a warm, inviting glow that will leave everyone enchanted.
Step 5: Create a Hanger
To finish your gorgeous jellyfish, tie a piece of ribbon or string through some of the colander holes to form a loop for hanging. This is perfect for suspending your lanterns from ceilings, branches, or hooks—just imagine the playful sway they’ll have!
Step 6: Display Your Jellyfish
Hang your lanterns at different heights, letting them float like magical creatures in your space. When the sun sets, switch on the fairy lights and bask in the soft glow as they dance around, turning your room or outdoor space into a dreamy undersea paradise.
Tips & Tricks for Your DIY Adventure
As with any craft, there are a few helpful hints to keep your creative flow smooth and enjoyable.
- Paint with Care: If you’re painting, make sure to do it in a well-ventilated area and allow each coat ample time to dry.
- Beads and Ribbons: Don’t be afraid to mix and match different ribbon textures and colors. Layering adds depth and whimsy.
- Multi-Purpose Lights: Consider using lights that have a timer so that your lanterns glow automatically at night! It can be a delightful surprise waiting for you each evening.
- Safety First: When working with hot glue, be cautious and let children help only with supervision. Hot glue guns can be tricky!
Avoiding Common Mistakes
One of the most common mistakes is rushing through the drying time of the paint or glue. Patience is crucial—allowing your items to dry ensures that they’re sturdy and well-crafted. Additionally, be mindful of not overloading your colanders with too many beads; while embellishment is key, you want to maintain their lightness and ethereal feel.
Creative Variations to Explore
Once you’ve mastered the jellyfish design, think about how you can personalize it! Could you create a themed set adorned with seashells? Or perhaps incorporate glitter for an extra magical touch? You could even consider making larger, more dramatic jellyfish for outdoor gardens or special events.
The Joy of Displaying Your Lanterns
Displaying your jellyfish lanterns isn’t just about lighting up a room; it’s about creating a unique ambiance that reflects your personality and creativity. Hang them above a cozy reading nook, use them as centerpieces for your next seaside-themed gathering, or string them along a patio for warm summer evenings under the stars. Their enchanting glow will invite your friends and family to relax, unwind, and get lost in the magic of your creations.
Frequently Asked Questions
-
Can these lanterns be used outdoors?
Absolutely! Just ensure that your fairy lights are battery-operated and weather-resistant. -
How long does it take to make a lantern?
Depending on your painting and drying time, you can make a lantern in about 1-3 hours. -
Can I use other materials instead of colanders?
While colanders work beautifully, consider using similar-shaped items like wire baskets or even papier-mâché forms for different looks.
Conclusion: Crafting Lasting Memories
Creating DIY jellyfish lanterns is more than just a craft; it’s an expedition of love, creativity, and joy. Each lantern tells a story—a story of imagination woven into the fabric of your everyday life. As the sun sets and their lights shimmer into life, may they remind you of the deep ocean of creativity that lies within you, forever ready to illuminate the world around you.
So gather your loved ones, pick up your tools, and let the magic begin! Your home will soon be filled with colorful, glowing jellyfish, casting light on cherished memories and inspiring moments yet to come.
Meta Description
Unleash your inner artist with these enchanting DIY jellyfish lanterns! Perfect for cozy decor, craft parties, and unforgettable celebrations, let your creativity shine in your next project!
SEO Tags
- DIY crafts
- Jellyfish lanterns
- Home decor
- Creative projects
- Party decorations
- Kids crafts
- Eco-friendly crafts






