

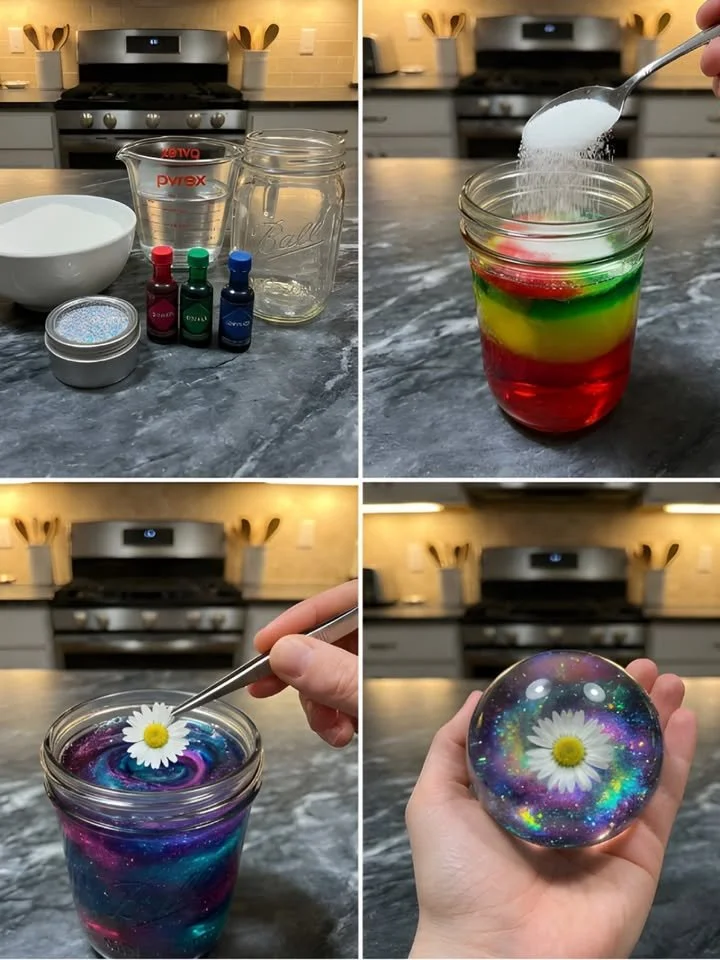
Kids Think This is MAGIC… ✨
Imagine this: it’s a cozy Saturday afternoon, and the sun is casting a warm glow over your kitchen. Scattered across the table are the remnants of breakfast—syrup spills, crumbs, and the inevitable stack of dishes waiting for their turn in the sink. But instead of cleaning, you and your children are about to embark on an adventure that feels a little like a science experiment, a bit like a fairy tale, and wholly captivating. Today, you’re going to create something so mesmerizing that your kids will not only be enchanted but will also think it’s pure magic.
With eager eyes and bubbling excitement, your children gather around a small glass jar for an experience that will combine creativity with science—a magical concoction made of simple ingredients that will have them spellbound. What’s the secret? A delightful mix of sugar, water, and a splash of color that transforms ordinary ingredients into shimmering crystals right before their eyes!
Why People Love This Idea
The beauty of this activity lies not just in the end result but in its simplicity and the way it captivates the imaginations of children (and adults). In a world so heavily focused on screens and digital distractions, this hands-on project brings the family together. It’s an opportunity for bonding, as you share curiosity and awe about the transformations happening before you. Kids are naturally drawn to colorful things and the characteristics of materials; a project like this ignites their scientific curiosity while providing a canvas for their artistic expression.
Parents have raved about this simple yet enchanting activity because it transforms what could be a mundane day into a memorable one. Not only do they get to witness the delight on their children’s faces, but they also get a peek into their little worlds—a whirlwind of emotions, observations, and joyful surprises.
Benefits and Best Occasions to Use It
This project is perfect for countless occasions—a rainy day at home, a birthday party, or even as an activity during playdates. It’s versatile; you can enchant kids after a festive holiday dinner or integrate it into a summer afternoon’s fun, allowing imagination and creation to thrive.
Not only does this craft capture the kids’ attention, but it also offers several benefits:
- Fine Motor Skills: Measuring, pouring, and stirring enhance manual dexterity.
- Problem Solving: Children will engage their minds to figure out how to create the ideal mixture.
- Color Theory: Mixing colors introduces them to basic art concepts.
- STEM Learning: Kids dive into scientific principles like crystallization while having fun.
Materials You’ll Need
To dive into this magical realm, gather these basic ingredients and tools. Don’t worry; you probably have most of them at home already:
- Sugar: Granulated sugar is perfect for creating those beautiful crystals.
- Water: The main base for your mixture.
- Food Coloring: A few drops of vibrant colors to make the mixture pop!
- Glitter (optional): A sprinkle of glitter can give your creation an extra twinkle. After all, magic deserves some sparkle!
- Small Glass Jar: This will be the mystical vessel for your magical creation.
- Spoon: For mixing and stirring, an essential tool in our magic workshop.
Step-by-Step Instructions
Now that you have your materials gathered (and maybe even the kids brimming with excitement), let’s dive into the process. This will be a memorable activity that thrives on exploration.
Step 1: Create Your Colorful Base
Begin this adventure by pouring some water into your glass jar. Add a few drops of your chosen food coloring to the water. Mix it well with your spoon, feeling the vibrations of anticipation as the colors swirl together.
Step 2: Sweeten the Deal
Next, slowly begin adding sugar. As you pour, keep stirring the mixture gently. Watch as it transforms into a thicker solution, almost like a magical potion gaining strength. You’ll feel like a sorcerer as the mixture thickens and becomes a beautiful example of science in action.
Step 3: Swirl in Some Rainbow
Now comes the exciting part! Take a moment to explore your creative spirit. Grab different colors of food coloring and, using a toothpick or the spoon, swirl in these colors to create a soft rainbow effect. It’s truly like painting a canvas, and every swirl is another stroke in your masterpiece.
Step 4: The Crystal Transformation
Once you’ve achieved your artistic vision, let the jar rest undisturbed in a safe space. This is where the magic happens! As the mixture sits, you’ll see the beginnings of a beautiful crystal-like formation. After a few hours, check back in with your creation and marvel at how it has evolved!
Helpful Tips for a Successful Experience
- Patience is Key: This project requires time—encourage your kids to peek in on the jar and discuss the changes happening.
- Humidity Matters: If it’s too humid, crystals might not form as expected, so try it on a dry day for the best results.
- Explore Variations: Don’t hesitate to experiment with flavors and colors. Try mixing blue and yellow for a playful green hue or layering different colors to create a stunning striped effect.
Common Mistakes to Avoid
- Over-saturating the sugar: If you add too much, the solution won’t crystallize correctly, leading to a sticky mess.
- Stirring too vigorously: While excitement is important, stirring too much can disturb the crystallization process.
Creative Variations
This magical craft can easily be adapted to suit different themes:
- Seasonal Colors: Use fall colors like red, orange, and yellow for autumn or frosty blues and whites for winter!
- Flavored Variants: If desired, add a few drops of flavor extracts to make your creations not just a visual treat but aromatic too! Consider adding vanilla or mint extract—just remember, these won’t be for consumption.
Presentation & Decoration Ideas
Once your crystals are formed, think of ways to display them. You can:
- Layer the colorful mixtures in different jars.
- Tie a ribbon around the jars for a thoughtful gift.
- Create a little mini-laboratory display on your kitchen counter.
Storage Tips
If you want to store your creations for later, keep them in a cool, dry place. However, be aware that over time, they may lose their sparkly charm and eventually dissolve back into sugar.
Frequently Asked Questions
-
How long will it take to see the crystals form?
Depending on the temperature and humidity, it can take anywhere from a few hours to a couple of days. Just be patient! -
Can we eat it?
While it’s made of food-safe ingredients, it’s best to enjoy the experience rather than the product itself.
Conclusion: Let the Magic Continue
In a world overflowing with screens and distractions, this simple craft ignites the imagination, encourages creativity, and instills a sense of wonder. Observing the transformation from a liquid concoction to a dazzling crystal formation elicits pure joy in children and nostalgia for parents who recall the joy of hands-on discovery.
So why not grab those ingredients and make some magic together? It’s a delightful way to spend an afternoon, and who knows—you might just create a new family tradition. As you and your kids eagerly observe, discuss, and marvel at the process, you’ll create not just beautiful crystals but rich memories that will shine brightly for years to come.
Let the magic unfold—because sometimes the best adventures start in the kitchen.
Meta Description: Discover a magical craft that combines fun, science, and creativity with our enchanting crystal-making activity! Perfect for kids, this hands-on project will captivate young imaginations and create lasting memories.
SEO Tags:
- kids crafts
- magical science experiments
- crystal making for kids
- fun family activities
- creative projects for children
- DIY colorful crystals
- home science experiments






