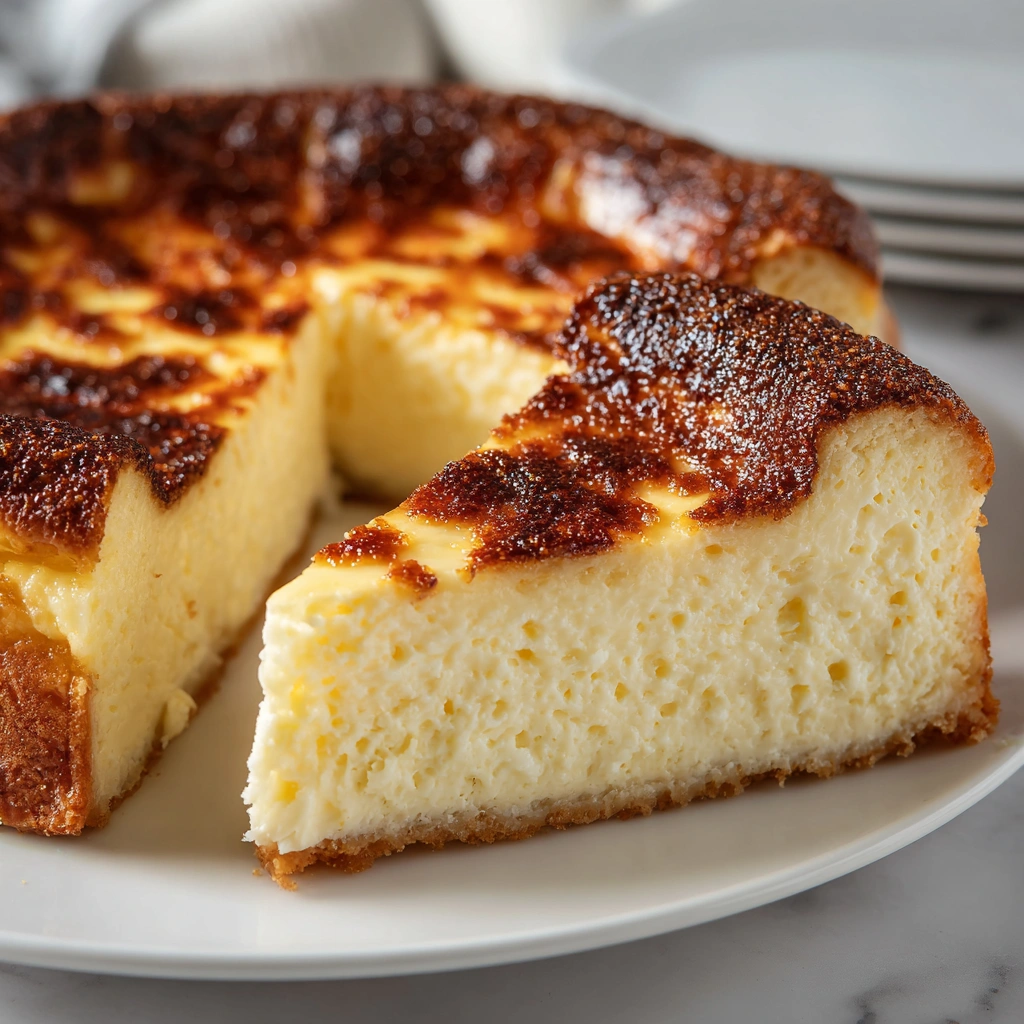
Introduction to Indulgent Burnt Basque Cheesecake in a Loaf Pan
Welcome to the world of indulgence with my Indulgent Burnt Basque Cheesecake in a Loaf Pan! If you’re like me, juggling a busy life while trying to whip up something special can feel overwhelming. This cheesecake is the perfect solution for those hectic days when you want to impress your loved ones without spending hours in the kitchen. With its rich, creamy texture and that delightful burnt top, it’s a showstopper that’s surprisingly easy to make. Trust me, this dessert will have everyone asking for seconds!
Why You’ll Love This Indulgent Burnt Basque Cheesecake in a Loaf Pan
This Indulgent Burnt Basque Cheesecake in a Loaf Pan is a dream come true for busy moms and professionals alike. It’s quick to prepare, taking just 20 minutes of hands-on time. The unique loaf pan shape makes it easy to slice and serve, perfect for gatherings or a cozy family dinner. Plus, the rich flavor and creamy texture will have everyone raving about your baking skills!
Ingredients for Indulgent Burnt Basque Cheesecake in a Loaf Pan
Gathering the right ingredients is the first step to creating this delightful dessert. Here’s what you’ll need:
- Cream Cheese: The star of the show! It gives the cheesecake its rich and creamy texture. Make sure it’s softened for easy mixing.
- Granulated Sugar: This sweetens the cheesecake and balances the tanginess of the cream cheese. You can use less if you prefer a less sweet dessert.
- Eggs: They provide structure and richness. Using large eggs is best for this recipe.
- Heavy Cream: This adds a luxurious creaminess that makes each bite melt in your mouth. You can substitute with half-and-half for a lighter version.
- Vanilla Extract: A splash of vanilla enhances the flavor, making it even more indulgent. Pure vanilla extract is always a great choice.
- All-Purpose Flour: Just a bit helps to stabilize the cheesecake. If you’re gluten-free, you can use a gluten-free flour blend instead.
For exact measurements, check the bottom of the article where you can find everything listed for easy printing. Happy baking!
How to Make Indulgent Burnt Basque Cheesecake in a Loaf Pan
Now that you have your ingredients ready, let’s dive into the steps to create this Indulgent Burnt Basque Cheesecake in a Loaf Pan. Each step is simple, and I promise you’ll feel like a pro in no time!
Step 1: Preheat the Oven
First things first, preheat your oven to 400°F (200°C). Preheating is crucial because it ensures even baking. A hot oven helps achieve that beautiful burnt top while keeping the inside creamy. Trust me, you want that contrast!
Step 2: Prepare the Cream Cheese Mixture
In a large mixing bowl, beat the softened cream cheese and granulated sugar together until smooth. You want a creamy, lump-free texture. This step is vital for a silky cheesecake. I usually use a hand mixer for this, but a whisk works too if you’re feeling strong!
Step 3: Incorporate the Eggs
Next, add the eggs one at a time. Mix well after each addition. This helps to incorporate air, making your cheesecake light and fluffy. Don’t rush this step; take your time to ensure everything is well blended.
Step 4: Add Cream and Vanilla
Now, stir in the heavy cream and vanilla extract until fully combined. The heavy cream adds that luxurious texture we all crave. You’ll notice the batter becoming richer and more decadent. It’s like a hug in a bowl!
Step 5: Fold in the Flour
Gently fold in the all-purpose flour. Use a spatula to avoid overmixing. You want to keep that airy texture. Overmixing can lead to a dense cheesecake, and we definitely want to avoid that!
Step 6: Pour into the Loaf Pan
Line your loaf pan with parchment paper for easy removal. Pour the batter in, smoothing the top with a spatula. Make sure it’s evenly distributed. This will help it bake uniformly, giving you that perfect shape.
Step 7: Bake to Perfection
Place the loaf pan in the preheated oven and bake for 50-60 minutes. Keep an eye on it! The top should be deeply browned, and the center should still be slightly jiggly. This is the secret to that creamy texture we love!
Step 8: Cooling and Refrigeration
Once baked, allow the cheesecake to cool at room temperature. This step is essential for the flavors to develop. After it cools, refrigerate for at least 4 hours. Chilling helps set the cheesecake, making it easier to slice. Patience is key here!
Tips for Success
- Always use room temperature ingredients for a smoother batter.
- Don’t skip the cooling step; it enhances the flavor and texture.
- For a deeper flavor, make the cheesecake a day in advance.
- Check for doneness by gently shaking the pan; a slight jiggle is perfect.
- Experiment with toppings like fresh berries or a drizzle of chocolate for added flair!
Equipment Needed
- Loaf Pan: A standard 9×5 inch loaf pan works best. If you don’t have one, a round cake pan can be used, but adjust baking time.
- Mixing Bowls: Use a large bowl for mixing. A glass or stainless steel bowl is ideal for easy cleaning.
- Hand Mixer or Whisk: A hand mixer makes it easier, but a whisk can work if you’re up for a workout!
- Spatula: A rubber spatula is perfect for folding in ingredients and scraping the bowl clean.
Variations
- Chocolate Swirl: Add melted chocolate to the batter for a rich chocolate flavor. Swirl it in before baking for a marbled effect.
- Citrus Zest: Incorporate lemon or orange zest into the batter for a refreshing citrus twist that brightens the flavor.
- Gluten-Free: Substitute all-purpose flour with a gluten-free flour blend to make this cheesecake suitable for gluten-sensitive friends.
- Lower Sugar: Use a sugar substitute like erythritol or stevia to reduce the sugar content without sacrificing sweetness.
- Fruit Toppings: Top with fresh berries, caramelized peaches, or a berry compote for a burst of flavor and color.
Serving Suggestions
- Pair with a dollop of whipped cream for extra creaminess.
- Serve alongside fresh berries for a pop of color and flavor.
- Drizzle with chocolate or caramel sauce for a decadent touch.
- Enjoy with a cup of coffee or tea to balance the sweetness.
- Garnish with mint leaves for a refreshing finish.
FAQs about Indulgent Burnt Basque Cheesecake in a Loaf Pan
Can I use a different pan for this cheesecake?
Absolutely! While a loaf pan is perfect for this Indulgent Burnt Basque Cheesecake in a Loaf Pan, you can use a round cake pan. Just keep an eye on the baking time, as it may vary slightly.
How do I know when the cheesecake is done baking?
The top should be deeply browned, and the center should have a slight jiggle. If it’s too firm, it may be overbaked. Remember, it will continue to set as it cools!
Can I make this cheesecake ahead of time?
Yes! In fact, making it a day in advance enhances the flavor. Just store it in the refrigerator after it cools completely. It’s a great make-ahead dessert for busy days!
What can I do with leftovers?
If you have any leftovers, store them in an airtight container in the fridge. They’ll keep well for up to 3 days. Enjoy them chilled or at room temperature!
Can I freeze the cheesecake?
Yes, you can freeze this cheesecake! Wrap it tightly in plastic wrap and then in aluminum foil. It can be frozen for up to 2 months. Thaw it in the fridge overnight before serving.
Final Thoughts
Creating this Indulgent Burnt Basque Cheesecake in a Loaf Pan is more than just baking; it’s about crafting a moment of joy for yourself and your loved ones. The rich, creamy texture and that beautifully burnt top make it a dessert that feels special, yet it’s surprisingly simple to prepare. Whether you’re celebrating a special occasion or just treating yourself after a long day, this cheesecake is sure to bring smiles. So, roll up your sleeves, embrace the process, and enjoy every delicious bite. Trust me, you’ll be glad you did!
Print
Indulgent Burnt Basque Cheesecake in a Loaf Pan Awaits!
- Prep Time: 20 minutes
- Cook Time: 60 minutes
- Total Time: 4 hours 20 minutes
- Yield: 8 servings 1x
- Category: Dessert
- Method: Baking
- Cuisine: Spanish
- Diet: Vegetarian
Description
A rich and creamy burnt Basque cheesecake baked in a loaf pan, offering a unique twist on the classic dessert.
Ingredients
- 2 cups cream cheese, softened
- 1 cup granulated sugar
- 3 large eggs
- 1 cup heavy cream
- 1 teaspoon vanilla extract
- 1/4 cup all-purpose flour
Instructions
- Preheat the oven to 400°F (200°C).
- In a large mixing bowl, beat the cream cheese and sugar until smooth.
- Add the eggs one at a time, mixing well after each addition.
- Stir in the heavy cream and vanilla extract until fully combined.
- Gently fold in the flour until just incorporated.
- Pour the batter into a lined loaf pan.
- Bake for 50-60 minutes or until the top is deeply browned and the center is slightly jiggly.
- Allow to cool at room temperature before refrigerating for at least 4 hours.
- Serve chilled and enjoy!
Notes
- For best results, use room temperature ingredients.
- Let the cheesecake cool completely before refrigerating.
- This cheesecake can be made a day in advance for better flavor.
Nutrition
- Serving Size: 1 slice
- Calories: 350
- Sugar: 25g
- Sodium: 200mg
- Fat: 28g
- Saturated Fat: 17g
- Unsaturated Fat: 8g
- Trans Fat: 0g
- Carbohydrates: 25g
- Fiber: 0g
- Protein: 6g
- Cholesterol: 120mg