
Crafting a Touch of Magic: CD Dragonfly Sun Catchers
There’s something wonderfully nostalgic about the glint of sunlight dancing off vibrant surfaces on a warm afternoon. Imagine yourself with a small group of friends or family huddled outside, laughter echoing amid the sound of rustling leaves. You’ve just transformed a pile of old CDs into breathtaking dragonfly sun catchers that shimmer in the afternoon glow, each one reflecting a rainbow of colors that flicker in the breeze. This isn’t just a craft; it’s a joyful memory in the making.
As we step into the world of DIY creations, there’s an undeniable satisfaction that comes from turning items that were once destined for the trash into beautiful pieces of art. The joy of creating lies not just in the final product but in the process itself—embracing creativity, bonding with loved ones, and celebrating the beauty of nature.
CD dragonfly sun catchers are a delightful project that’s perfect for a sunny day, a family gathering, or even a quiet afternoon of solitude. Let’s dive deep into why these whimsical creations have captured the hearts of many and how you can make them too.
Why People Love This Project
This charming craft speaks to both the young and young at heart; it brings together creativity, sustainability, and a playful spirit. Who wouldn’t want to see their garden or home adorned with iridescent dragonflies made from old CDs that catch the light and reflect colorful patterns?
Moreover, crafting is therapeutic. The rhythmic movement of cutting, gluing, and decorating lets one escape into a creative flow that can melt away the stresses of daily life. Whether you’re looking for a way to bond with your children or simply seeking a new hobby, CD dragonfly sun catchers offer a fulfilling experience. They’re simple enough for kids yet customizable enough for adults to unleash their artistic flair.
Materials That Spark Joy
As we embark on this crafting adventure, here’s everything you’ll need:
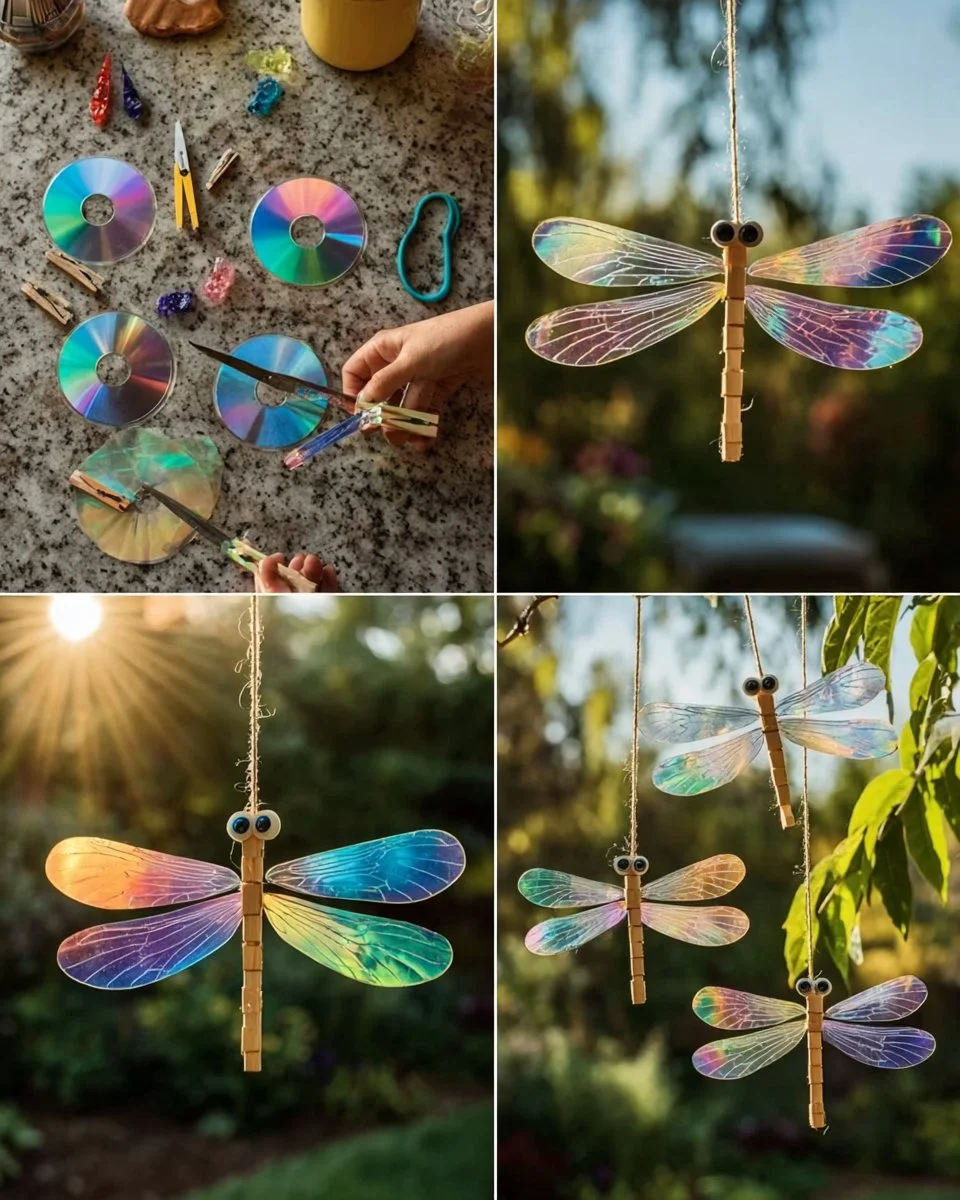
- Old CDs: These will form the wings of your dragonfly. Don’t fret about the designs; any scratched or unused CD will work beautifully.
- Wooden clothespins: The body of your dragonfly, sturdy and rustic, adds a lovely charm.
- Googly eyes: These whimsical touches give personality to your creations—who can resist a little fun?
- Hot glue gun: Your trusty buddy in crafting, perfect for securing pieces together.
- Scissors: Strong scissors will help you cut the CDs into shapes with precision.
- String or fishing line: Essential for hanging your dragonflies and giving them that magical floating effect.
- Decorative gems or beads: For those who love a bit of sparkle, these add dimension and depth to your creation.
These materials are all relatively common—there’s a good chance you already have most of them at home. Their simplicity contrasts beautifully with the complexity of creativity that can unfold when you start crafting.
Step-by-Step Instructions
Crafting these dragonflies isn’t just about following instructions; it’s about embracing the experience. Let’s walk through each step together, shall we?
Step 1: Cut the CDs into Wing Shapes
Begin by taking your old CDs and envisioning their transformation. Use strong scissors to cut the CDs into small oval wing shapes. The edges don’t need to be perfect; a bit of variation will only add charm to each dragonfly. As you cut, feel the crispness of the plastic and marvel at how something once deemed obsolete is about to take flight in a new incarnation.
Step 2: Attach the Wings to the Clothespins
With your oval wings ready, grab your wooden clothespins. Take a moment to appreciate their rustic charm; they’re the perfect base for your dragonfly. Using your hot glue gun, apply glue to one side of the clothespin and attach two wings. Then, flip it over and repeat. The contrast of the shiny CDs against the textured wood creates a fascinating visual.
Step 3: Stick on the Googly Eyes
Now for the most fun part: giving your dragonfly a personality! Carefully attach googly eyes to the top of the clothespin using hot glue. Just like that, your dragonfly is starting to come to life. Help your little companions pick out funny or silly eyes to add a touch of whimsy.
Step 4: Add a String for Hanging
Once your dragonfly is assembled and the glue has dried, it’s time to prepare it for flight (or hang it). Tie a loop of string or fishing line to one end of the clothespin. Fishing line, in particular, lends a celestial floating effect that will amplify the charm when these creatures sway gently in the wind.
Step 5: Sparkle with Colorful Gems or Beads
If you’re feeling especially adventurous, use decorative gems or beads to embellish your dragonfly. Glue them on in strategic spots where you think they’d catch the light, creating flashes of color that will twinkle invitingly in the sun.
Step 6: Hang Your Dragonflies
Finally, find a sunny spot—whether that be outside in your garden or near a bright window—and hang your artistry. Position them in such a way that they can dance and shimmer in the sunlight. Take a moment to step back and appreciate the joyful magic you have created.
Helpful Tips and Beginners’ Mistakes to Avoid
As you embark on this creative journey, there are a few helpful tips to keep in mind:
- Safety First: Always supervise children when they’re using scissors or hot glue. For younger kids, consider pre-cutting the CD shapes to minimize risk.
- Fishing Line: This creates that wonderful floating effect. If you’re hanging your dragonflies outside, consider using fishing line so they appear to hover with magical grace.
- Direct Sunshine: Place your dragonflies where they can soak up the sunshine. The more sun, the more colorful reflections you’re likely to see in your space.
Common mistakes include not allowing enough time for the glue to dry before moving the creation or trying to personalize them too much without a clear plan. Trust the process; sometimes, the most delightful designs come from a moment’s inspiration!
Creative Variations
The world of crafting is vast and inspiring. As you grow more comfortable making traditional dragonfly designs, consider branching out:
- Themed Creations: Create dragonflies that reflect seasons or holidays. For instance, use pastel-colored beads for spring or darker motifs for autumn.
- Wings a Different Shape: Experiment with other wing shapes like hearts or stars to create an entirely new character.
- Larger Scale Projects: Combine multiple dragonflies to create a garden mobile hung from a tree branch.
With each variation, embrace the chance to explore your creativity while adding personal touches.
Presentation Ideas
Once you’ve finished your dragonfly sun catchers, think about how best to display them. They can be placed along the railings of a porch, hung from strategically chosen spots in the garden, or even made as part of a centerpiece for a spring-themed gathering. Each dragonfly becomes an inviting invitation for nature’s beauty.
Long Lasting Enjoyment
You may be wondering about the longevity of your lovely creations. Most of the materials are quite durable, but do take care to bring them indoors during severe weather to extend their lifespan. A gentle wipe with a soft cloth can help keep them looking fresh.
Frequently Asked Questions
You might have a few questions swirling in your mind after reading this, so let’s address the most common ones:
-
Can I use other materials besides CDs?
Absolutely! You might experiment with plastic lids or cardboard for a more eco-friendly version, just be mindful of their longevity in outdoor settings.
-
What age group is this project suitable for?
This craft is perfect for ages 5 and up, with appropriate adult supervision during the cutting and gluing stages.
-
How can I customize them further?
The sky’s the limit! Paint them, add glitter, or even use washi tape to create different patterns.
Conclusion: Embrace the Crafting Journey
Creating CD dragonfly sun catchers is much more than an arts and crafts project; it’s a unique opportunity to create lasting memories, unleash your creativity, and share moments of laughter with loved ones. Each dragonfly is a testament to your imagination, transforming the mundane into magic.
So gather your materials, find a cozy crafting spot, and let your imagination soar. Emerging from this crafting oasis are not just decorations—they are symbols of joy, creativity, and the beauty of turning something old into new. They sparkle in the sunlight, just like the moments shared while making them. Here’s to crafting, sunlight, and the magic of creativity!
Meta Description: Discover the joy of making CD dragonfly sun catchers with our in-depth guide! Transform old CDs into sparkling treasures that dance in the sunlight while creating treasured memories with your loved ones.
SEO Tags: CD dragonfly sun catchers, DIY craft projects, upcycled crafts, entertaining children, sun catchers, colorful decorations, creative family bonding


