

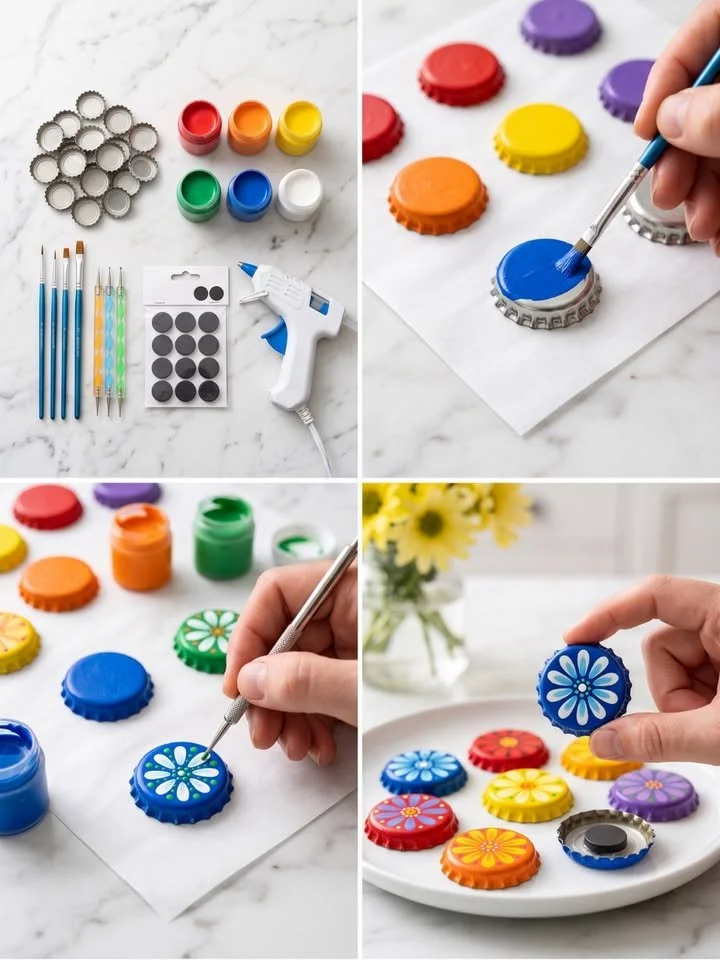
Transform Your Old Bottle Caps into Charming Flower Magnets
There’s something magical about transforming everyday items into delightful creations. Perhaps you remember a cozy afternoon spent with family and friends, surrounded by scraps of paper, colorful paints, and laughter, as everyone dived into crafting unique treasures. Now, imagine recapturing that sentiment by transforming ordinary metal bottle caps into vibrant flower magnets that add a cheerful touch to your fridge, locker, or craft room. Not only is this DIY project a perfect way to breathe new life into discarded materials, but it also allows your creativity to bloom.
As we embark on this colorful journey, let’s take a moment to revel in the joy of upcycling. Picture yourself gathering around the kitchen table, surrounded by an array of colors and textures, ready to create something uniquely yours. With just a few simple materials and a dash of creativity, you’ll find yourself crafting not just magnets, but bright bursts of joy ready to decorate your personal spaces.
Why Bottle Cap Flower Magnets Are a Hit
The beauty of DIY projects lies in their ability to bridge creativity with functionality. These bottle cap flower magnets are not only eye-catching but also practical. They serve as a reminder of your artistic flair and can spark conversations whenever guests enter your space. Each magnet tells a story; whether you relived cherished memories during the crafting process or invited a child to join in the fun, you create a piece filled with sentiment.
Moreover, this project appeals not just to seasoned crafters but also to those just stepping into the world of DIY. The materials are affordable, the instructions are easy to follow, and you don’t need advanced artistic skills to create beautiful designs. It’s an easy-to-follow project that invites improvisation, allowing you to explore shapes, colors, and patterns. Whether you choose to sprinkle a touch of whimsy, opt for a bold floral motif, or blend colors for a more abstract style, the possibilities are endless.
Perfect Occasions to Make Them
Bottle cap flower magnets make for exciting and engaging workshops at birthday parties, family get-togethers, or art classes. They also serve wonderfully during festive seasons—think vibrant spring flowers in your home or cheerful summer garden themes. Additionally, they make lovely handmade gifts for friends or unique favors for events.
Gathering Your Materials
Now that you’re excited about the possibilities, let’s explore what you’ll need for this crafting adventure. If you’re anything like me, witnessing a range of colorful materials come together is half the fun.
- Clean Metal Bottle Caps: These are the canvas for your creative expression. Each cap holds the potential for a tiny masterpiece.
- Acrylic Craft Paint: Choose your favorite colors—be it the soothing hues of blue and green or the vibrant cheeriness of red and yellow.
- Fine Paintbrushes and Dotting Tools: The fine brushes will help you navigate the details while dotting tools offer precision for your flower designs.
- Small Round Disc Magnets: These will turn your painted caps into lovely magnets, perfect for sticking on fridges or magnetic boards.
- Hot Glue Gun and Glue Sticks: A reliable partner in ensuring your creations stick around for longer.
- Parchment Paper or a Protective Craft Surface: Protect your workspace while you unleash your creativity.
Crafting Your Bottle Cap Flower Magnets
Ready to dive in? Let’s walk through the steps to bring these magnetic flowers to life with a delightful ease that allows you to lose yourself in creativity.
-
Clean the Bottle Caps: Start by washing and drying each metal bottle cap thoroughly to remove any leftover residue from their previous life. This sets the stage for beautiful paint adherence.
-
Base Color Coating: Choose a solid, vibrant base color for each cap. Imagine the joy as the colors begin to transform the mundane into the extraordinary. Using a fine paintbrush, apply a thin layer of paint and allow it to dry completely. If you’re feeling adventurous, double-dip with a second coat for smoother coverage.
-
Flower Design Magic: Now comes the fun part! Use dotting tools or the end of a paintbrush handle to add petals and flower centers in contrasting colors within each cap. Think of your favorite flowers—the delicate swirls of daisies, the bold strokes of sunflowers, or the soft petals of tulips. Let your imagination run wild!
-
Drying Time: Let your painted caps dry completely. This is an excellent time to sip your favorite beverage or put some music on while you await the transformation.
-
Attaching Magnets: Using your hot glue gun, attach a small round magnet to the inside back of each bottle cap. Press it gently to ensure it sticks. Watch as your creations come together, eager to find a home on your refrigerator or locker.
-
Final Touch: Once the glue has set, your flower magnets are ready for their unveiling!
Tips to Elevate Your Craft
As you embark on this crafting journey, here are several tips to keep in mind:
-
Thin Coats Are Key: Smooth coverage is crucial. Applying two thin coats of paint is often more effective than a single thick one, reducing drips and ensuring a polished look.
-
Experiment with Dot Sizes: Don’t be afraid to mix up the sizes of your dots for added personality in your flower designs. Tiny dots can create accents, while larger ones may serve as stunning flower centers.
-
Seal for Longevity: If you desire added durability, a clear craft sealer can preserve your beautiful artwork, protecting colors from fading or chipping over time.
Avoiding Common Mistakes
As with any creative endeavor, sometimes it’s easy to encounter a stumble. Here are a few common pitfalls to avoid:
-
Skipping the Cleaning Step: Leaving residue on the caps can compromise paint adhesion. Ensure they’re clean before you begin.
-
Rushing the Drying Process: Patience is a virtue! Rushing to glue your magnets while the paint is still wet can lead to smudged designs. Allow ample time for each layer to dry.
Creative Variations
Why not extend this crafting concept? Consider personalizing your magnets by adding initials or special dates with paint pens. Alternatively, explore seasonal themes—think spooky Halloween pumpkins or festive snowflakes for winter. You could even collaborate with kids, allowing them to create their own designs, making their fridge a delightful showcase of family creativity.
Beyond the Craft: Storage and Care
Ensuring your beautiful magnets remain in pristine condition requires a bit of care. Store your finished magnets in a small craft container to keep them safe, away from heat sources that could soften the glue. Take time to admire them whenever you pass by!
Frequently Asked Questions
-
Can I use plastic bottle caps?
- While plastic bottle caps can be painted, they may not hold up as well as metal caps when magnets are applied.
-
What can I do if I don’t have a dotting tool?
- The end of a paintbrush handle can work just as well! Alternatively, you can employ cotton swabs for smaller details.
-
How do I clean my brush between colors?
- A quick rinse in water can keep your brush clean between colors, ensuring you maintain vibrant designs.
Final Thoughts
Creating DIY bottle cap flower magnets is more than just a craft—it’s an invitation to express your unique style and creativity while upcycling materials that might otherwise end up in the trash. Each colorful flower signifying not only artistic flair but joyful memories shared with loved ones adds warmth and character to everyday spaces.
So gather your materials, invite a friend or family member, and spend an afternoon embracing the beauty of crafting together. Allow your imagination to soar as you transform simple caps into vibrant flowers, and let the cheerful creations adorn your surroundings, reminding you of the joy of creation every time you glimpse a smile on your fridge.
SEO Meta Description
Transform old metal bottle caps into colorful flower magnets with this easy, fun DIY project that’s perfect for adding cheer to your home décor.
Suggested SEO Tags
- DIY Crafts
- Bottle Cap Projects
- Upcycling Ideas
- Flower Magnets
- Home Décor DIY
- Creative Crafts
- Handmade Gifts






