

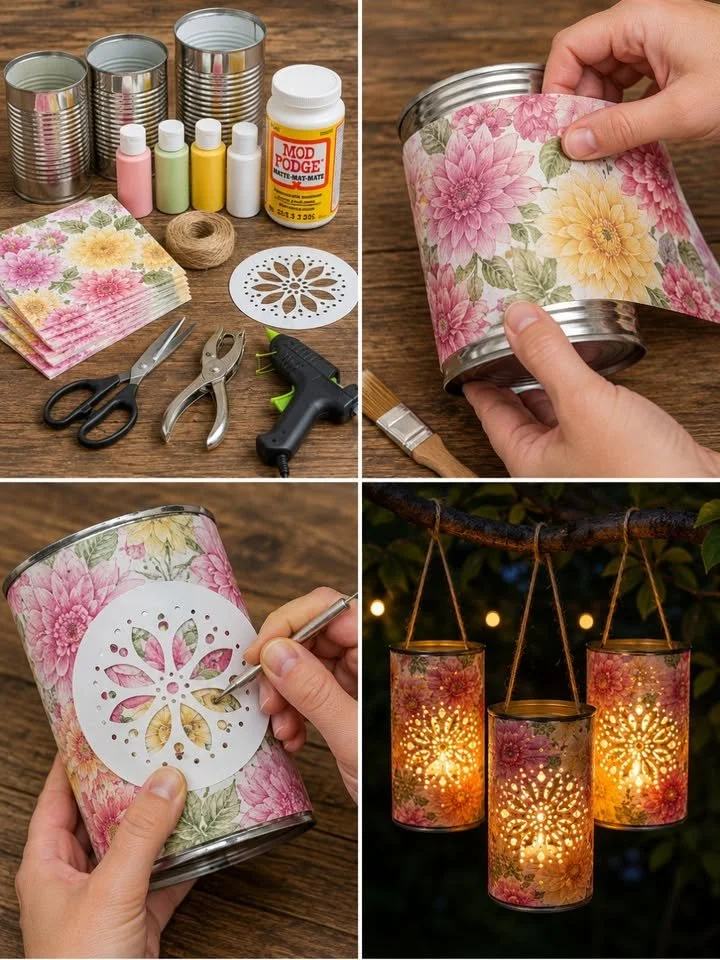
Illuminate Your Nights with DIY Floral Tin Can Lanterns 🏮🌸✨
There’s something magical about a warm summer night, isn’t there? The air is sweet with the scent of blooming flowers, and the golden glow of the setting sun creates a soft embrace around you. Imagine a gathering of friends under a starlit sky, laughter mingling with the gentle rustle of leaves, and the flickering light of lanterns dancing around you. How do we create that enchanting atmosphere? One playful, crafty project will transform your outdoor space into a cozy haven of light and joy: DIY floral tin can lanterns.
These rustic, charming lanterns are simple to make but leave a lasting impact. Each one tells a story of creativity, transforming humble tin cans into beautiful works of art that shimmer and shine with your personal touch. Whether you’re hosting a backyard soirée, celebrating an outdoor family gathering, or just enjoying a peaceful moment with a cup of tea, these lanterns will serve as a delightful backdrop filled with warmth and love.
Why People Love This Project
The charming allure of these floral tin can lanterns lies in their ability to bring a touch of whimsy and personalization to any setting. They are not just lanterns; they’re conversation starters, pieces of art, and heartfelt gifts from your hands to your loved ones. There’s a unique, satisfying pleasure in crafting something beautiful, and seeing the soft glow illuminate the night is an emotionally rewarding experience.
Moreover, this project allows for endless creativity. You can play with colors, patterns, and designs that match your personal style or the theme of your gathering. Add a splash of vibrant colors, or stick with muted earth tones for a more rustic aesthetic—the choice is yours. With every punch and stroke of paint, you pour a piece of yourself into each lantern.
Best Occasions to Use Your Lanterns
These DIY lanterns are exceptionally versatile and can seamlessly fit into countless occasions:
- Summer Nights: When the sun dips below the horizon, hang these lanterns to create an enchanting outdoor atmosphere.
- Garden Parties: Perfect for whimsical tea parties surrounded by blooming flowers.
- Family Gatherings: Use them for birthdays or reunions to keep the spirits high and the ambiance cozy.
- Seasonal Celebrations: Whether it’s a harvest festival or a holiday gathering, their soft glow is sure to add to the festive spirit.
Materials You’ll Need
Let’s gather our supplies! Making these floral tin can lanterns is not only fun but requires relatively simple materials that may even be in your home already.
- 3 empty metal tin cans (clean and label-free)
- Floral paper napkins or decorative tissue paper for the design
- Mod Podge (or decoupage glue) to adhere your paper
- Paintbrush or sponge brush for applying Mod Podge
- Acrylic paints (pink, yellow, green, white – optional base coat) for a colorful foundation
- Paper stencil with a floral cutout design to guide your punching
- Push pin, nail, or metal stylus for creating holes in the cans
- Scissors to trim your paper
- Jute twine for hanging
- Tea light candles or LED candles (the safer option) for that soft, flickering light
Step-by-Step Instructions
Now that we’ve got everything together, let’s dive into the joy of crafting. These steps will guide you through this artistic journey, layer by layer.
Step 1: Prepare the Cans
Start this adventure by washing and drying your tin cans thoroughly. It’s important to ensure that there are no labels left—your canvas needs to be smooth and clear. If the edges are sharp, take a moment to smooth them out to avoid any unexpected mishaps.
Step 2: Apply the Floral Design
Take a deep breath as you begin! Brush a thin layer of Mod Podge onto the outside of the can, laying the groundwork for the burst of floral beauty. Carefully wrap a floral napkin around the surface, smoothing out any wrinkles with your fingers; this is your moment to be a true artist. Once set, seal it with another light coat of Mod Podge on top. Watching the colors and patterns come to life is like witnessing a garden bloom!
Step 3: Add Decorative Stenciling
Once the Mod Podge dries (and you can sip some tea while waiting!), grab your floral stencil. Place it on the wrapped can and begin to gently punch small holes along the design using your stylus or nail. The sound of your tool pricking through the tin is oddly satisfying, like punctuating a beautiful sentence. With each punch, you create delicate floral shapes that will shine brilliantly once lit.
Step 4: Reinforce and Dry
Patience is key! Allow your cans to dry completely for a few hours. This not only reinforces the paper and glue but also builds anticipation for your enchanting creations.
Step 5: Add Hanging Twine
Time to add a practical and charming touch! Wrap jute twine around the top rim of the can, creating a secure loop for hanging. Feel the texture of the jute against your fingers; it adds a rustic element that contrasts beautifully with soft floral designs.
Step 6: Insert the Light Source
The moment of truth has arrived! Place a tea light or an LED candle inside each can, ensuring a gentle flicker of light. If you’re using real candles, do remember to keep safety in mind—LEDs are a fantastic alternative, offering peace of mind.
Step 7: Display Your Lanterns
Now for the best part—showing off your creations! Hang them from tree branches, place them on outdoor tables, or dot them around your patio. As night falls, watch as your garden transforms under the warm glow, creating that magical ambiance you envisioned from the start.
Crafting Tips to Elevate Your Lanterns
-
Experiment with Colors: Don’t hesitate to mix colors in your floral designs! Layering shades can create a beautiful depth that is visually stunning.
-
Texture Plays a Role: Try incorporating textured paper or using different types of stencils to create varied patterns.
-
Keep It Personal: Use personal photographs or kids’ artwork as your decoupage material—this can add a unique sentimental touch to your lanterns.
Beginner Mistakes to Avoid
- Rushing the Drying Process: Allow sufficient drying time between each step to avoid smudging or misadventures with paint.
- Skipping Safety Measures: If using real candles, ensure you’re keeping flammable materials away. Always monitor lit candles.
- Neglecting Surface Preparation: A well-prepared can is key to a successful craft. Focus on cleaning and smoothing your cans before starting.
Creative Variations
Feeling adventurous? Here are some fun variations to tailor your lantern project:
- Seasonal Themes: Use leaf patterns for autumn, snowflakes for winter, or vibrant butterflies for spring assessments.
- Layered Shades: Paint the inside of your cans with bold colors—the light will shine through, creating captivating tones.
- Mixed Materials: Go beyond just paper and mix in some lace or burlap for an even more textured look.
Present Your Lanterns with Style
To enhance the allure of your lanterns, consider creating a magical setting around them. Set up small rustic tables with cozy blankets, and scatter petals or small jars filled with fairy lights. Feel the nostalgic fairy tales come to life as you sip your favorite drink amidst the soft glowing light.
Frequently Asked Questions
How long do these lanterns last?
With proper care, your lanterns can endure through many seasons and celebrations. However, the paper may wear over time, so treat them with care and keep them dry.
Can I use these lanterns indoors?
Absolutely! They can transform any room, bringing a rustic charm indoors. Just make sure to use LED candles for safety.
What if I run out of time?
If you feel crunched for time, focusing on fewer cans or simplifying the designs can help streamline the process without sacrificing the beauty.
Conclusion
As the sun sets and the lanterns glow, you’ll feel a profound sense of fulfillment, knowing you created something so beautiful with your own hands. Each flicker of light is not just a decoration but a representation of your spirit and the love you put into crafting these delightful pieces. So, gather your supplies, unleash your creativity, and embark on this adventure of turning tin cans into glowing floral wonders. You’ll not only illuminate your nights but also warm your heart through the joy of creating!
Meta Description: Discover the joy of crafting DIY floral tin can lanterns! Transform simple tin cans into glowing garden lights that bring a rustic charm and cozy atmosphere to any occasion.
SEO Tags: floral lanterns, DIY decor, tin can crafts, outdoor lighting, homemade lanterns, decoupage projects, garden party ideas






