

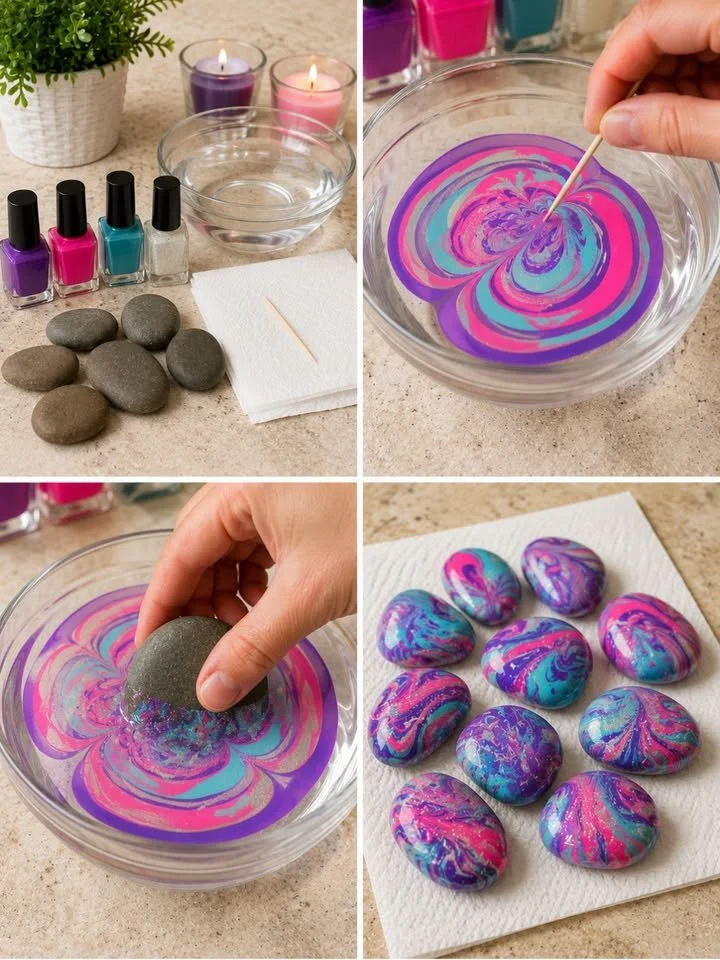
DIY Marbled River Stones: Craft Your Own Unique Masterpieces
Imagine a sunny afternoon, the air warm and filled with the sounds of nature. You’re sitting outside with family or friends, enjoying a leisurely day. Perhaps there’s a hint of creativity buzzing in the air, and you feel inspired to make something special together. These moments often lead us to discover beautiful crafts that can adjoin art and nature, adding a personal touch to our spaces. One such delightful activity? Creating your own marbled river stones.
These stunning marbled stones, made using a simple water-transfer nail polish technique, turn ordinary river rocks into glossy, one-of-a-kind pieces of art. They’re not just vibrant decor; they make fantastic paperweights or thoughtful handmade gifts. Let’s dive into this immersive craft—perfect for artists of all ages—and see how to transform simple stones into breathtaking mementos.
Why People Love This Idea
The beauty of DIY projects lies in their ability to transform everyday materials into something extraordinary. Each painted stone becomes a canvas for your imagination, reflecting your personal style and creativity. There’s a sense of joy and accomplishment that accompanies creating something with your own hands. Perfect for gatherings, this activity encourages laughter and shared creativity, perfect for family bonding or friendly get-togethers.
Furthermore, working with marbled river stones is incredibly freeing. You don’t need an art degree to create something beautiful. Whether you prefer bright, bold colors or subtle pastels, each design is uniquely yours, imbuing each stone with personal significance. Plus, there’s something satisfying in bringing a splash of color to your garden or workspace while sharing stories and techniques with loved ones.
The Benefits and Best Occasions to Use It
Creating marbled river stones is perfect for various occasions. Picture a family reunion where kids and adults alike can rally around this easily accessible craft. Or a rainy weekend, where you and your friends can craft together indoors, keeping spirits high. Birthdays, holidays, or simply a regular Thursday night can all become opportunities for creating something stunning and memorable.
These stones also make for charming gifts. Imagine presenting a beautifully marbled piece to a friend or a loved one, showing them that you took time to create something special just for them. They can serve as thoughtful favors for events like weddings, baby showers, or housewarming parties. The possibilities are truly endless!
Materials You’ll Need
Gathering your supplies is the first exciting step in this creative journey. Here’s what you will need:
- Smooth river stones: These can be found at craft stores, garden centers, or even collected from your surrounding environment. Make sure they are clean and dry to ensure the best results.
- Clear glass bowl: This will be your marble creation station.
- Water: Room temperature works best to create a smooth finish.
- Nail polish: Choose colors that inspire you—think shades of purple, pink, turquoise, or even metallics like silver. The more colors, the more vibrant your designs!
- Toothpick or wooden skewer: This will help you swirl your colors together beautifully.
- Paper towels: For drying your created stones.
- Gloves: Optional, but useful for minimizing mess and protecting your hands.
Step-by-Step Instructions
Now for the fun part! Let’s walk through the steps to give life to your own marbled river stones.
-
Prepare the Water Bowl: Fill your clear glass bowl with clean, room-temperature water. Take a moment to appreciate the stillness as it promises to be your artistic canvas.
-
Create the Marble Pattern: Unscrew your first bottle of nail polish, pick your color, and gently drop small amounts onto the water’s surface. Watch how the vivid polish spreads, creating floating rings that dance across the water. Don’t hesitate to layer multiple colors—the more, the merrier!
-
Swirl the Design: Here’s where your creativity shines. Using the toothpick or wooden skewer, gently drag through the polish to create swirls and patterns. Feel free to experiment—this is your unique artwork in the making! Just remember to move quickly—the polish will begin to set in moments.
-
Dip the Stone: Now, hold a clean, dry river stone at an angle and gradually dip it into the patterned water surface. Allow the stone to submerge fully, then lift it out delicately. Admire how the colors cling to its surface, an artwork ready to set.
-
Let It Dry: Place the coated stone gently on a paper towel. Allow it to dry completely, which usually takes about 30-60 minutes depending on the thickness of the polish. As it dries, you might find yourself imagining the perfect spot for your new decor piece.
-
Repeat (Optional): Why stop at one? Repeat the process for additional stones, perhaps mixing colors and patterns for layered effects. Each new piece will tell its own story.
Helpful Tips and Mistakes to Avoid
As you embark on this artistic endeavor, here are some pearls of wisdom to keep your crafting flowing smoothly:
- Choose the Right Nail Polish: Opt for quick-drying formulas that layer well. Sparkly and metallic finishes can add a dazzling touch.
- Work in a Well-Ventilated Area: Nail polish fumes can be intense! Ensure you’re crafting where the air can circulate.
- Avoid Over-Mixing: When swirling the polish, don’t overdo it; aim for inviting, free-flowing patterns. Over-mixing can lead to a muddy effect.
Beginner Mistakes to Avoid: Don’t be discouraged if your first stone isn’t a masterpiece—it might take a few tries to find your groove. Start with simple designs and gradually build complexity as you grow more comfortable.
Creative Variations
If you’re feeling adventurous, try a few fun variations:
- Seasonal Colors: Tailor your colors to reflect the season—bright pastels for spring, warm hues for autumn, or festive shades for holiday gatherings.
- Texture Play: Experiment with adding glitter or other embellishments to your stones for more visual interest.
- Personalization: After marbling, try using paint pens to add initials, designs, or meaningful words to each stone.
Serving and Storage Ideas
These marbled river stones can be displayed in various ways. Arrange them in a decorative bowl on your coffee table, scatter them along your garden path, or use them as elegant paperweights on your desk. They could also be grouped together in clusters, showcasing a range of colors and patterns that catch the eye.
For storage, keep your stones in a cool, dry place, especially if they are a part of your decor. Ensure they are separated by layers of tissue paper if needed to prevent scratching, allowing their glossy surfaces to shine.
Frequently Asked Questions
Q: Can I use other materials instead of stones?
Absolutely! Try this technique with smooth ceramics or even wooden pieces if you want to expand your artistic frontier.
Q: Will the nail polish wash off if exposed to water?
Once fully dried, the polish creates a durable coating, but it’s wise to keep them out of the rain or any significant moisture to ensure longevity.
Q: How can I remove mistakes?
If you’re not happy with a design, you can gently scrub off the polish with nail polish remover and start over—just ensure the stone is dry before you begin again!
Inspiring Your Creativity
Crafting your own marbled river stones is not merely about creating beautiful decor; it’s about the time spent crafting, laughing, and sharing with others. This project invites you into a world of color and creativity, where you can express your personality on each unique stone. Each dip into the colorful water leaves you with a tangible piece of your imagination, a mini masterpiece ready to brighten any space.
Next time you’re gathering for a cozy afternoon, consider reaching for those stones and nail polish. As you help each other dip and swirl away, you’ll create not just art but warm memories that last far longer than the polish on your stones. So, roll up your sleeves and dive right into this crafty adventure—the world of marbled river stones awaits your personal touch!
Meta Description
Discover how to create stunning DIY marbled river stones using a simple water-transfer nail polish technique. Perfect for decor, gifts, and family bonding.
SEO Tags
- DIY marbled river stones
- Water transfer nail polish technique
- Creative crafts for all ages
- Handmade gifts and decor
- Outdoor and indoor crafts
- Family bonding activities
- Colorful paperweights






