

Crafting Miniature Terracotta Pots: A Delightful DIY Adventure
There’s something simply enchanting about miniature items—a tiny universe all of their own. Picture a cozy afternoon, sunlight filtering through the curtains, illuminating a cluttered table laden with vibrant crafting supplies. The excitement is palpable as you gather soft, squishy air-dry clay, ready to create adorable little terracotta pots that breathe life into both your imagination and your décor. Whether it’s designs meant for fairy gardens, charming dollhouses, or as whimsical gifts for loved ones, these tiny pots radiate warmth and joy, making crafting them an experience worth savoring.
{
}
The Allure of Miniature Creativity
Why are we so enamored with miniature crafts? Perhaps it’s the charm of creating something little that packs a big punch of personality. Miniature terracotta pots evoke a sense of nostalgia, reminding us of sun-drenched afternoons spent playing with dollhouses or dreaming up elaborate fairy gardens. They serve as vessels for our creativity, allowing us to channel our inner artisan as we mold and shape each tiny masterpiece.
Moreover, each pot is a testament to our love for gardening and nature, even in their most delicate form. With succulent plants or a sprinkle of decorative moss, these pots transform into charming focal points, lending a whimsical touch to any space. So let’s dive into the process, where crafting becomes a journey of exploration, creativity, and self-expression.
Occasions to Embrace Mini Magic
The beauty of miniature terracotta pots extends far beyond a simple craft project. They are ideal for various occasions:
- Celebrate Spring: A spring garden party could dazzle guests with cute mini pots filled with early blooms.
- Spooky Delight: Halloween crafts become a breeze when you create tiny pots to house miniature pumpkins or ghoulish decorations.
- Holiday Wonders: Thanksgiving or Christmas tables can be accentuated with these enchanting pots filled with holiday-themed items.
- Gifting with Heart: Handmade gifts, especially for plant lovers and kids, speak volumes of thoughtfulness and creativity.
The versatility and charm of these tiny pots make them a beloved addition to any craft repertoire.
Gathering Your Materials
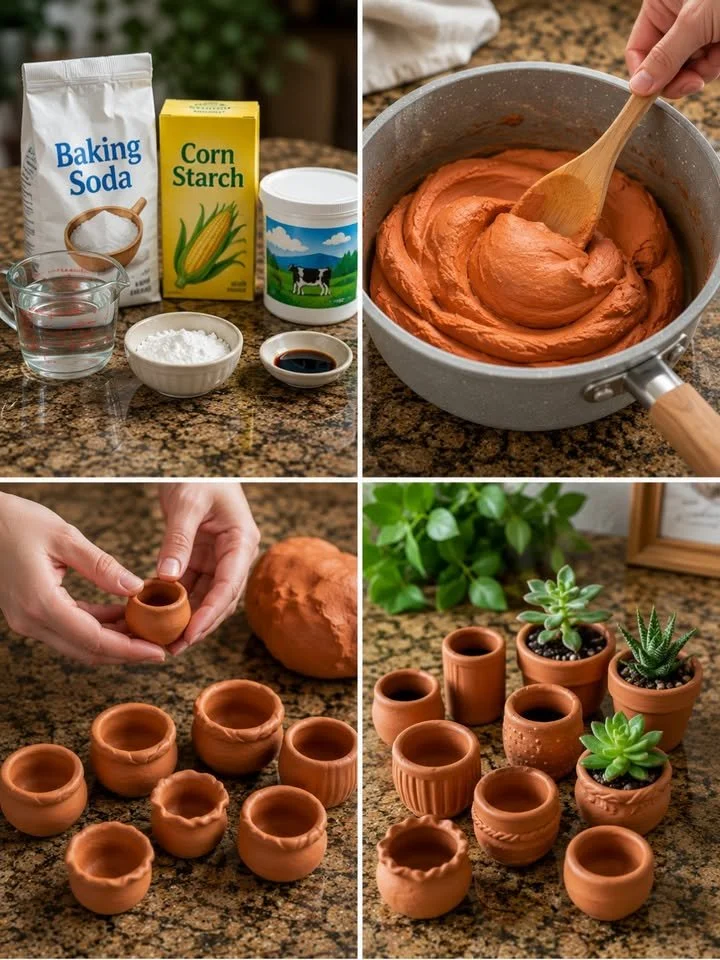
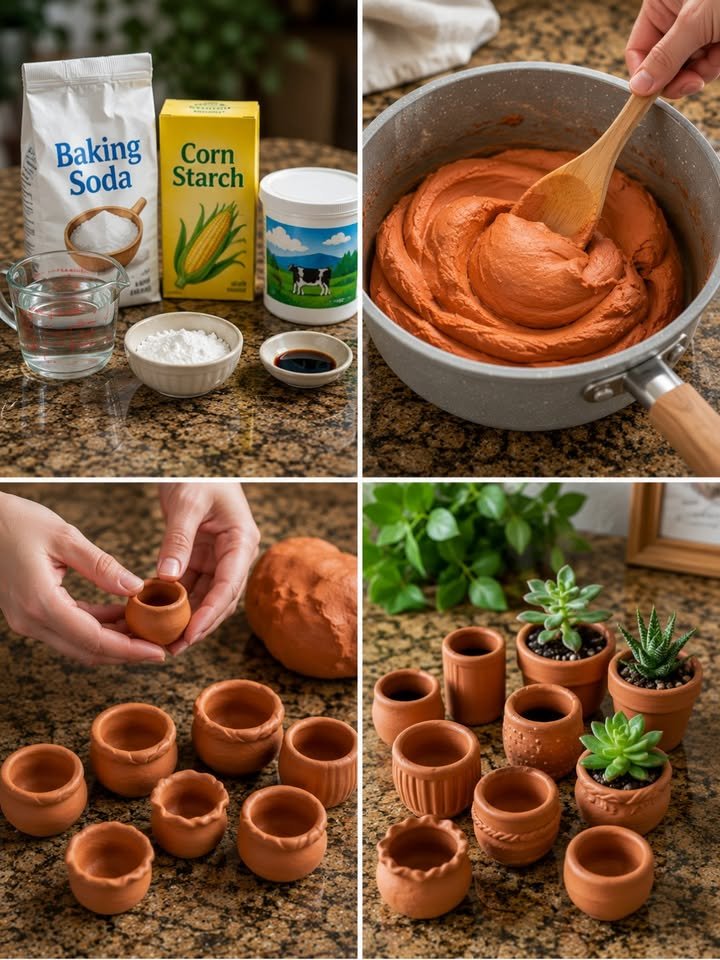
Now, let’s gather everything we need to create these little treasures. You’ll find that most materials are household staples, making this an easily accessible craft. Here’s what you’ll need:
- 1 cup baking soda
- 1/2 cup cornstarch
- 3/4 cup water
- Brown and orange food coloring (optional)
- Non-stick saucepan
- Wooden spoon
- Measuring cups
- Small bowl of water (for smoothing)
- Mini succulents, pebbles, or decorative moss (for embellishing your pots)
As you collect these items, imagine the delightful outcomes of your efforts. Each element plays a crucial role in shaping your creative journey.
A Step-by-Step Guide to Your mini pots
Step 1: Make the Clay
To begin, combine the baking soda and cornstarch in your non-stick saucepan, stirring them together in anticipation of the creative endeavor ahead. Gradually mix in the water, seeking a silky smooth consistency. If you’re feeling adventurous, add a few drops of brown and orange food coloring for that authentic terracotta hue. Imagine the rich earth tones bringing your mini pots to life!
Step 2: Cook the Mixture
Now, place your saucepan over medium-low heat, stirring continuously like a potions master concocting magic. As the heat envelops the mixture, you’ll notice it begins to thicken—it’s as if you’re sculpting soft dough that gradually pulls away from the sides of the pan. This transformation is immensely satisfying, evoking a sense of accomplishment.
Step 3: Cool the Dough
Once thickened, transfer the clay to a plate or bowl. Cover it with a damp cloth and let it cool for a bit—it needs to be the perfect temperature for molding. In this serene pause, take a moment to enjoy the earthy aroma that fills the room.
Step 4: Shape the Pots
Now comes the fun part! Tear off small pieces of clay and roll them into tiny balls. As you pinch and shape each piece into hollow pots, feel the creativity flourish at your fingertips. Leave no cracks behind; use a small bowl of water to smooth any imperfections, infusing your design with finesse and care.
Step 5: Add Details
This is where your creative spirit can truly shine! Utilize your fingers or simple craft tools to add decorative rims, textures, or patterns. Imagine how each detail will enhance the character of your pots—will they be rustic and worn, or polished and sleek?
Step 6: Dry Completely
Place your miniature masterpieces on a tray, ready for their transformation. Allow them to air dry for 24 to 48 hours, turning them gently now and then to ensure even drying. As the minutes tick by, anticipation swells, and you can almost picture how delightful they’ll be once complete.
Step 7: Display Your Creations
The grand reveal! Once dried, your little pots are ready for the spotlight. Fill them with tiny succulents, vibrant pebbles, or soft decorations like moss. Imagine each pot nestled within a cozy corner of your home, adding cheerful charm. They could make fantastic centerpieces on your table, or adorn a lovely windowsill—each telling a story of creativity and care.
Helpful Tips for a Successful Crafting Experience
- Control the Clay Texture: If your clay feels too sticky, add a little more cornstarch; if it’s too crumbly, a few drops of water should do the trick.
- Experiment with Color: Don’t just settle with brown and orange; consider mixing different shades to create unique terracotta styles or whimsical candy colors for a whole new aesthetic.
- Sculpting Symbols: If you’re feeling extra creative, try etching symbols or words into the clay before it dries, adding an even more personal touch.
Common Pitfalls to Avoid
Crafting miniature terracotta pots is a joyful experience, but a few beginner mistakes can cloud the fun. Be careful not to rush the drying process—premature handling can lead to cracks or breakage. Also, remember to maintain a consistent temperature while cooking the clay; too high heat can alter the mixture negatively.
Creative Variations to Explore
Once you’ve mastered the basics, the world of miniature pots opens up into a realm of endless creativity. Here are some delightful variations to consider:
- Colorful Glazes: After your pots are dry, paint them with vibrant acrylics for a pop of color and personality.
- Miniature Garden Themes: Use various pot sizes to create a themed garden, like a succulent oasis or an enchanted fairy realm.
- Seasonal Décor: Adapt your pots for the seasons; use autumn leaves in fall, tiny ornaments in winter, or bright flowers in spring and summer.
Presented with Elegance
When you showcase your miniature terracotta pots, consider their surroundings to enhance your creativity even further. Arrange them on a rustic wooden tray or nest them in a bed of decorative stones. When gifting, create a beautifully wrapped set, perhaps incorporating a hand-written note sharing the story behind your handmade treasures.
Frequently Asked Questions
1. Can I paint these pots?
Absolutely! Once they are completely dry, feel free to paint them with acrylics or seal them with a clear glaze for added shine and protection.
2. How long do these pots last?
As long as they are kept in a dry place and not exposed to too much moisture, your pots can last for years. Just enjoy them responsibly!
3. Can I make larger pots with the same clay?
While this clay can be adapted for larger projects, be mindful of drying times and the thickness of your creations; larger items may take longer to dry thoroughly without cracking.
The Joy of Crafting Together
Creating miniature terracotta pots is more than just a craft; it is a heartfelt journey. Perhaps you choose to embark on this adventure alone, allowing the softness of the clay to soothe your thoughts, or invite friends and family to join in, sharing laughter and stories molding memories into each tiny pot. As you pour your heart and soul into this charming craft, allow it to serve as a whimsical reminder that sometimes, the smallest things can bring the biggest joy. Nurture your creativity, celebrate each tiny triumph, and watch as your crafted creations fill your space, bringing warmth and delight to all who encounter them. Happy crafting! 🌿✨
Meta Description: Dive into crafting adorable miniature terracotta pots using homemade air-dry clay. Perfect for fairy gardens, dollhouses, or handmade gifts. Discover the joy of DIY!
SEO Tags: DIY terracotta pots, miniature gardening, crafts for kids, homemade air-dry clay, fairy garden ideas, succulent pots, creative gifting ideas.






