

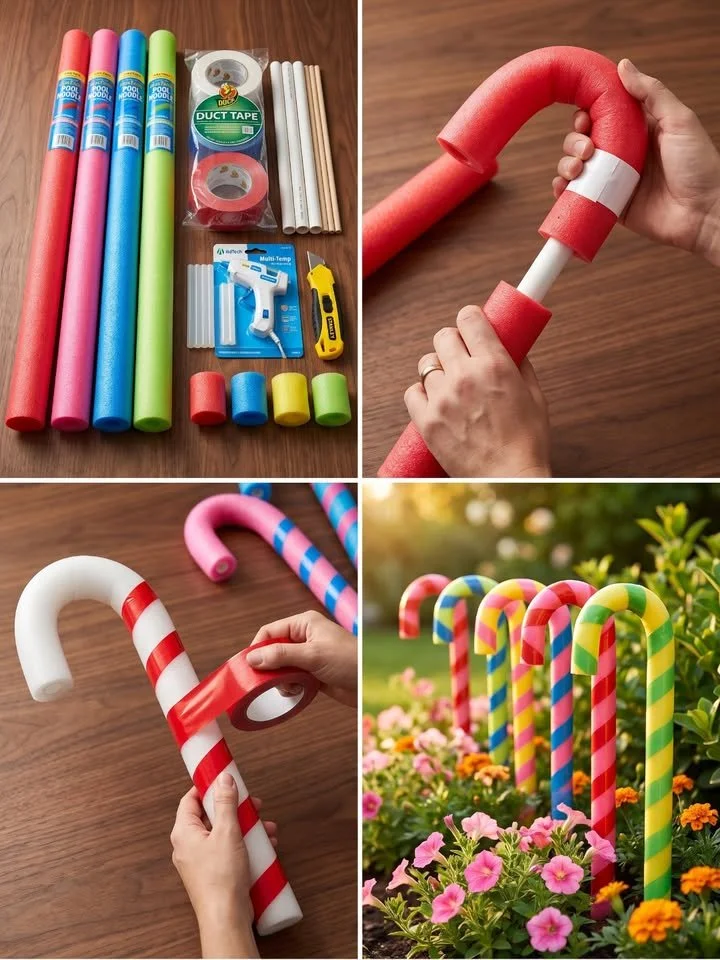
Dollar Store Pool Noodles Become Giant Garden Candy Canes That Brighten Every Flower Bed! 🍭
As the year winds down and holiday lights begin to twinkle across the neighborhood, there’s an unmistakable air of joy and expectation swirling through the crisp air. Children tug at their parents’ sleeves, eyes wide with excitement, as they anticipate the festivities. It’s that wonderful season when doors are flung open, and homes come alive with the warmth of family gatherings and laughter. Yet, amidst all this cheer, have you ever felt your garden could use a little festive magic too? If so, let me introduce you to a delightfully whimsical DIY project—transforming simple dollar store pool noodles into radiant garden candy canes that will bring smiles to everyone who stroll past your flower beds!
Why People Love This Idea
The sheer joy of crafting something beautiful that enhances your outdoor space is a unique thrill. Taking what’s typically a summer pool accessory and turning it into a statement piece for your winter garden is not just resourceful—it’s brimming with creativity and charm. People adore the idea of making garden candy canes because:
-
Affordability: Pool noodles are inexpensive and widely available, making them an accessible crafting material for anyone who wants to add a festive touch without breaking the bank.
-
Vibrant Colors: They come in a rainbow of hues that can enliven any garden, adding splashes of cheer that can be enjoyed from afar.
-
Simplicity: This project is straightforward enough for anyone—whether you’re an experienced crafter or a complete beginner—to jump in and create something special.
-
Personalization: Every candy cane can reflect your style. You can go wild with the colors, patterns, and sizes, making each one a unique expression of your holiday spirit.
The Magic of Garden Candy Canes
Imagine stepping into your garden and being greeted by oversized, colorful candy canes swaying gently in the breeze. These delightful decorations not only scream festive cheer but also serve as whimsical markers guiding visitors along your flower beds or pathways. Their playful presence inspires nostalgia and whimsy, evoking memories of childhood winter wonderlands filled with sweets and laughter. Plus, they remind us of the simple joys of crafting something with our own hands—an experience that can uplift spirits and create lasting memories, especially when involved with family and friends.
Materials You’ll Need
Let’s gather our supplies for this enchanting project. You’ll find that most of these materials are easily accessible, with a few likely already sitting in your garage or shed. Here’s what you’ll need:
- Pool Noodles: Assorted colors, of course! Choose a mix to create a vibrant display.
- PVC Pipe or Wooden Stakes: Ensure they’re sturdy enough to hold your candy canes upright in the soil.
- White Duct Tape: This will be used to secure your candy canes and add a neat finish.
- Hot Glue Gun: A must-have to help sculpt those delightful curves and secure your creations.
- Utility Knife: For cutting the noodles to size.
- Acrylic Paint (Optional): Use this if you wish to add custom details or touch-ups to your candy canes.
Step-by-Step Instructions
Creating these candy canes is a joyful process, and I can’t wait to share it with you. Let’s dive in and sprinkle some holiday magic onto your garden!
-
Cut the Pool Noodles: Using your utility knife, carefully slice each pool noodle into 12-inch sections. Take your time with this step to ensure clean cuts; this will make your candy canes look polished and professional.
-
Slide Them Onto Stakes: Take a PVC pipe or a sturdy wooden stake and slide each noodle piece down until it’s well seated. This will form the base of your candy cane.
-
Create the Curved Tops: Now comes the fun part! Gently bend the top of the noodle to form a candy cane shape. If it feels a bit stiff, try warming it up slightly with your hands—it should be flexible enough to mold without breaking.
-
Secure the Bend: For extra security, use your hot glue gun to affix the bend, ensuring it holds its joyous shape. You can also use white duct tape on the inside to create a clean look.
-
Wrap for Stripes: This is where your creativity will shine! Using contrasting colored duct tape, wrap diagonal stripes around each candy cane. Play with colors and patterns to make them pop—dare to use classic red and white, or get adventurous with turquoise and lime green!
-
Add Final Touches: If you desire, add a bit of flair with acrylic paint or touch up any edges. A few painted dots here and there could mimic the look of a peppermint candy!
-
Installation: Finally, push those lovely striped candy canes deep into the soil around your garden beds or sidewalks. Experiment with the arrangement, mixing and matching colors for a merry visual delight.
Tips for Crafting and Displaying Candy Canes
To really make the most of this creative endeavor, here are a few helpful pointers:
-
Choose Different Heights: Variation in height adds dimension. Use longer stakes for the back row and shorter ones at the front for a layered effect.
-
Consider the Seasons: While these candy canes are perfect for winter, you don’t need to stop there! With different colors, they can be adapted to reflect other seasons too—think pastel colors for spring or bold bright shades for summer.
-
Lighting: For an extra magical touch during holiday evenings, wrap lights around the candy canes or place solar garden lights nearby to create a lovely glow.
Creative Variations to Explore
Why stop at just candy canes? Let your imagination run wild!
-
Giant Peppermints: Cut larger circles from pool noodles, paint them white, and add red swirls to mimic oversized peppermint candies. Place them throughout your garden for a sugary wonderland effect.
-
Themed Noodles: Use noodle colors that represent your favorite holiday palettes or themes, whether it be classic red and green or wintery blues and silvers.
Conclusion
In bringing a touch of festive cheer to your flower beds with giant garden candy canes, you’re not just decorating—you’re crafting warm memories, igniting creativity, and showcasing your unique style. Adorned with stripes and vibrant colors, your garden will transform into a magical spectacle that brightens everyone’s day, reminding us all of the sweet joy outdoor living can bring during the holiday season and beyond.
So gather your kids, friends, or simply pour yourself a cozy cup of cocoa, and dive into this delightful project. As you watch your garden come alive with color and charm, you’ll find that the best part isn’t just the end result—it’s the laughter, conversation, and creative exploration shared along the way. Happy crafting and may your gardens be filled with joy and laughter this festive season!
Meta Description: Discover how to transform dollar store pool noodles into giant garden candy canes that brighten your flower beds. This DIY project is affordable, fun, and perfect for festive decoration!
SEO Tags: DIY garden projects, holiday decorations, pool noodles crafts, festive garden ideas, candy cane decorations, creative outdoor decor, winter gardening.






