

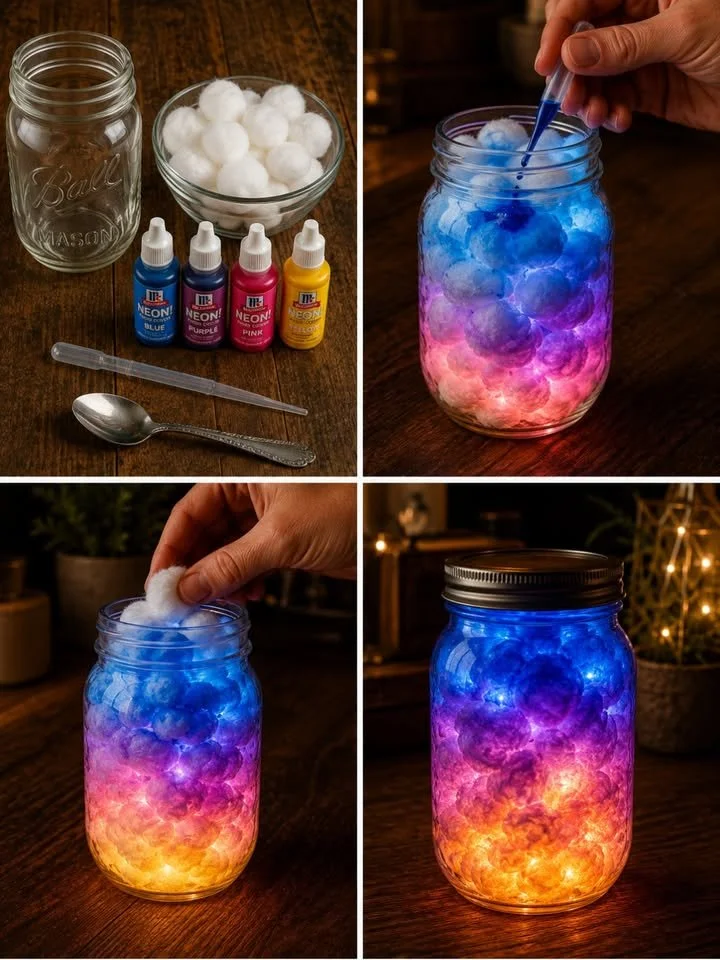
Unveiling Magic: Crafting Your Own Nebula Cloud Jar
As twilight descends and the hustle and bustle of the day fades into soft whispers of night, there’s a certain magic in the air—a gentle stillness that invites comfort and creativity. Imagine a cozy evening where you find yourself nestled among art supplies, a cup of chamomile tea steaming gently next to you, the faint aroma of lavender lingering in the air. You gather your loved ones for a delightful crafting session, and that’s when the real fun begins. This isn’t just any craft; today, you’re about to embark on a whimsical journey to create your very own Nebula Cloud Jar, a visual masterpiece that captures the enchanting essence of the universe—glowing with vibrant colors like a swirling galactic cloud, suspended in time and space.
The Allure of the Nebula Cloud Jar
Why have Nebula Cloud Jars captured the hearts of countless crafters and dreamers alike? It’s simple. This delightful craft not only serves as a stunning decoration but also as a mesmerizing nightlight that transforms any bedroom or nursery into a serene cosmos. The gentle flicker of its internal glow radiates warmth and tranquility, soothing both children and adults. The best part? This project is not just about the glowing jar; it’s about the magical moments spent with friends or family, laughing, sharing stories, and unleashing bursts of creativity.
Imagine the joy on your child’s face as they watch the colors dance within the jar, resembling a dazzling nighttime sky filled with stars. Or picture how, as an adult, creating one can serve as a wonderful escape from your daily routine — a chance to reconnect with your inner child and bask in the beauty of simple pleasures.
Perfect Occasions and Unique Benefits
The Nebula Cloud Jar is a versatile craft that shines in various settings. Whether you’re planning a birthday party, indulging in a rainy afternoon activity, or creating a unique decor piece for a baby shower, this project fits seamlessly into any occasion. They make fantastic gifts, too. Imagine presenting a loved one with a jar crafted by your hands, a little piece of cosmos wrapped in love.
Beyond its aesthetic appeal, crafting a Nebula Cloud Jar also promotes mindfulness. The process of mixing colors and choosing the right placements of glitter can be incredibly therapeutic, grounding you in the moment and unleashing your creativity.
Gathering Your Materials
Before diving in, let’s gather the materials you’ll need to conjure your celestial masterpiece. You can find most of them around your home, making this not just a fun craft but also an eco-friendly one. You’ll need:
- A clean glass jar with a lid (like a mason jar)
- Cotton balls or white pillow stuffing (to mimic the clouds)
- Acrylic paints (in rich blues, purples, and pinks)
- Glow-in-the-dark paint or LED tealight (for that captivating glow)
- Glitter (fine holographic or star-shaped for added magic)
- A small paintbrush and a mixing tray
- Water (to mix with the paint)
- Optional: Star stickers for extra sparkle
As you collect these materials, feel free to let your creativity flow. Which colors speak to you? How much glitter feels just right? The beauty of this project is the freedom to make it uniquely yours.
Step-by-Step Instructions
Now, let’s embark on our crafting adventure! Here’s a cozy breakdown of how to bring your Nebula Cloud Jar to life.
-
Prepare Your Jar: Start by washing and drying your glass jar. This is your canvas. If you want to add a personal touch, you can paint the outside of the jar with a solid color that matches your nebula theme.
-
Mixing Colors: In your mixing tray, combine your acrylic paints with a splash of water to achieve a smooth, flowing consistency. Aim for a spoken-color palette by mixing hues but be mindful not to start with too many colors at once to keep your nebula swirling rather than muddy.
-
Creating the Nebula Effect: With your paintbrush, begin by dabbing the mixed colors onto your cotton balls or pillow stuffing, allowing the colors to blend naturally—don’t overthink it! The beauty lies in the unpredictable. Layer the colors to create depth, reminiscent of the shifting skies above.
-
Filling the Jar: Gently place your colorful cotton clouds into the glass jar. This should be done in layers, alternating colors to mimic a galaxy in motion. Add glitters in between the layers to create that dynamic sparkle and shimmer.
-
Add the Glow: If you’re using glow-in-the-dark paint, add a thin layer over your colored clouds, focusing on areas where you want extra light to emanate. If you’re using an LED tealight, simply place it at the bottom of the jar.
-
Sealing the Magic: Once you’re satisfied with the layers, put the lid on the jar, and you’re ready to bring the nebula to life. When it’s dark, turn on the tealight (if you chose that route) or let it absorb light throughout the day so it can glow beautifully at night.
Helpful Tips for Success
- Take your time with the painting and layering process. The more relaxed you are, the more creative your nebula will be.
- Experiment! Don’t hesitate to add more colors or glitters; sometimes the biggest surprises come from happy accidents.
- If you’re crafting with kids, allow them to freely express their ideas. Every nebula will be a unique expression of its creator’s imagination, and that’s the real treasure!
Common Beginner Mistakes to Avoid
While crafting is all about having fun, here are a few tips to keep you from getting too frustrated along the way:
- Rushing the color mixing: It’s easy to get excited, but remember, patience will reward you with a more beautiful nebula-like effect.
- Overloading on materials: A little glitter goes a long way! Avoid overwhelming your jar with too many additives.
- Neglecting to seal well: Make sure your lid is on tightly; you don’t want your galaxy spilling out into the world.
Creative Variations
Why stop at just one style? You can reinvent this project every time! Consider using:
- Pastel colors for a dreamy aesthetic.
- Iridescent glitters for a mesmerizing effect.
- Adding small figurines or charms that reflect your interests, like stars, planets, or even tiny boats.
The possibilities are endless; let your imagination soar!
Presentation Ideas
Once your Nebula Cloud Jar is complete, display it thoughtfully. Create a cozy corner atop a bedside table, mantle, or study desk. Pair it with fairy lights or other decorative elements like plants or books to create a picture-perfect vignette. It can be the centerpiece of your peaceful evening routine—imagine curling up with your favorite book while your nebula gently glows beside you.
FAQs About Nebula Cloud Jars
-
How long will the glow last? Depending on the type of glow-in-the-dark paint or LED used, it can last anywhere from a few hours to all night, especially if it absorbs ample light throughout the day.
-
Can I use other kinds of jars? Absolutely! Any clear glass jar will do. Consider using a large pickling jar or even a small glass vase for different effects.
-
Is there a safe way to clean the glitter? If glitter spills, gently sweep it into a dustpan. Although it can be tricky, using a lint roller for quick clean-up can also help. Always create a glitter Zone if possible!
Conclusion: Embrace the Crafting Journey
Creating your own Nebula Cloud Jar is more than just a craft; it’s an experience—a soothing dance of color and light that transports you somewhere magical. As the warm glow of your jar illuminates the night, it serves as a reminder of the beauty in creativity and the joy of shared moments.
So gather your friends, pour your heart into this project, and watch as a simple jar transforms not just your space, but also your spirit. Each nebula crafted will tell a unique story—one of wonder, inspiration, and endless possibilities. Let your inner artist take the lead, and who knows? You might just create a galaxy of dreams.
Meta Description: Dive into an enchanting crafting adventure with our ultimate guide to creating your own Nebula Cloud Jar—a colorful galaxy trapped in glass, perfect as a night light or decoration.
SEO Tags: #Crafting #NebulaCloudJar #DIYDecor #NightLight #HomeDecor #CreativeProjects #ParentingFun






