

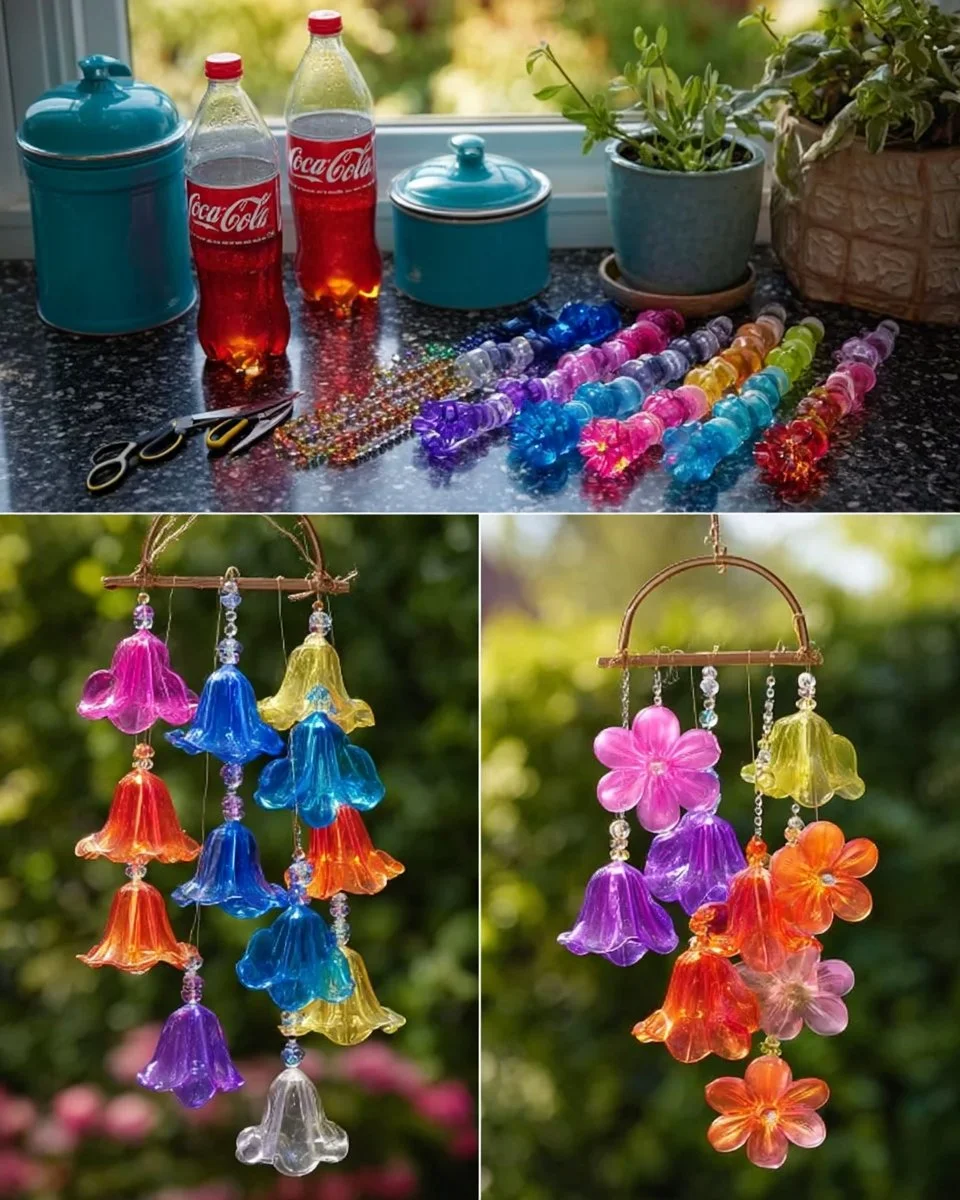
A Symphony of Color and Sound: Crafting Your Own Plastic Bottle Flower Wind Chime 🌸
Imagine a warm, breezy afternoon. You throw open your windows, inviting in the fresh air and the gentle sounds of nature. Birds are chirping, and just outside, you can hear a sweet tinkling sound dancing on the wind—a sound that brings back childhood memories of sunlit gardens and carefree days spent crafting in the backyard. What if you could capture this joy, infusing your home with enchantment and a touch of whimsy? Enter the delightful DIY project that is a Plastic Bottle Flower Wind Chime. This gorgeous recycled craft not only adds spirited decor to your space but also serves as an artistic expression of your creativity—all while helping Mother Earth.
Why Do People Love This Craft?
The love for creating wind chimes from recycled plastic bottles springs from a potent mix of environmental awareness and the joy of personal expression. Each chime you craft tells a story, reflecting your personality and spirit. As you transform mundane materials into delightful flowers, you engage in a playful dialogue with the world around you. This project melds art with sustainability, encouraging a renewed appreciation for the beauty in repurposing what would otherwise be discarded.
But beyond the act of crafting, there’s something deeply rewarding about the process. As you cut, paint, and assemble, you find yourself immersed in creativity. Each bottle morphs into a bright flower, evoking feelings of joy and accomplishment. Once completed, these wind chimes not only bring color and sound to your living space but also serve as a gentle reminder of nature and your artistic journey. Plus, they make for stunning conversation starters at outdoor get-togethers or a cozy afternoon with friends!
Materials Needed
Before diving into the crafting adventure, let’s gather our tools and materials. You’ll be amazed at how simple and beautiful the items can be:
- Colored plastic bottles (or clear bottles + paint): Look for bottles that bring vibrancy; think sodas or juice containers.
- Scissors or craft knife: You’ll need something sharp to make those distinct petal shapes.
- String or fishing line: To hang your flowers and allow them to dance in the breeze.
- Beads or crystals (optional): For that touch of glimmer and shine.
- Glue: Especially important for securing embellishments.
- Metal rings or bottle caps: To anchor your flowers.
- Wooden hoop, branch, or top hanger: This will be the heart of your wind chime.
Step-by-Step Instructions
Let’s embark on this crafting journey together. You might want to put on some music that makes your heart soar—something that inspires you while you work.
Step 1: Cut the Flower Shapes
Begin your project by carefully cutting off the bottom sections of your plastic bottles. This is where the magic starts! Slice upward into petal strips—don’t rush it; take your time. The bottom of the bottle will naturally form bell-shaped flowers, which lend an enchanting touch to your wind chime.
As you round each strip into flower petals, you’ll find yourself envisioning a glorious garden right in your hand. The sound of scissors gliding through plastic feels satisfying, as your flowers start to take shape, full of potential waiting to burst forth into vivid life.
Step 2: Bring on the Color
Here comes the exciting part: painting! Using glass paint, spray paint, alcohol inks, or acrylic paint, transform your flowers into brilliant masterpieces. Bright, translucent colors like blue, purple, orange, yellow, and pink will work wonders. Each brushstroke or spray not only adds color but infuses your creations with a sense of warmth and vitality.
Feel free to play with the color palette. You could opt for a monochromatic garden of blues or create a riotous rainbow arrangement. Don’t forget to take a moment to enjoy the aroma of the paint; let it inspire your inner artist.
Step 3: Add Shine
Now that your flowers are dazzling with color, it’s time to make them shine! Use glue to secure mirror pieces, rhinestones, beads, or even glitter along the edges of your petals. Imagine how these elements will catch and reflect the sunlight, showering your garden with sparkles. A touch of silver tape around the necks of the bottles adds a polished, sophisticated look—an effortless way to elevate your wind chime to true artistry.
Step 4: String Them Together
Let’s connect your beautiful flowers! Thread string through the bottle caps or tiny holes created near the tops of your petals. This is where you’ll decide how to display your creations. You can stack your flowers vertically, creating an ethereal floral cascade. Consider adding beads between the flowers for an extra whimsical touch that jingles delightfully in the wind.
Step 5: Attach to a Base
Once your flowers are strung, it’s time to tie them to your chosen base—be it an embroidery hoop, driftwood, a sturdy stick branch, or a metal ring. This is where your wind chime starts to transform from a collection of flowers into an enchanting garden installation. Hang your masterpiece outdoors or near windows where gentle breezes can carry the sounds of your creation into your home.
Extra Ideas to Elevate Your Wind Chime ✨
Why stop at just flowers? Here are a few creative variations to inspire even more beauty:
- Solar fairy lights nestled inside the chime can create a magical glow as night falls.
- Glow-in-the-dark paint adds an element of surprise, making your chime a star in the night.
- Rainbow gradient arrangements seamlessly blend colors and beauty.
- Delicate butterfly beads between flowers can bring a touch of whimsy.
- Crystal drops hanging at the ends can catch the sunlight beautifully, creating a prism of color.
Where to Hang Your Masterpiece
Consider the best locations for your wind chime. A sunny window brightens a room, while a balcony or patio allows your creation to sing sweetly in the breeze. Gardens become even more inviting with a vibrant mobile drifting gently above blooms.
Personal spaces like children’s rooms or cozy corners can find joy in the magic of your chime, adding a splash of creativity and sound to the atmosphere.
FAQs
Can I use regular plastic bottles?
Absolutely! Just ensure they’re clean and dry before starting your project.
How long will my wind chime last?
With proper care and maintenance, it should last for seasons. Just be mindful of extreme weather conditions.
What about the weight? Is it okay for outdoor use?
Use lightweight materials and ensure everything is securely attached to handle outdoor breezes.
What if I’m not great at painting?
Don’t worry—each flower will turn out beautifully in its own unique way. Embrace imperfect designs; they tell a story of creativity!
The Joy of Crafting
As you stand back and admire your completed Plastic Bottle Flower Wind Chime, breathe in the moment. You’ve transformed what was once mere plastic into a beacon of color and sound, a vibrant reminder of the beauty of creativity and sustainability. This craft not only brings joy to your space but also serves as a testament to your artistic journey, echoing the laughter and warmth of family moments shared while creating together.
So, gather your materials, unleash your imagination, and let the wind carry your colorful melody into the world. Happy crafting!
SEO Meta Description: Create a stunning Plastic Bottle Flower Wind Chime with this engaging, step-by-step guide. Learn how to transform recycled materials into a colorful, artistic outdoor decoration that adds joy and whimsy to any space.
SEO Tags: DIY crafts, recycled crafts, wind chime ideas, plastic bottle crafts, creative home decor, colorful garden decorations, sustainable DIY projects.






