

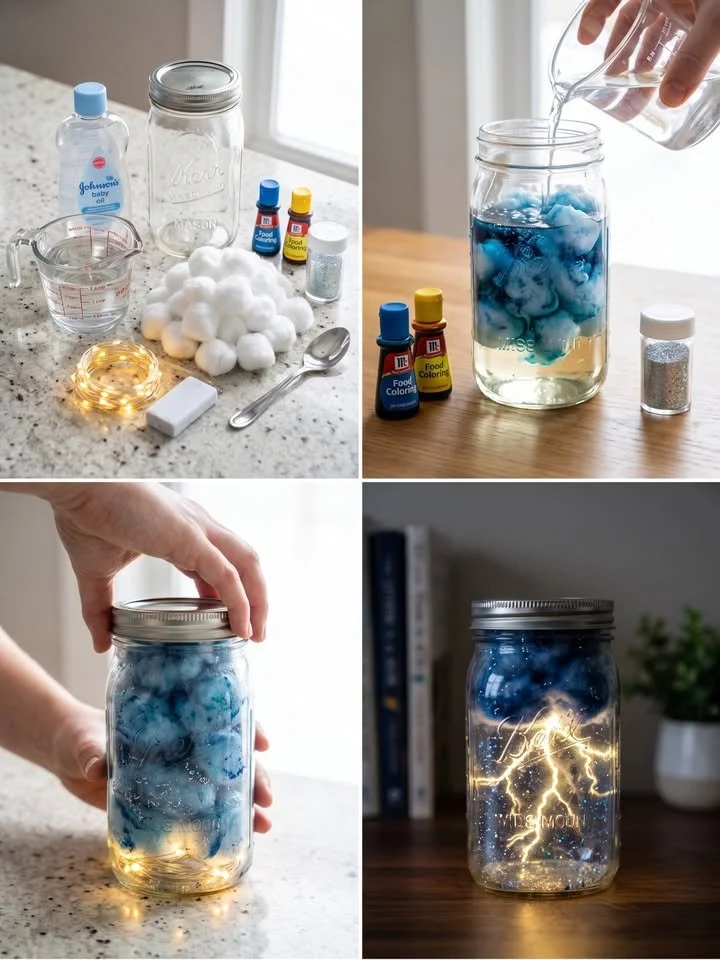
Storm in a Jar: Capturing Nature’s Magic At Home
Imagine a rainy afternoon, the skies are dark and moody, with thunder rumbling softly in the distance. You want to capture that magical feeling—the shimmering, electric energy of a storm—without getting soaked. Enter the "Storm in a Jar," a mesmerizing DIY project that encapsulates the beauty and rawness of nature right in your living space. It’s not just a craft; it’s a gateway to imagination, a creative outlet that evokes nostalgia, coziness, and a little bit of whimsy.
The Allure of Creating a Thunderstorm in Your Home
There’s something inherently captivating about storms. Whether it’s the way the clouds roll in, the scent of rain-soaked earth, or the dramatic light show in the sky, storms possess a chaotic beauty that many of us find enchanting. This project allows you to bottle up that essence in a mason jar. You can customize the colors, the intensity of the “lightning,” and even how the glitter dances like raindrops. The result is a charming centerpiece or a mood enhancer that brings life to any room, fostering creativity and sparking conversations.
Ideal Occasions for Your Storm-Infused Creation
The "Storm in a Jar" is perfect for many settings:
- Craft Parties: Invite friends over for an afternoon of creativity, laughter, and shared inspiration.
- Family Nights: Engage children in a sensory exploration of science and art, connecting them with nature’s wonders.
- Home Decor: Use it as an accent piece on bookshelves or coffee tables, delighting guests with its enchanting glow during cozy movie nights.
- Seasonal Celebrations: Whether it’s a rainy autumn evening or a summer slumber party, this jar adds a touch of magic to any atmosphere.
Gathering Your Materials: The Essentials for Storm Creation
Before diving into this whimsical project, let’s gather what you’ll need. The materials come together to create the illusion of a tumultuous sky without the messy aftermath. Here’s what you need:
- 1 clear mason jar with lid: This acts as our storm container.
- Baby oil (or any clear mineral oil): This creates the cloud effect by providing a density difference.
- Water: To fill the remaining space in the jar.
- Blue food coloring: A splash of color to enhance the depth of your clouds.
- Cotton balls: Essential for replicating those robust yet airy storm clouds.
- Fine iridescent glitter (silver or holographic): Perfect for adding that magical raindrop sparkle.
- Warm-white LED fairy lights (battery pack preferred): These will be the lightning that reverberates through the storm.
- Spoon or tweezers: For delicate placement of your materials.
- Optional: Yellow LED string lights for a dramatic lightning effect.
Crafting Your Own Mesmerizing Storm in a Jar
Now, let’s create magic! Follow these steps, and you will soon watch as the chaos of a thunderstorm transforms before your eyes.
Step 1: Create the Storm Base
First, fill your mason jar approximately 70% with baby oil and 30% with water. Watch as the two liquids settle into two distinct layers. This separation is key; it mimics the atmospheric conditions we see in real storms, allowing the clouds to float and swirl.
Step 2: Add the Storm Clouds
Next, take the cotton balls and pull them apart to create loose, fluffy cloud shapes. For added depth, lightly tint some of them with diluted blue food coloring before gently dropping them into the jar. As they float, you’ll see them drift gracefully between the layers, resembling the soft, rolling clouds of a stormy sky.
Step 3: Sprinkle in Rain and Stars
Now, it’s time to introduce some sparkle! Add a pinch of iridescent glitter to the jar. This will drift slowly and catch the light, mimicking raindrops shimmering in the glow of lightning.
Step 4: Insert the Lightning Core
The heart of your “storm” lies in the lights. Carefully place your battery-powered LED fairy lights into the bottom of the jar, coiling them first. As you let some strands rise up through the cotton clouds, be sure the battery pack remains hidden under the lid for a seamless look. This is where the magic begins; the lights will flicker like bolts of lightning through the clouds.
Step 5: Seal and Finish
Close the lid tightly and shake the jar gently, mixing the clouds and glitter to create an animated storm effect. Once you’re satisfied with the distribution, turn on the lights and watch the storm come to life!
The Magic of the Lightning Effect: How It Works
The enchantment of your storm in a jar doesn’t end with just clouds and glitter. There are fascinating science principles at work.
-
Light Placement = Your Lightning Source:
For more authentic lightning, spread the LED lights throughout the jar instead of focusing them in one spot. The warm whites or slightly yellow hues will create realistic “flashes,” diverging in various directions, while gaps in the cotton provide “lightning channels.” -
Cotton = Lightning Diffuser:
The cotton acts as a stunning diffuser—loose pieces give the illusion of soft fog, while denser sections create shadowy masses within the clouds where light can peek through to mimic natural lightning strikes. -
Glitter = Electric Spark Effect:
Using just a hint of fine glitter can reflect light and create a dazzling effect; think of it like magical sparks dancing in the night sky. -
Oil + Water Movement = Storm Motion:
The interplay between oil and water creates a mesmerizing motion, as the cotton and food coloring float and swirl, showcasing the dynamic energy of a storm. The beautiful hues and textures mimic thunderclouds rolling and shifting overhead.
Pro Tips for Enhancing Your Storm Effect
- Consider using twinkling LED fairy lights in flicker mode for more atmospheric effects.
- Hide some lights deeper within the cotton for that “inside-cloud lightning” look.
- A tiny pinch of yellow glitter can create brilliant flash highlights, simulating electric bursts.
- Dim the lights in the room to dramatically enhance the overall effect.
- Use a dark background to create contrast that accentuates the lightning and colors.
Mistakes to Avoid
When making your own storm in a jar, be mindful of the following common pitfalls:
- Overdoing the Glitter: While sparkles are charming, too much can detract from the storm aesthetic, turning it into a messy project.
- Too Much Water: Maintaining the oil-to-water ratio is crucial; too much water will drown your clouds.
- Forgetting the Light Spread: Concentrating lights in one area limits the lightning effect; distribute them for maximum visual impact.
Creative Variations to Explore
Once you’ve mastered the basic storm in a jar, consider experimenting with your ingredients for different effects:
- Try using colored glitter for fun, themed versions—think pink for a sunset storm or various shades for a rainbow effect.
- Add small toys like plastic thunderstorms or raindrops to create a story within your storm.
- Utilize different essential oils before sealing the jar for a sensory aspect—imagine a fresh rain scent wafting through the air when you shake it.
Storing and Maintenance Ideas
Although the "Storm in a Jar" is primarily a decorative piece, you may wonder about its longevity. Keep it in a place away from direct sunlight to prevent any fading or evaporation of the oil. If you notice any settling of the materials, a gentle shake should refresh your storm. Ensure that children are supervised as the jar contains small pieces.
FAQ About Your Storm in a Jar
1. Can I use other types of oils?
Certainly! Anything that is clear and light enough to float on water will work. Just avoid oils with strong fragrances as they might alter the visual appeal.
2. How long will the storm last?
As long as it’s stored properly, your storm can last indefinitely. Just give it a little gentle shake now and then to re-activate the clouds.
3. Is this project safe for kids?
Absolutely! Just be cautious with the small glitter pieces and keep the battery pack secure.
4. Can I make this storm bigger?
You can scale up this project by using larger jars; just maintain the same ratios of oil and water.
Closing Thoughts: Capturing the Essence of Nature
Crafting a "Storm in a Jar" isn’t just about creating a captivating piece of decor; it’s about harnessing a moment of nature’s magic and bringing it into your home. Each jar tells a story, captivating hearts and minds with its dance of light and movement. Imagine making one with your family, sharing stories of storms past, or looking into your jar and finding peace in its swirling clouds. With every shake, you remember the thrill of thunderstorms, igniting your imagination and creativity anew.
So gather your materials, unleash your inner artisan, and let your storms rage in style—because every home deserves a little magic.
SEO Meta Description
Create a mesmerizing "Storm in a Jar" that fills your home with the beauty of lightning and clouds. A complete guide to crafting this enchanting DIY decor piece.
Suggested SEO Tags
- Storm in a Jar
- DIY home decor
- Lightning effect lamp
- Creative crafts
- Family activities
- Party decor ideas
- Sensory projects






