

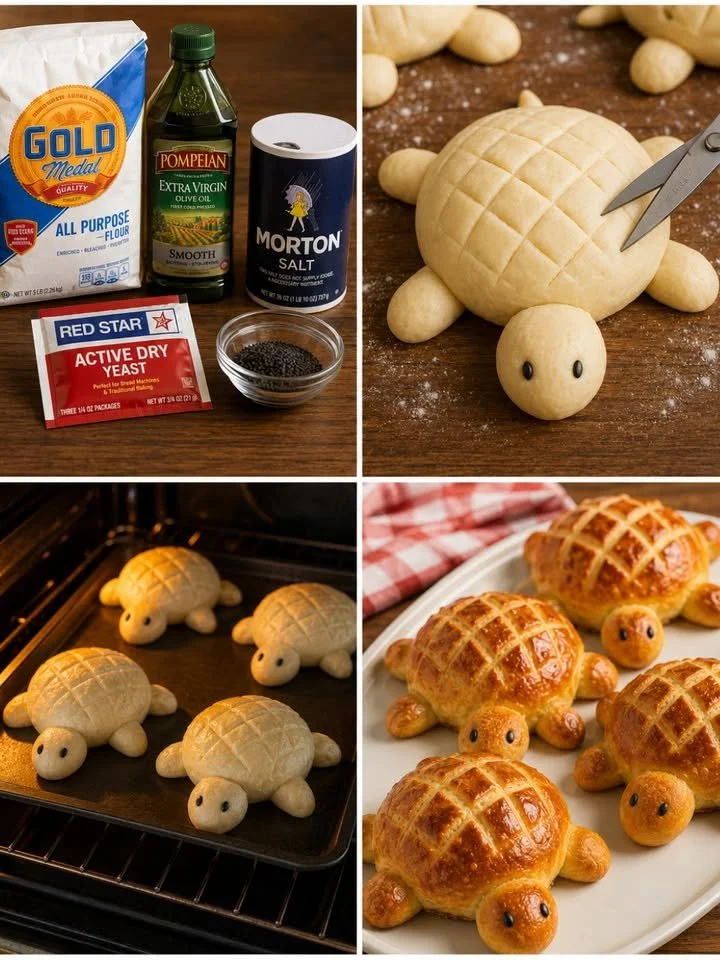
Turtle Bread Rolls: A Whimsical Treat for Family Gatherings
Picture this: it’s a sunny Saturday afternoon, and the kitchen is filled with the intoxicating aroma of freshly baked bread. The kids are buzzing with excitement, eager to embark on a culinary adventure. As flour dust dances in the air, you pull out your ingredients to create something special – Turtle Bread Rolls. With their adorable turtle shape and soft, pillowy interiors, these rolls not only please the palate but also ignite smiles at the dinner table.
Join me as we roll up our sleeves and dive into a delightful baking project that will bring joy to your family gatherings and warm your heart with every bite.
Why Do We Adore Turtle Bread Rolls?
There’s something about a food item shaped like a cute little turtle that makes these bread rolls utterly irresistible. They transform a mundane meal into a playful experience, sparking joy in both children and adults alike. The fluffy texture and golden-brown crust create a delightful contrast that is satisfying to bite into, while the subtle hint of olive oil adds a touch of sophistication to their flavor.
These rolls are more than just food; they’re a symbol of togetherness. The process of making turtle bread rolls can be a cherished family activity, creating memories that last long after the last bite has been devoured. From kneading the dough to shaping the turtles, every step is an opportunity for laughter and bonding, making them perfect for family dinners, birthday parties, or any celebration that calls for a sprinkle of whimsy.
The Benefits of Making Turtle Bread Rolls
Making turtle bread rolls at home offers several advantages:
- Quality Ingredients: You control what goes into your rolls, ensuring they are free from preservatives or additives.
- Creative Expression: Shaping the rolls into little turtles invites creativity. You can customize each roll, giving your turtles unique personalities.
- Family Bonding: Involving kids in the kitchen fosters essential skills while cultivating an appreciation for home-cooked meals.
- Versatility: These rolls are delightful on their own, but they also pair remarkably well with soups, salads, or as a fun addition to any holiday spread.
Gather Your Ingredients
To create these charming turtle rolls, you’ll need the following ingredients, which are simple yet create magical results:
- 3 1/2 cups all-purpose flour: This will give your rolls the necessary structure and fluffiness.
- 2 1/4 teaspoons active dry yeast (1 packet): The yeast brings the rolls to life, aiding in that delightful rise.
- 1 cup warm water (110°F/45°C): This temperature is perfect for activating the yeast without killing it.
- 2 tablespoons olive oil: Adds moisture and a subtle depth of flavor.
- 1 tablespoon sugar: Provides a slight sweetness and fuels the yeast activity.
- 1 teaspoon salt: Balances flavors and enhances the overall taste.
- 1 egg, beaten (for egg wash): Gives the turtles their golden-brown sheen as they bake.
- Black sesame seeds for the eyes: The finishing touch that brings your turtles to life.
Let’s Bake: Step-by-Step Instructions
Now that we have our ingredients ready, let’s embark on our baking adventure! Here’s how to create your turtle-shaped rolls, step by step:
-
Activate the Yeast: In a medium bowl, combine the warm water, sugar, and yeast. Allow this mixture to sit for 5–10 minutes until it becomes foamy. This magical froth signifies that your yeast is alive and ready to work its wonders.
-
Combine and Mix: Once foamy, stir in the olive oil and salt into the yeast mixture. This will create a rich and flavorful base for your dough.
-
Knead the Dough: Gradually add the flour, mixing until a sticky dough starts to form. Flour your work surface and knead the dough for about 8–10 minutes until it becomes smooth and elastic. This step is essential for developing the gluten that gives your rolls their delightful texture.
-
Let It Rise: Transfer the dough into a lightly oiled bowl, cover it with a clean kitchen towel, and let it rise in a warm spot for about 1 hour or until it doubles in size. This is the perfect time to enjoy a cup of tea or clean up your kitchen!
-
Shape Your Turtles: After the dough has risen, punch it down gently to release excess air. Divide it into four larger pieces for the turtle bodies, and smaller pieces for their heads, legs, and tails. Shape the larger dough into balls, and attach smaller balls for heads and limbs. It’s a fun puzzle that brings out the artist in you!
-
Create the Shells: Using kitchen shears, snip a crosshatch pattern across each turtle shell. This not only looks adorable but allows the rolls to expand beautifully while baking.
-
Add Some Character: Gently press two black sesame seeds into each turtle’s head for eyes—this is the part where your creations truly come to life!
-
Final Rise: Place your turtle rolls onto a parchment-lined baking sheet. Cover them loosely with a towel and let them rise for another 30 minutes. You’ll start to feel a sense of anticipation as you witness their transformation.
-
Egg Wash and Bake: Preheat your oven to 375°F (190°C). Brush the tops of your turtles with the beaten egg for that coveted golden hue. Bake for 18-22 minutes, until they are beautifully golden brown.
-
Cool Down: Once baked, transfer the rolls to a wire rack to cool slightly before serving. Be patient; the aroma alone will be tempting!
Delicious Tips and Common Mistakes
Baking is as much about the journey as the destination, and here are some tips to ensure your turtle rolls turn out perfectly:
- Use a kitchen scale for measuring flour if you have one; precision can make a world of difference.
- Don’t skip the resting times; they are essential for a fluffy texture and flavor development.
- Watch the dough—if it looks too dry, add a splash more water; if it’s too sticky, sprinkle a bit of flour.
- Practice your shaping skills—the turtles don’t have to be perfect! Each one can be its own character.
Creative Variations
Once you’ve mastered the classic turtle bread rolls, don’t hesitate to experiment! Here are a few variations to spark your creativity:
- Cheese-filled Turtles: Add your favorite cheese into the dough before shaping to surprise your guests with a gooey center.
- Herbs and Spices: Incorporate herbs like rosemary or garlic powder into the dough for an aromatic twist.
- Sweet Turtles: Want a dessert variation? Add a cinnamon sugar filling and top with a drizzle of icing.
Serving and Presentation Ideas
When your turtle bread rolls emerge from the oven, how you present them can enhance the joyful experience. Here are some ideas:
- Serve them warm with a selection of dips or flavored butters at your next family gathering.
- Create an adorable display on a platter accompanied by a small pond of dipping sauce, like marinara or herb-infused oil.
- For a picnic, pack them in a cute basket lined with a soft cloth, and watch as everyone reaches for a turtle.
Storage Tips
If you happen to have leftovers (which is unlikely after such a delightful treat), store your turtle rolls in an airtight container at room temperature for up to 2 days. You can also freeze them for future enjoyment. Simply wrap them in plastic wrap and then foil, and they’ll be ready to thaw and bake for a warm, fresh experience.
Frequently Asked Questions
Can I use whole wheat flour instead?
Absolutely! Just be aware that using whole wheat flour will alter the texture slightly, making it denser, but it will add wonderful flavor!
How do I ensure my rolls are soft and fluffy?
Make sure to not over-knead your dough; kneading just until smooth is ideal. Also, the rising times are essential for achieving that fluffy interior!
In Conclusion: A Heartwarming Adventure
Baking turtle bread rolls is not just about satisfying hunger; it’s an experience that mixes creativity, joy, and deliciousness into one warm bundle. This whimsical recipe allows you and your family to engage in a delightful kitchen endeavor that beats any store-bought bread. So, the next time you’re looking to create something special, remember that a little flour, some yeast, and a dash of imagination can turn a weekend into a memorable adventure.
Gather your loved ones, roll up those sleeves, and get ready to create some charming turtle bread rolls that are sure to become a beloved family tradition for years to come!
SEO Meta Description: Discover the joy of making Turtle Bread Rolls that are not only adorable but also fluffy and delicious! Perfect for family gatherings, parties, or just for fun.
SEO Tags: #TurtleBreadRolls #BakingWithKids #FamilyCooking #HomemadeBread #CuteFoodIdeas #BakingRecipes #BreadRecipes






